Introduction
Overview
Teaching: 5 min
Exercises: 5 minQuestions
How to get to your cluster?
How to get ready to submit the workflow?
Objectives
Get your GCP environment ready to run an argo workflow
Scale your cluster up to 4 nodes
Get the tools running to observe the working processes
Access your GKE Cluster
For the CMS Open data Workshop 2023, we have added you to a GCP project where we will provide temporary resources to run an Argo Workflow. Before we get into details please follow the following steps to get things started!
Find your cluster
- Go to the Google Kubernetes Engine page
- You should see a listing of clusters.
- Find the number of your cluster in the email you have received and select your cluster in the list.
Connect to the cluster
- Now go back to the cluster listing page, click on the three vertical dots, and choose “connect”.

- Click on “RUN IN CLOUD SHELL” to connect to your cluster.

- In the cloud shell press Enter after the command and authorize cloud shell in the pop-up window that opens

- If requested, submit the command
gcloud auth loginand follow the link the get the authorization code.
A persistent disk has already been created for you, as well as persistent volumes and persistent volume claims. Some other resources are already available, and you will see them with
$ kubectl get all -n argo
NAME                                     READY   STATUS    RESTARTS   AGE
pod/http-fileserver-1-5b85db44df-84ppt   1/1     Running   0          30m
pod/nfs-server-1-69db86f88-kvbkb         1/1     Running   0          32m
pod/pv-pod                               1/1     Running   0          30m

NAME                        TYPE           CLUSTER-IP       EXTERNAL-IP     PORT(S)                      AGE
service/http-fileserver-1   LoadBalancer   10.127.203.234   35.195.41.247   80:32703/TCP                 32m
service/nfs-server-1        ClusterIP      10.127.194.124   <none>          2049/TCP,20048/TCP,111/TCP   32m

NAME                                READY   UP-TO-DATE   AVAILABLE   AGE
deployment.apps/http-fileserver-1   1/1     1            1           30m
deployment.apps/nfs-server-1        1/1     1            1           32m

NAME                                           DESIRED   CURRENT   READY   AGE
replicaset.apps/http-fileserver-1-5b85db44df   1         1         1       30m
replicaset.apps/nfs-server-1-69db86f88         1         1         1       32m
Argo
Argo resources
Deploy the argo resources needed to run the example workflow with
kubectl apply -n argo -f https://raw.githubusercontent.com/argoproj/argo-workflows/master/manifests/quick-start-postgres.yaml
If Ctrl-v does not work for pasting the command, try Shift-Ctr-v.
Argo command-line interface
To submit the workflow from the cloud shell, you will need the argo command-line interface. You can download the binary and move it to its respective path with the following commands:
# Download the binary
curl -sLO https://github.com/argoproj/argo-workflows/releases/download/v3.4.7/argo-linux-amd64.gz

# Unzip
gunzip argo-linux-amd64.gz

# Make binary executable
chmod +x argo-linux-amd64

# Move binary to path
sudo cp ./argo-linux-amd64 /usr/local/bin/argo

# Test installation
argo version
If your cloud shell gets disconnected and argo is not available in the new cloud shell, you can repeat the sudo cp ... command to have it in place again.
Submit the workflow
Now fast forward: to make sure that the workflow makes it in time to finish during the hands-on session, submit it right now. We will explain the details while the workflow is running.
Get the workflow file with
curl -LO https://raw.githubusercontent.com/cms-opendata-analyses/PhysObjectExtractorTool/odws2023/PhysObjectExtractor/cloud/argo_poet.yaml
The workflow defines the persistent volume in which the output is stored. Edit the workflow to replace <NUMBER> to correspond to your cluster number. You can use an editor available in cloud shell for editing, or use command line editors such as vim or nano if you are familiar with them. Or if you like, use the following command to replace the string, but replace YOUR_CLUSTER_NUMBER in it with the number of your cluster
sed -i 's/<NUMBER>/YOUR_CLUSTER_NUMBER/' argo_poet.yaml
Then submit the workflow with
argo submit argo_poet.yaml -n argo
Check that it got running with
argo get @latest -n argo
Get your services
To get the external IP of both the Argo GUI (with which you can follow the workflow) and the http server (through which you can download the outputs), run the following command:
kubectl get svc -n argo
Http File Server
In a new tab open <EXTERNAL-IP>, no need to add anything, just paste the external IP of your http-fileserver-<NUMBER> from the output of the command above.
You can also use the following command to print out the exact URL (replace <NUMBER> with the number of your cluster)
echo "http://$(kubectl get services -n argo http-fileserver-<NUMBER> -o jsonpath='{.status.loadBalancer.ingress[0].ip}')"
Argo GUI
To get the Argo GUI running, run the following command:
kubectl -n argo port-forward deployment/argo-server 2746:2746
Once it has started forwarding the port, we will have to manually enable the port. Open a new cloud shell tab and run the following command:
lynx --accept_all_cookies --source https://localhost:2746 >/dev/null 2>&1
Finally, patch the service with:
kubectl patch svc argo-server -n argo -p '{"spec": {"type": "LoadBalancer"}}'
Since it is creating an external ip, wait a couple minutes. You can check if it is ready with:
kubectl get svc -n argo
To access the Argo GUI, open a new browser tab with the following IP address: https://<EXTERNAL-IP>:2746, replacing <EXTERNAL-IP> with the corresponding external IP of your argo-server-<NUMBER> from the output of the command above.
You can also use the following command to print out the exact URL
echo "https://$(kubectl get services -n argo argo-server -o jsonpath='{.status.loadBalancer.ingress[0].ip}'):2746"
You should now be able to see your workflow in the Argo GUI.
Next
OK, we got it running! Now let’s go to see the details…
Key Points
You can submit the workflow from the Google cloud shell connected to your cluster.
Demo: Run a Full Analysis Flow
Overview
Teaching: 20 min
Exercises: 45 minQuestions
How do I follow the progress of a workflow?
What are the different steps in the example workflow?
Objectives
Mimic a full analysis flow
Understand structure of a workflow
Find the recid for a dataset and put it into the yaml file
Follow the workflow progress
You can watch the progress of the workflow either on the command line or in the Argo GUI.
On the command line, you can see the state of the workflow with
argo get @latest -n argo
and you can check the logs with
argo logs @latest -n argo
You can also get the logs from the pods (take the pod name from the listing of argo get... output) using
kubectl logs <pod-name> -n argo
You check the status of the pod
kubectl describe pod <pod-name> -n argo
When the workflow has finished, you will be able to access the output files from the http file server. You can also see the contents of the disk with
kubectl exec pv-pod -n argo -- ls /mnt/data
Expanding the Yaml File
In the previous section, you downloaded a workflow definition and submitted it. It should now be running. This workflow corresponds to the analysis example presented in this workshop.
The workflow mimicks a full analysis, first processing CMS open data samples with POET and then running an analysis script on the output files.
Open up the file argo-poet.yaml, and take a look through its contents. Below is an explanation of the major steps.
The workflow calls and runs multiple different tasks. The file is broken up into different templates. Note that each task runs in a container, and the workflow is using the same container images that we have been using in the workshop.
-
cms-od-example, the first template, is the entrypoint, and it contains the outline for the rest of the workflow. The listing under
dagdefines the inputs and outputs of each step and their dependencies. -
prepare-template gets the directories ready for other workflow steps.
-
get-metadata-template uses
cernopendata-clientto get the metadata of the dataset. -
joblist-template prepares an array that the next step would iterate over.
-
runpoet-template processes the data, and it will take the longest amount of time to complete.
-
merge-step-template combines the inputs from the jobs of the previous steps into a single file.
-
analysis-step-template creates some histograms to check that the processing went OK.
The “runpoet” step takes the array of the preceding step as input and iterates over it. It runs multiple jobs at the same time. The Argo GUI helps us visualize this process.
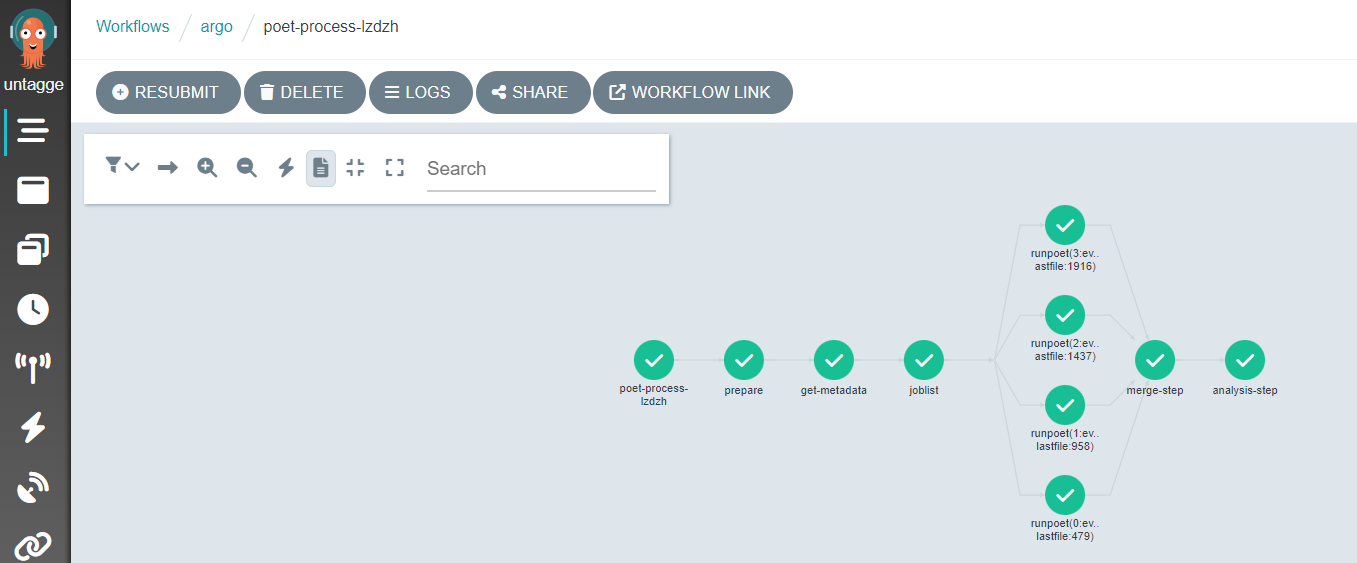
Depending on the resources you allocate to your cluster, there is a limit to the number of pods you have running at one time. If you have more pods than this number, they will wait for each other to complete.
Workflow input parameters
The workflow takes the following parameters:
  arguments:
    parameters:
    - name: startFile
      value: 1
    - name: nEvents
      value: 10000
    - name: recid
      value: 24119
    - name: nJobs
      value: 4
and they need to be defined as part of the first template:
  templates:
  - name: cms-od-example
    inputs:
      parameters:
      - name: startFile
      - name: nEvents
      - name: recid
      - name: nJobs
They give input to the workflow steps.
startFileis the first file in the list to be processednEventsis the number of events to be processedrecidis the dataset to be processed.nJobsis the number of separate jobs
This implementation is mainly for small-scale testing but in principle can be run with any number of events and jobs.
Getting metadata
The metadata are retrieved using the cernopendata-client container image. It is available also as a command-line tool. Task get-metadata make the following queries:
cernopendata-client get-file-locations --recid "" --protocol xrootdfor a listing of all files in a datasetcernopendata-client get-metadata --recid "" --output-value type.secondarythe type of data (Collision/Simulated)cernopendata-client get-metadata --recid "" --output-value distribution.number_filesfor number of files in the dataset.
Leaving out the --output-value option would give all metadata, which could also be inspected directly from the open data portal records by adding /export/json to the record URL.
Passing information from one task to another
The main challenge in any workflow language is the communication between the tasks. This workflow implementation illustrates some of the possibilities when using Argo as a workflow language:
- a mounted volume
/mnt/vol, available as apersistent volumeto all tasks - used for files-
the persistent volume claim is defined in the beginning with
volumes: - name: task-pv-storage persistentVolumeClaim: claimName: nfs-<NUMBER> -
it can then be used in those steps that need access to it with
  volumeMounts:
  - name: task-pv-storage
    mountPath: /mnt/vol
-
- input parameters - used for configurable input parameters
-
they are defined for each step in the
dagsection, e.g.- name: get-metadata dependencies: [prepare] template: get-metadata-template arguments: parameters: - name: recid value: "{{inputs.parameters.recid}}" -
and later in the workflow in the step implementation
 - name: get-metadata-template
   inputs:
     parameters:
     - name: recid
-
- output parameters - used to pass the output from one task to another through a defined parameter
-
they are defined in the
dagsection, e.g.- name: dataType value: "{{outputs.parameters.dataType}}" -
and in the step implementation in which they must have a default value:
  outputs:
    parameters:
    - name: dataType
      valueFrom:
        default: "default"
        path: /tmp/type.txt
-
- output to stdout - used to pass the stdout output of one task to another.
Getting the output
Now back to the workflow that you submitted earlier. When it has completed, you will see the output in the http file-server browser window. Please note that each download costs money so do not download big files repeatedly for this workshop hands-on exercise.
Once the workflow is complete, make sure to delete it so that the cluster can scale down and does not consume resources unnecessarily:
argo delete @latest -n argo
This will not delete the output files as they were written to a persistent disk, but it removes all the pods on which tasks were running. Note that if you run the workflow again, it will overwrite the files of the previous run.
Warning!
Cloud Shell has a usage limit of 50 hours per week. In order to stay within that limit, take the habit of closing Cloud Shell as soon as you are done.
If you need more time, please install the
gcloudCLI locally, and connect to the cluster through it from your local terminal. The connect command is the same that you would use to connect in Cloud Shell.
Remarks
This is an example workflow for demonstration purposes. To keep it simple, it does not include any error handling or extensive bookkeeping. It is, however, a typical processing task that we envisage CMS open data users to be interested in.
We have implemented this example in Argo. There are many other workflow languages available, and Argo is only one of them.
Key Points
You can run an analysis on an entire dataset using multiple templates and scattering
Cloud challenges
Overview
Teaching: 10 min
Exercises: 60 minQuestions
How to adapt the workflow to my needs?
How to get my own code in the processing step?
How to change the resource requests for a workflow step?
Objectives
Rehearse getting back to the cluster
Exercise adapting the example workflow
Getting back to your cluster
Get to your cluster through the Google Kubernetes Engine page page.
Select your cluster and connect.
Open the cloud shell. The files that you had in the cloud shell are still available, but you will need to copy the argo executable to the path:
# Move binary to path
sudo cp ./argo-linux-amd64 /usr/local/bin/argo

# Test installation
argo version
Challenges
Choose one or more of the following challenges:
Challenge 1
Change the workflow to run over
/SingleElectron/Run2015D-08Jun2016-v1/MINIAODSolution
- Find the dataset and identify its
recid. Use the search facets to find all MINIAOD collision datasets from 2015.- Change the input recid value in
argo_poet.yaml.
Challenge 2
Change the resource request to better match our cluster configuration.
If we look at the cost optimization of the cluster, we see that the choice of
750mfor the CPU request was not optimal:
Solution
- Read the documentation about kubernetes resource requests.
- Choose a different value for the resource request
cpu: 750minargo_poet.yamland see how it changes the scheduling and resource usage.- You can see the nodes on which the pods run with
kubectl get pods -n argo -o wide- You can see the resource usage of the nodes with
kubectl top nodesand that of pods withkubectl top pods -n argo

Challenge 3
Change the processing step to use your own selection. For example, you may not want to have the PF candidate collection (
packedPFCandidates) included because it makes the output file very large.Solution
- Make your own fork of the POET repository and move to
odws2023branch.- Modify the configuration file
PhysObjectExtractor/python/poet_cfg_cloud.py: removeprocess.mypackedcandidatefrom the twocms.Pathat the end of the file.- Change the runpoet step in the workflow file to clone from your repository.
Challenge 4
Change the analysis step to plot different values. For example, you may want to plot some values from the PF candidate collection, such as their number and the pdg id’s.
Solution
- Make a fork of the POET repository and move to
odws2023branch.- Modify the analysis script
PhysObjectExtractor/cloud/analysis.Cfor your needs.- Change the analysis step to your code.
- You can use this simple plotter as an example.
- If you do not intend to change the actual processing, it is enough to have that file alone in a repository (or any other location from which you can get it with
wgetorcurl -LO), it does not need to be a fork from the POET repository.- Remember that you need to use the GitHub
rawview to get the file if you are not cloning the repository.- Change the analysis step in the workflow file to get the file from your repository.
Key Points
Workflows can be written in a way to allow changes through input parameters
The processing and analysis steps can clone your code from git repositories
Next steps
Overview
Teaching: 10 min
Exercises: 10 minQuestions
What are the factors for efficient use of cloud resources
Objectives
Get an understanding of costs
Get an overview of different options
We have run through an example of CMS open data processing on public cloud resources. Now it is time for some preliminary considerations on costs.
Cost and time
The charges in cloud computing come from the cluster, disk space, and networking. They are based on the time that resources are available and/or on their size. An example of billing details covering the preparations and the first cloud tutorial session:
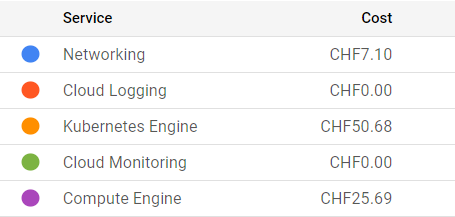
For this workshop, we are using a scalable max 4-node cluster that can efficiently run at least two parallel jobs (pods) on each node. The pricing depends on the zone, and whether we’ve chosen to allow nodes on “Spot-VMs”, i.e. VMs that may get deleted on short notice. For our chosen solution, the price is approximately 0.2-0.3 USD/hour and it shows under “Kubernetes Engines”. The estimated cost is visible during the cluster creation on the GKE web interface. Note that the “autopilot” clusters are not a choice because their settings do not allow using the nfs disk as we do it.
For the persistent disk, we’ve selected a standard 100 GB disk that costs approximately 0.04 USD/GB/month depending on the zone. In addition, each cluster node creates a 100 GB disk that gets deleted when the node is deleted. Some care is to be taken when setting things up as a more expensive “balanced” disk appears as default. The costs related to disks appear under “Compute Engine”. The GCP documentation provides an overview of disk costs.
Uploading (“ingress”) and downloading (“egress”) data to and from a cloud provider has cost. This appears under “Networking”. In our case, these are the costs related to the Argo GUI and the file server through a “load balancer”. You can use the GKE pricing calculator to estimate all costs, including download in the Networking Egress tab.
As an example of the time and cost, running over 1M of events (1%) in our chosen dataset took 1 hour 10 mins to run, and the resulting output file, including the full list of particle flow candidates, is 4.6 GB.
Further optimization
Resource requests
A kubernetes resource can have resource requests in terms of CPU and memory. In our workflow, we requested a certain minimum amount of CPU for the heaviest CMSSW task. This is necessary to make the cluster autoscale, i.e. increase the number of nodes when needed. Much further optimization could be done for the best choice of resource requests and limits.
Container pull
Pulling the container from the docker or GitLab image registry takes approximately 6-7 minutes for each job. It would be worth studying whether uploading the container image to the cloud provider’s registry makes it faster. The cost of uploading and storing the image would need to be evaluated.
Data upload
We have not estimated whether it would be convenient to upload the data to the cloud provider’s disk. It will certainly make the data access for processing faster, but the cost to upload (“ingress”) and host some TB of input data needs to be taken into account.
Data download
Downloading data from cloud resources (“egress”) is not free. For quick checks of the workflow, you would rather have a lightweight output, i.e. a plot instead of a full histogram file. The final cost estimate needs to include the costs to download the full output data.
Free resources
Most cloud providers offer some initial free resources that can be used for a limited time. Some of them remain free even after the initial trial period, but have a limit of free use in a given time. This is the case for the cloud shell which we used to access the cluster, its free use is limited to 50 hours per week. Note that you can also access GKE clusters using the gcloud CLI from your own computer.
Next steps
For the hands-on session, we provided clusters that already had part of the machinery installed. For a walk-through of the environment setup from scratch, read through the Cloud post-exercise.
Key Points
There are several factors to take into consideration when running workflows on public cloud resources.