Introduction
Overview
Teaching: 10 min
Exercises: 0 minQuestions
What is Kubernetes?
What is a Kubernetes cluster and why do I need one?
What is Argo?
Objectives
Learn the very basics of Kubernetes
Learn a bit about the architecture of a Kubernetes cluster
Learn the very basics of Argo
Introduction
Kubernetes is a container orchestration system open sourced by Google. Its main purpose is to schedule services to run on a cluster of computers while abstracting away the existence of the cluster from the services. Kubernetes is now maintained by the Cloud Native Computing Foundation, which is a part of the Linux Foundation. Kubernetes can flexibly handle replication, impose resource limits, and recover quickly from failures.
Most of you have been working with Docker containers throughout this workshop. As you know now, one could see these Docker containers like isolated machines that can run on a host machine in a very efficient way. Your desktop or laptop could actually run several of these containers if enough resources are available. For instance, you could think that one can maximize the hardware resources by running multiple CMSSW open data containers in one desktop. Imagine, if you could run 10 CMSSW containers (each over a single root file) at the same time in a single physical machine, then it will take you 10 times less time to skim a full dataset.
Now, if you had more machines available, let’s say 3 or 4, and in each one of them you could run 10 containers, that will certainly speed up the data processing (specially the first stage in our analysis flow example, which we will see later) Now, if you could have access to many more machines, then a few problems may appear. For instance, how would you install the software required in all those machines? Would there be enough personpower to take care of that? How would you take care of, and babysit all those containers?
Kubernetes (K8s)
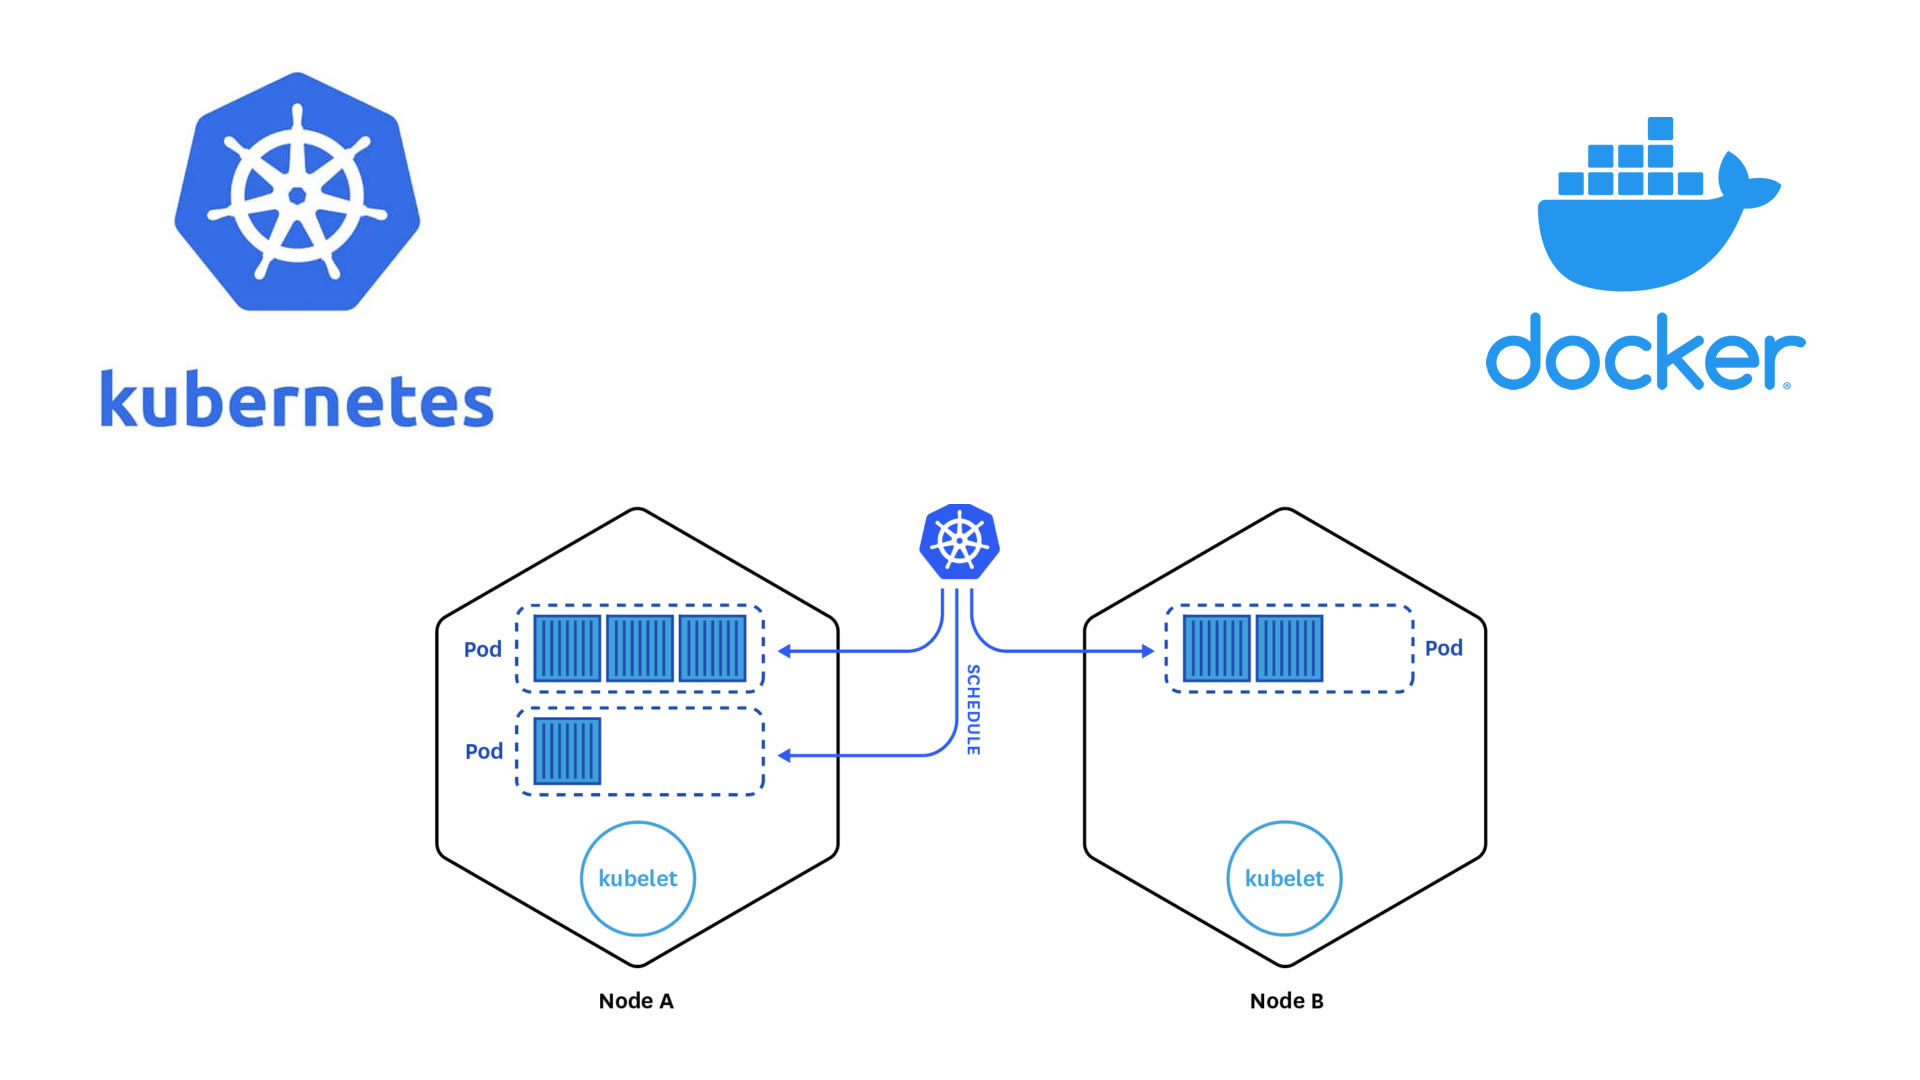
A Kubernetes cluster consists of “master” nodes and “worker” nodes. In short, master nodes share state to manage the cluster and schedule jobs to run on workers. It is considered best practice to run an odd number of masters.
Kubernetes Components
When you deploy Kubernetes, you get a cluster. A Kubernetes cluster consists of a set of worker machines, called nodes. The worker nodes host the Pods that are the components of the application workload.
-
Masters Kubernetes masters share state via etcd, a distributed key-value store (KVS) implementing the Raft protocol. Do note that the state stored in etcd is scheduling state, service locations, and other cluster metadata; it does not keep state for the services running on the cluster.
-
Workers While master nodes are constantly sharing data, managing the control plane (routing inside the Kubernetes cluster), and scheduling services, workers primarily run pods.

Nodes Components
- Pods In the Kubernetes world, pods are the smallest computing unit. A pod is made up of one or more containers. While pods are essential for understanding Kubernetes, when writing services we don’t actually deal in pods but one further abstraction, deployments, which create pods for us|
- Kubelet The kubelet is the primary “node agent” that runs on each node.The kubelet takes a set of PodSpecs and ensures that the containers described in those PodSpecs are running and healthy.
- Kube-Proxy It reflects the services defined in the cluster and manages the rules to load-balance requests to a service’s backend pods.
Autoscaling
Kubernetes supports autoscaling to optimise your nodes’ resources as wll as adjust CPU and memory to meet your application’s real usage. When you need to save some money, you can scale down. Probably you want to pay for what you use, keep only with the resources when you need them If you want to learn about pricing, ckeck the next link: Google-cloud
Key Points
Kubernetes is an orchestrator of containers. It is most useful when it is run in a cluster of computers.
Commercial K8s clusters are a good option for large computing needs.
We can run our containerized CMSSW jobs and subsequent analysis workflows in a K8s cluster.
Getting started with Argo and Kubectl
Overview
Teaching: 10 min
Exercises: 0 minQuestions
How to use Kubectl commands?
What is kubectl?
What is Argo workflows?
Objectives
Lear what the kubectl command can do
Appreciate the necessity for the Argo workflows tool (or similar)
Lear how to set up different services/resources to get the most of your cluster
The kubectl command
Kubernetes provides a kubectl for communicating with a Kubernetes cluster’s control plane, using the Kubernetes API. Use the following syntax to run kubectl commands from your terminal window:
kubectl [command] [TYPE] [NAME] [flags]
where command, TYPE, NAME, and flags are:
command: Specifies the operation that you want to perform on one or more resources, for example create, get, describe, delete.
TYPE: Specifies the resource type.
NAME: Specifies the name of the resource.
flags:Specifies optional flags.
For installation instructions, see Installing kubectl; for a quick guide:
- See the cheat sheet.
- The
kubectlcommand is the main tool for interacting with your K8s cluster. You will use it to do essentially anything in the cluster. Here is the official cheatsheet, which is very useful but already very long.
Let’s run a few examples.
- Get the status of the nodes in your cluster:
kubectl get nodes
- Get the cluster info:
kubectl cluster-info # Display addresses of the master and services
Let’s list some kubernetes components:
- Check pods
kubectl get pod
- Check the services
kubectl get services
We don’t have much going on. Let’s create some components.
- Inspect the
createoperation
kubectl create -h
Note there is no pod on the list, so in K8s you don’t create pods but deployments. These will create pods, which will run under the hood.
- Let’s create an application, it does not matter which. Let’s go for
nginx:
kubectl create deployment mynginx-depl --image=nginx
The nginx image will be pulled down from the Docker Hub.
This is the most minimalist way of creating a deployment.
- Check the deployments
kubectl get deployment
- Check pods
kubectl get pod
Argo
Argo is a collection of open source tools that let us to extend the functions in Kubernetes. We can find some benefits from use argo.
- Cloud agnostic service
- Argo can execute on absolutely in all clusters in kubernetes.
- We can review the state of resources constantly.
- There is a large capacity of executing jobs at the same time and from different nodes.
- It’s possible correct debug errors. We are going to explain 3 of the tools most important for working with argo.
Argo as a workflow engine
- Is used to execute complex job orchestration, including serial and parallel execution where each stage is executed like a container.
- It is the most popular workflow execution engine for kubernetes.
- You can run thousands of workflows a day, each with thousands of concurrent tasks.
- Designed from the ground up for containers without the overhead and limitations of legacy VM and server-based environments.
While jobs can also be run manually, a workflow engine makes defining and submitting jobs easier. In this tutorial, we use argo. Install it into your working environment with the following commands (all commands to be entered into the cloud shell):
While jobs can also be run manually, a workflow engine makes defining and submitting jobs easier. In this tutorial, we use argo quick start page to install it.
Namespaces
Namespaces are a kind of reservations in your K8s cluster. Let’s create one for the Argo workflow we will user
kubectl create ns <NAMESPACE>
Kubernetes namespaces
The above commands as well as most of the following use a flag
-n argo, which defines the namespace in which the resources are queried or created. Namespaces separate resources in the cluster, effectively giving you multiple virtual clusters within a cluster.You can change the default namespace to
argoas follows:kubectl config set-context --current --namespace=argo
Key Points
kubectlis the ruler of GKEArgo is a very useful tool for running workflows and parallel jobs
To be able to write, read and extract data, a few services/resources need to be set up on the GCP
Demo: Creating a cluster
Overview
Teaching: 5 min
Exercises: 20 minQuestions
What are the basic concepts and jargon I need to know?
Do do I manually create a K8s cluster on the GCP
Objectives
Learn how to create a K8s cluster from scratch
Introduction
In this demonstration we will show you the very basic way in which you can create a computer cluster (a Kubernetes cluster to be exact) in the cloud so you can do some data processing and analysis using those resources. In the process we will make sure you learn about the jargon. During the hands-on session of the workshop (cloud computing), a cluster similar to this one will be provided to you for the exercises.
If needed you can watch a walkthrough here:
Minikube
If you’ve opted to use minikube, creating a kubernetes cluster is as easy as running:
minikube startFeel free to skip to the next episode.
Creating your own cluster on GKE
For the hands-on part of this lesson you will not have to create the cluster for yourself, it will be already done for you. For pedagogical reasons, however, we will show an example of how to do it by hand. The settings below should be good and cheap enough for CMSSW-related workflows.
Here you will find some instructions on how to use preemptible machines in GKE. Preemptible VMs offer similar functionality to Spot VMs, but only last up to 24 hours after creation, this might be taken into account if reducing costs is of your concern.
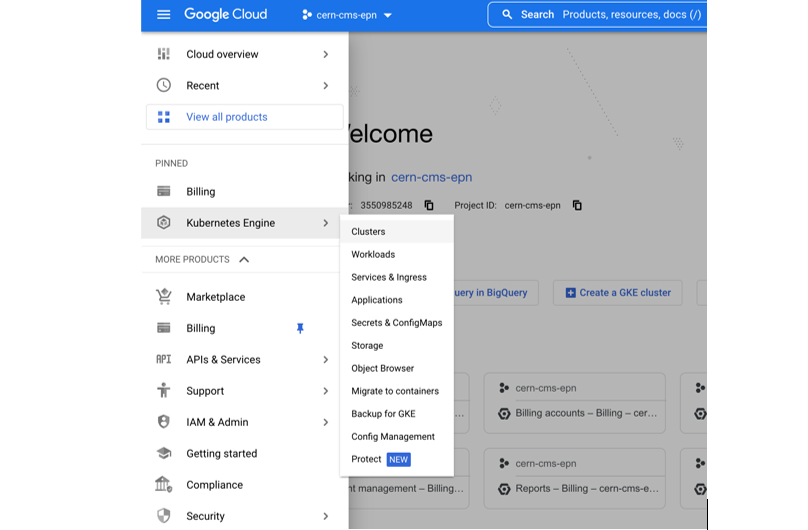
- Get to the Console
- Create a new project or select one of your interest (if you already have one)
- Click on the Kubernetes engine/clusters section on the left side menu
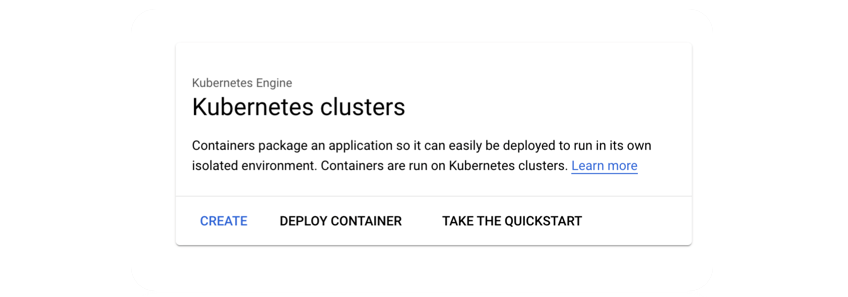
- Select create cluster (standard)
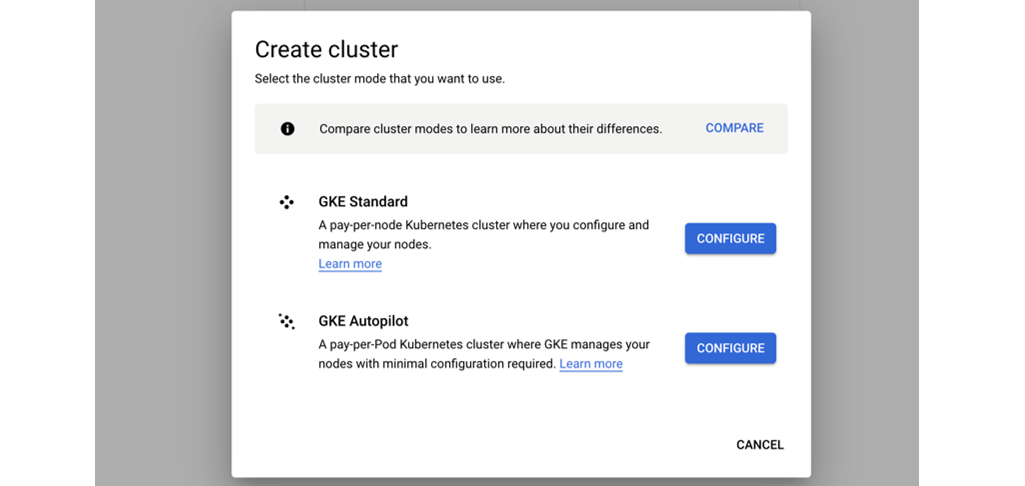
- Select GKE Standard
- Give it a name
- Change the zone to
europe-west1-b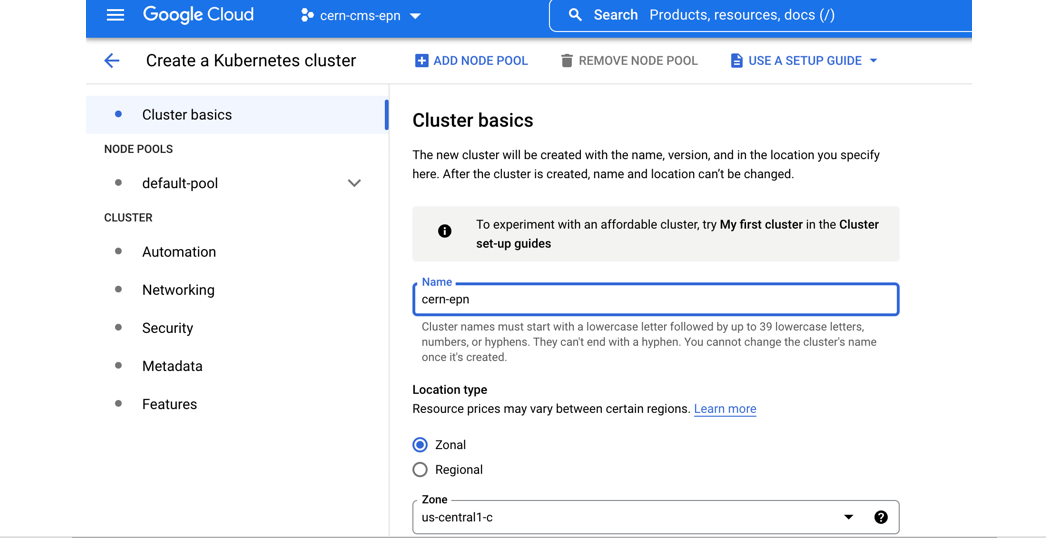
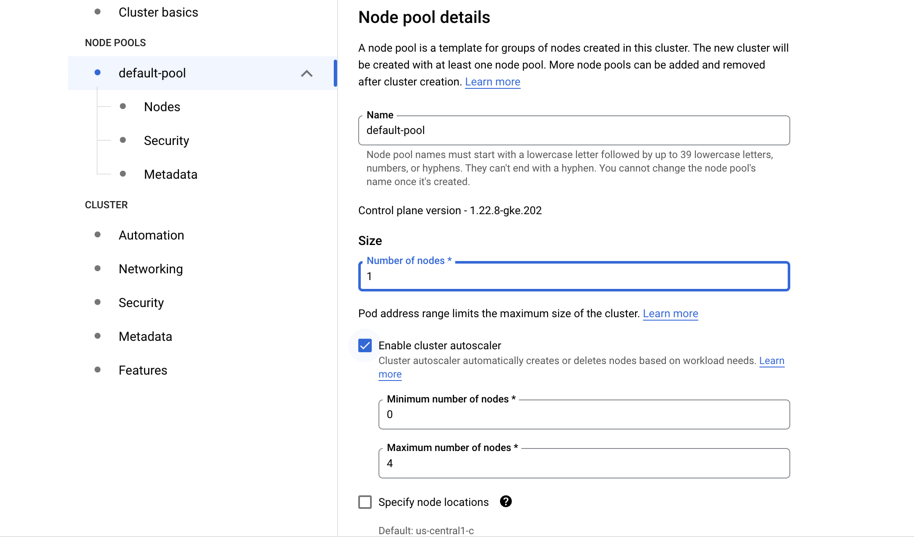
- Many ways to configure the cluster, but let’s try an efficient one with autoscaling
- Go to default pool
- Choose size: 1 node
- Autoscaling 0 to 4
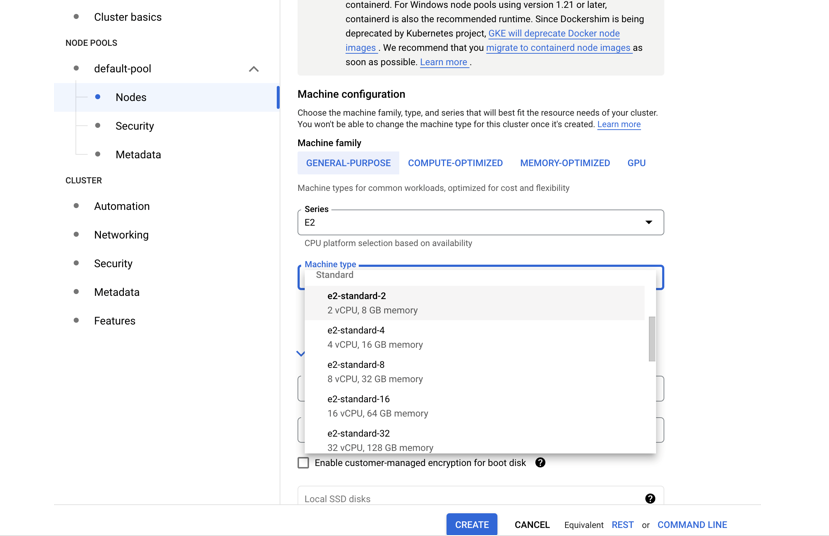
- Go to Nodes
- Choose a machine e2-standar-4
- Leave the rest as it is
- Hit create
- Creation will take while
While we wait, lets inspect the Cloud shell…
Cloud shell
GCP provides an access machine so you can interact with their different services, including our newly created K8s cluster. This machine (and the terminal) is not really part of the cluster. As was said, it is an entry point. From here you could connect to your cluster.
The
gcloudcommandThe gcloud command-line interface is the primary CLI tool to create and manage Google Cloud resources. You can use this tool to perform many common platform tasks either from the command line or in scripts and other automations.
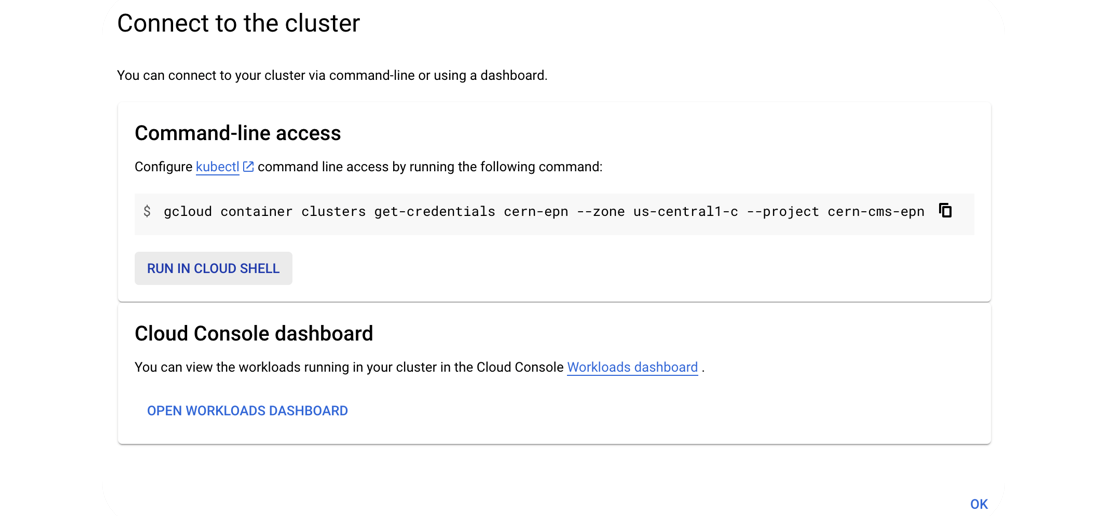
Connect to your cluster
Once the cluster is ready (green check-mark should appear)
- Click on the connect button of your cluster:
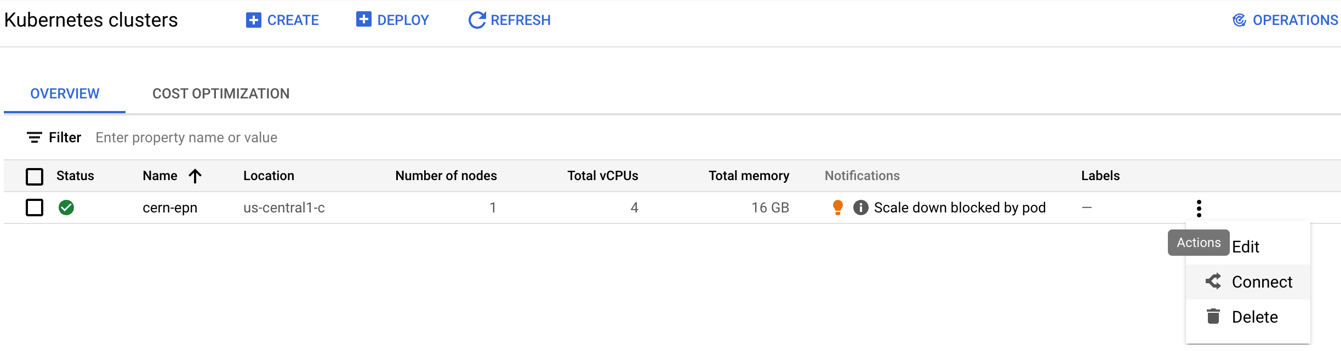
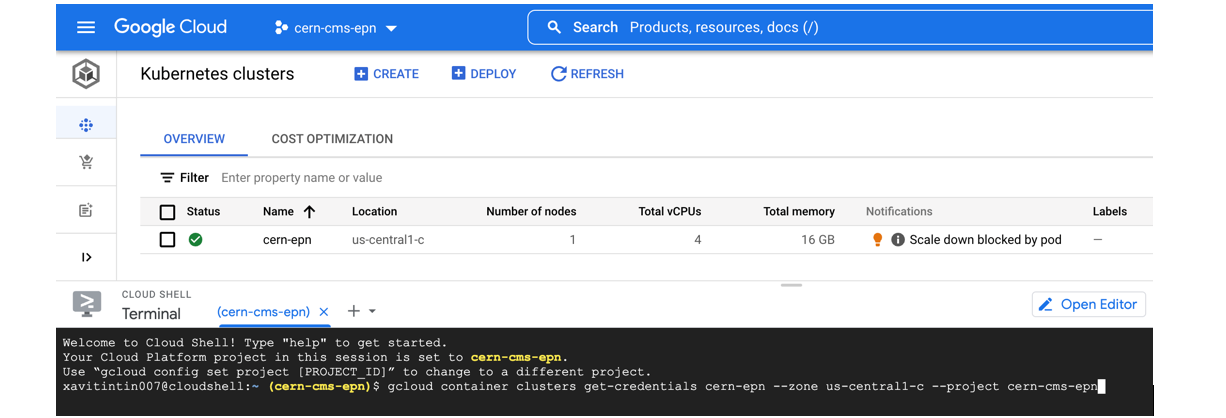
- Execute that command in the cloud shell:
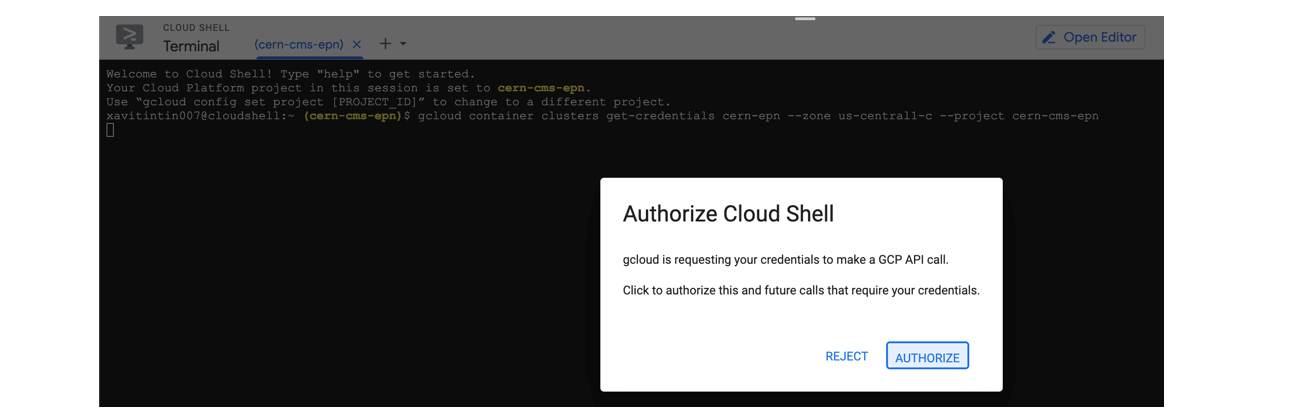
- You’ve connected to your shell, now press enter to link to your GKE cluster:
- Authorize Shell
Key Points
It takes just a few clicks to create you own K8s cluster
Demo: Storing a workflow output on Kubernetes
Overview
Teaching: 5 min
Exercises: 30 minQuestions
How to setup a workflow engine to submit jobs?
How to run a simple job?
How can I set up shared storage for my workflows?
How to run a simple job and get the the ouput?
Objectives
Understand how to run a simple workflows in a commercial cloud environment or local machine
Understand how to set up shared storage and use it in a workflow
Install argo as a workflow engine
While jobs can also be run manually, a workflow engine makes defining and submitting jobs easier. In this tutorial, we use [argo](https://argoproj.github.io/argo/quick-start/). Install it into your working environment with the following commands (all commands to be entered into the cloud shell):
kubectl create ns argo
kubectl apply -n argo -f https://raw.githubusercontent.com/argoproj/argo-workflows/master/manifests/quick-start-postgres.yaml

# Download the binary
curl -sLO https://github.com/argoproj/argo/releases/download/v2.11.1/argo-linux-amd64.gz

# Unzip
gunzip argo-linux-amd64.gz

# Make binary executable
chmod +x argo-linux-amd64

# Move binary to path
sudo mv ./argo-linux-amd64 /usr/local/bin/argo
This will also install the argo binary, which makes managing the workflows easier.
In case you leave your computer, you might have to reconnect to the CloudShell again, and also on a different computer. If the
argocommand is not found, run the command above again starting from thecurlcommand.
You can now check that argo is available with:
argo version
Run a simple test workflow
To test the setup, run a simple test workflow with
argo submit -n argo --watch https://raw.githubusercontent.com/argoproj/argo/master/examples/hello-world.yaml
Wait till the yellow light turns green. Get the logs with
argo logs -n argo @latest
If argo was installed correctly you will have the following:
hello-world-ml5bf: time="2022-07-25T12:33:54.295Z" level=info msg="capturing logs" argo=true
hello-world-ml5bf:  _____________
hello-world-ml5bf: < hello world >
hello-world-ml5bf:  -------------
hello-world-ml5bf:     \
hello-world-ml5bf:      \
hello-world-ml5bf:       \
hello-world-ml5bf:                     ##        .
hello-world-ml5bf:               ## ## ##       ==
hello-world-ml5bf:            ## ## ## ##      ===
hello-world-ml5bf:        /""""""""""""""""___/ ===
hello-world-ml5bf:   ~~~ {~~ ~~~~ ~~~ ~~~~ ~~ ~ /  ===- ~~~
hello-world-ml5bf:        \______ o          __/
hello-world-ml5bf:         \    \        __/
hello-world-ml5bf:           \____\______/
Please mind that it is important to delete your workflows once they have completed. If you do not do this, the pods associated with the workflow will remain scheduled in the cluster, which might lead to additional charges. You will learn how to automatically remove them later.
argo delete -n argo @latest
Storage Volume
If we run some application or workflow, we usually require a disk space where to dump our results. There is no persistent disk by default, we have to create it.
You could create a disk clicking on the web interface above, but lets do it faster in the command line.
Create the volume (disk) we are going to use:
gcloud compute disks create --size=100GB --zone=europe-west1-b gce-nfs-disk-1
Set up an nfs server for this disk:
wget https://cms-opendata-workshop.github.io/workshop2022-lesson-introcloud/files/001-nfs-server.yaml
kubectl apply -n argo -f 001-nfs-server.yaml
Set up a nfs service, so we can access the server:
wget https://cms-opendata-workshop.github.io/workshop2022-lesson-introcloud/files/002-nfs-server-service.yaml
kubectl apply -n argo -f 002-nfs-server-service.yaml
Let’s find out the IP of the nfs server:
kubectl get -n argo svc nfs-server |grep ClusterIP | awk '{ print $3; }'
Let’s create a persistent volume out of this nfs disk. Note that persistent volumes are not namespaced they are available to the whole cluster.
We need to write that IP number above into the appropriate place in this file:
wget https://cms-opendata-workshop.github.io/workshop2022-lesson-introcloud/files/003-pv.yaml
vim 003-pv.yaml
Deploy:
kubectl apply -f 003-pv.yaml
Check:
kubectl get pv
Apps can claim persistent volumes through persistent volume claims (pvc). Let’s create a pvc:
wget https://cms-opendata-workshop.github.io/workshop2022-lesson-introcloud/files/003-pvc.yaml
kubectl apply -n argo -f 003-pvc.yaml
Check:
kubectl get pvc -n argo
Now an argo workflow coul claim and access this volume with a configuration like:
# argo-wf-volume.yaml
apiVersion: argoproj.io/v1alpha1
kind: Workflow
metadata:
  generateName: test-hostpath-
spec:
  entrypoint: test-hostpath
  volumes:
    - name: task-pv-storage
      persistentVolumeClaim:
        claimName: nfs-1
  templates:
  - name: test-hostpath
    script:
      image: alpine:latest
      command: [sh]
      source: |
        echo "This is the ouput" > /mnt/vol/test.txt
        echo ls -l /mnt/vol: `ls -l /mnt/vol`
      volumeMounts:
      - name: task-pv-storage
        mountPath: /mnt/vol
Submit and check this workflow with:
argo submit -n argo argo-wf-volume.yaml
argo list -n argo
Take the name of the workflow from the output (replace XXXXX in the following command) and check the logs:
kubectl logs pod/test-hostpath-XXXXX -n argo main
Once the job is done, you will see something like:
ls -l /mnt/vol: total 20 drwx------ 2 root root 16384 Sep 22 08:36 lost+found -rw-r--r-- 1 root root 18 Sep 22 08:36 test.txt
Get the output file
The example job above produced a text file as an output. It resides in the persistent volume that the workflow job has created. To copy the file from that volume to the cloud shell, we will define a container, a “storage pod” and mount the volume there so that we can get access to it.
Create a file pv-pod.yaml with the following contents:
# pv-pod.yaml
apiVersion: v1
kind: Pod
metadata:
  name: pv-pod
spec:
  volumes:
    - name: task-pv-storage
      persistentVolumeClaim:
        claimName: nfs-1
  containers:
    - name: pv-container
      image: busybox
      command: ["tail", "-f", "/dev/null"]
      volumeMounts:
        - mountPath: /mnt/data
          name: task-pv-storage
Create the storage pod and copy the files from there
kubectl apply -f pv-pod.yaml -n argo
kubectl cp  pv-pod:/mnt/data /tmp/poddata -n argo
and you will get the file created by the job in /tmp/poddata/test.txt.
While jobs can also be run manually, a workflow engine makes defining and submitting jobs easier. In this tutorial, we use [argo](https://argoproj.github.io/argo/quick-start/). Install it into your working environment with the following commands (all commands to be entered into the cloud shell):
kubectl create ns argo
kubectl apply -n argo -f https://raw.githubusercontent.com/argoproj/argo-workflows/master/manifests/quick-start-postgres.yaml

# Download the binary
curl -sLO https://github.com/argoproj/argo/releases/download/v2.11.1/argo-linux-amd64.gz

# Unzip
gunzip argo-linux-amd64.gz

# Make binary executable
chmod +x argo-linux-amd64

# Move binary to path
sudo mv ./argo-linux-amd64 /usr/local/bin/argo
This will also install the argo binary, which makes managing the workflows easier.
Unless argo is already installed once on the local computer, when coming back to your computer, the
argocommand is not found, to solvent this run the command above again starting from thecurlcommand.
This will also install the argo binary, which makes managing the workflows easier.
You can now check that argo is available with:
argo version
Run a simple test workflow
To test the setup, run a simple test workflow with
argo submit -n argo --watch https://raw.githubusercontent.com/argoproj/argo/master/examples/hello-world.yaml
Wait till the yellow light turns green. Get the logs with
argo logs -n argo @latest
If argo was installed correctly you will have the following:
hello-world-ml5bf: time="2022-07-25T12:33:54.295Z" level=info msg="capturing logs" argo=true
hello-world-ml5bf:  _____________
hello-world-ml5bf: < hello world >
hello-world-ml5bf:  -------------
hello-world-ml5bf:     \
hello-world-ml5bf:      \
hello-world-ml5bf:       \
hello-world-ml5bf:                     ##        .
hello-world-ml5bf:               ## ## ##       ==
hello-world-ml5bf:            ## ## ## ##      ===
hello-world-ml5bf:        /""""""""""""""""___/ ===
hello-world-ml5bf:   ~~~ {~~ ~~~~ ~~~ ~~~~ ~~ ~ /  ===- ~~~
hello-world-ml5bf:        \______ o          __/
hello-world-ml5bf:         \    \        __/
hello-world-ml5bf:           \____\______/
Please mind that it is important to delete your workflows once they have completed. If you do not do this, the pods associated with the workflow will remain scheduled in the cluster, which might lead to additional charges. You will learn how to automatically remove them later.
argo delete -n argo @latest
Storage Volume
If we run some application or workflow, we usually require a disk space where to dump our results. Unlike GKE, our local machine is the persistent disk by default. So let's create a persistent volume out of this nfs disk. Note that persisten volumes are not namespaced they are available to the whole cluster.
nano pv.yaml
apiVersion: v1
kind: PersistentVolume
metadata:
  name: task-pv-volume
  labels:
    type: local
spec:
  storageClassName: manual
  capacity:
    storage: 10Gi
  accessModes:
    - ReadWriteOnce
  hostPath:
    path: "/mnt/data"
---
Deploy:
kubectl apply -f pv.yaml -n argo
Check:
kubectl get pv
Apps can claim persistent volumes through persistent volume claims (pvc). Let’s create a pvc:
nano pvc.yaml
apiVersion: v1
kind: PersistentVolumeClaim
metadata:
  name: task-pv-claim
spec:
  storageClassName: manual
  accessModes:
    - ReadWriteOnce
  resources:
    requests:
      storage: 3Gi
Deploy:
kubectl apply -f pvc.yaml -n argo
Check:
kubectl get pvc -n argo
Now an argo workflow coul claim and access this volume with a configuration like:
# argo-wf-volume.yaml
apiVersion: argoproj.io/v1alpha1
kind: Workflow
metadata:
  generateName: test-hostpath-
spec:
  entrypoint: test-hostpath
  volumes:
    - name: workdir
      hostPath:
        path: /mnt/data
        type: DirectoryOrCreate
  templates:
  - name: test-hostpath
    script:
      image: alpine:latest
      command: [sh]
      source: |
        echo "This is the ouput" > /mnt/vol/test.txt
        echo ls -l /mnt/vol: `ls -l /mnt/vol`
      volumeMounts:
      - name: workdir
        mountPath: /mnt/vol
Submit and check this workflow with:
argo submit -n argo argo-wf-volume.yaml
argo list -n argo
Take the name of the workflow from the output (replace XXXXX in the following command) and check the logs:
kubectl logs pod/test-hostpath-XXXXX -n argo main
Once the job is done, you will see something like:
time="2022-07-25T05:51:14.221Z" level=info msg="capturing logs" argo=true
ls -l /mnt/vol: total 4 -rw-rw-rw- 1 root root 18 Jul 25 05:51 test.txt
Get the output file
The example job above produced a text file as an output. It resides in the persistent volume that the workflow job has created. To copy the file from that volume to the cloud shell, we will define a container, a “storage pod” and mount the volume there so that we can get access to it.
Create a file pv-pod.yaml with the following contents:
# pv-pod.yaml
apiVersion: v1
kind: Pod
metadata:
  name: task-pv-pod
spec:
  volumes:
    - name: task-pv-storage
      persistentVolumeClaim:
        claimName: task-pv-claim
  containers:
    - name: task-pv-container
      image: busybox
      command: ["tail", "-f", "/dev/null"]
      volumeMounts:
        - mountPath: /mnt/data
          name: task-pv-storage
Create the storage pod and copy the files from there
kubectl apply -f pv-pod.yaml -n argo
kubectl cp  task-pv-pod:/mnt/data /tmp/poddata -n argo
and you will get the file created by the job in /tmp/poddata/test.txt.
Kubernetes namespaces
The above commands as well as most of the following use a flag
-n argo, which defines the namespace in which the resources are queried or created. Namespaces separate resources in the cluster, effectively giving you multiple virtual clusters within a cluster.You can change the default namespace to
argoas follows:kubectl config set-context --current --namespace=argo
Key Points
With Kubernetes one can run workflows similar to a batch system
Open Data workflows can be run in a commercial cloud environment using modern tools
Demo: Deploy a Webserver
Overview
Teaching: 5 min
Exercises: 20 minQuestions
How can I visualize my workflows?
How do I deploy my Argo GUI?
Objectives
Prepare to deploy the fileserver that mounts the storage volume.
Submit your workflow and get the results.
Minikube
This episode is relevant when working on the Google Kubernetes Engine, as will be done during the hands-on session of the workshop. If you are going through these pre-exercises on minikube, just read this as part of your information, but do not work through it.
Accessing files via http
With the storage pod, you can copy files between the storage element and the CloudConsole. However, a practical use case would be to run the “big data” workloads in the cloud, and then download the output to your local desktop or laptop for further processing. An easy way of making your files available to the outside world is to deploy a webserver that mounts the storage volume.
We first patch the config of the webserver to be created as follows:
mkdir conf.d
cd conf.d
curl -sLO https://raw.githubusercontent.com/cms-opendata-workshop/workshop-payload-kubernetes/master/conf.d/nginx-basic.conf
cd ..
kubectl create configmap basic-config --from-file=conf.d -n argo
Then prepare to deploy the fileserver by downloading the manifest:
curl -sLO https://github.com/cms-opendata-workshop/workshop-payload-kubernetes/raw/master/deployment-http-fileserver.yaml
- Open this file and again adjust the
apiVersiontoapps/v1and NUMBER=1 as the following:
# deployment-http-fileserver.yaml
apiVersion: apps/v1
kind: Deployment
metadata:
  labels:
    service: http-fileserver
  name: http-fileserver
spec:
  replicas: 1
  strategy: {}
  selector:
    matchLabels:
      service: http-fileserver
  template:
    metadata:
      labels:
        service: http-fileserver
    spec:
      volumes:
      - name: volume-output
        persistentVolumeClaim:
          claimName: nfs-1
      - name: basic-config
        configMap:
          name: basic-config
      containers:
      - name: file-storage-container
        image: nginx
        ports:
        - containerPort: 80
        volumeMounts:
          - mountPath: "/usr/share/nginx/html"
            name: volume-output
          - name: basic-config
            mountPath: /etc/nginx/conf.d
Apply and expose the port as a LoadBalancer:
kubectl create -n argo -f deployment-http-fileserver.yaml
kubectl expose deployment http-fileserver -n argo --type LoadBalancer --port 80 --target-port 80
Exposing the deployment will take a few minutes. Run the following command to follow its status:
kubectl get svc -n argo
You will initially see a line like this:
NAME                          TYPE           CLUSTER-IP   EXTERNAL-IP   PORT(S)        AGE
http-fileserver               LoadBalancer   10.8.7.24    <pending>     80:30539/TCP   5s
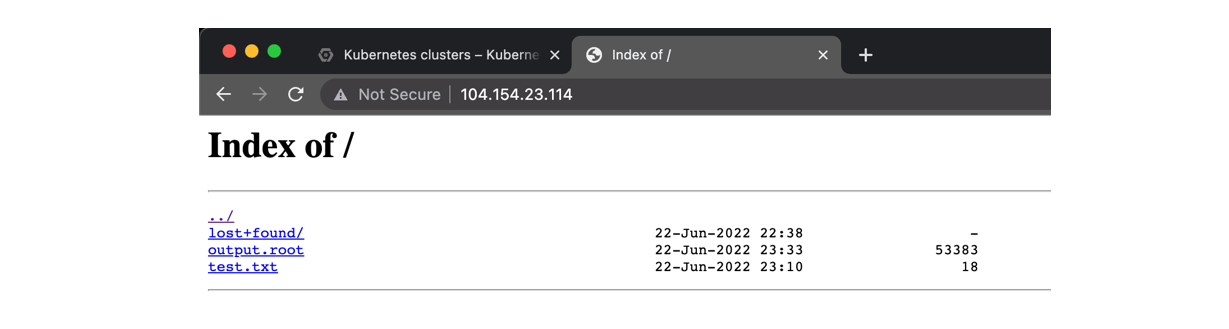
Wait a couple minutes recheck the previous command, copy your EXTERNAL-IP and paste it on a new tab, it should look something like this:

The <pending> EXTERNAL-IP will update after a few minutes (run the command
again to check). Once it’s there, copy the IP and paste it into a new browser
tab. This should welcome you with a “Hello from NFS” message. In order to
enable file browsing, we need to delete the index.html file in the pod.
Determine the pod name using the first command listed below and adjust the
second command accordingly.
kubectl get pods -n argo
kubectl exec http-fileserver-XXXXXXXX-YYYYY -n argo -- rm /usr/share/nginx/html/index.html
Warning: anyone can now access these files
This IP is now accessible from anywhere in the world, and therefore also your files (mind: there are charges for outgoing bandwidth). Please delete the service again once you have finished downloading your files.
kubectl delete svc/http-fileserver -n argoRun the
kubectl expose deploymentcommand to expose it again.
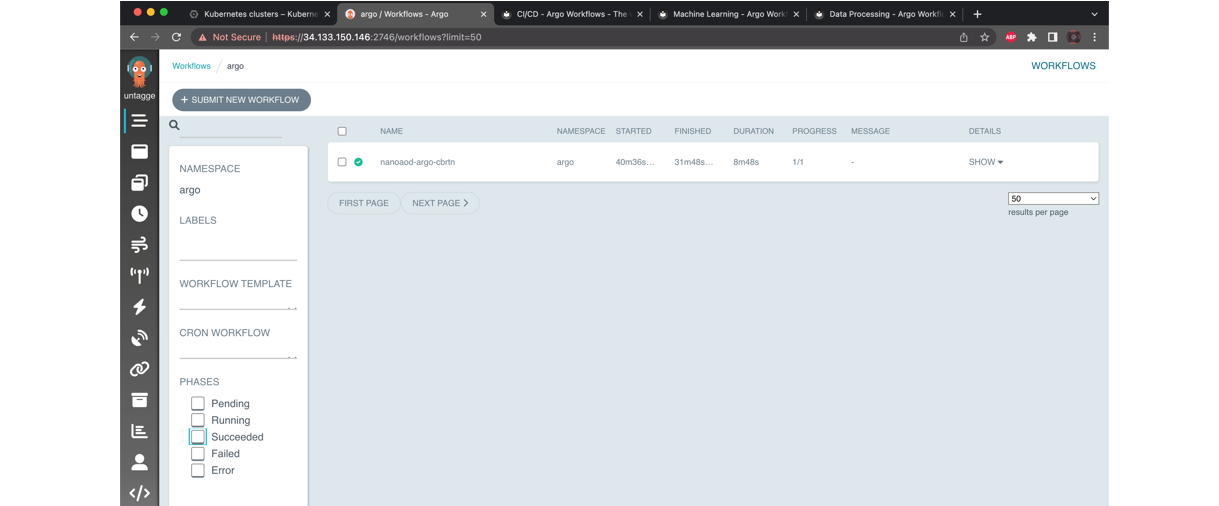
Argo GUI
Check the services running and the associated IP addresses:
kubectl get svc -n argo
kubectl -n argo port-forward deployment/argo-server 2746:2746
Once it has started fowarding the port we will have to manually enable the port, to do this open a new cloud shell tab and run the following command:
lynx https://localhost:2746
Access it and then quit. Return to the previous tab and you will see that the port is being accessed and handled, you can exit with ^C and finally patch the service with:
kubectl patch svc argo-server -n argo -p '{"spec": {"type": "LoadBalancer"}}'
Since it is creating an external ip, wait a couple minutes. You can check if it is ready with:
kubectl get svc -n argo
- Finally, you can access this address in your localhost. Do not forget to add “https://” and “:2746”
- Click on Advanced, proceed to
(unsafe) and voilà
Key Points
With a simple but a tight yaml structure, a full-blown analysis can be performed using the Argo tool on a K8s cluster.
Cleaning up
Overview
Teaching: 5 min
Exercises: 10 minQuestions
How do I clean my workspace?
How do I delete my cluster?
Objectives
Clean my workflows
Delete my storage volume
Cleaning workspace
Remember to delete your workflow again to avoid additional charges: Run this until you get a message indicating there is no more workflows.
argo delete -n argo @latest
Delete the argo namespace and all yaml files and configurations with:
kubectl delete ns argo
rm *
rm -r *
Delete your disk:
gcloud compute disks delete DISK_NAME [DISK_NAME …] [--region=REGION | --zone=ZONE]
Demo delete disk
To delete the disk ‘gce-nfs-disk-1’ in zone ‘us-central1-c’ that was used as an example in this workshop , run:
gcloud compute disks delete gce-nfs-disk-1 --zone=us-central1-c
Delete cluster
-
Click on the delete button of your cluster:
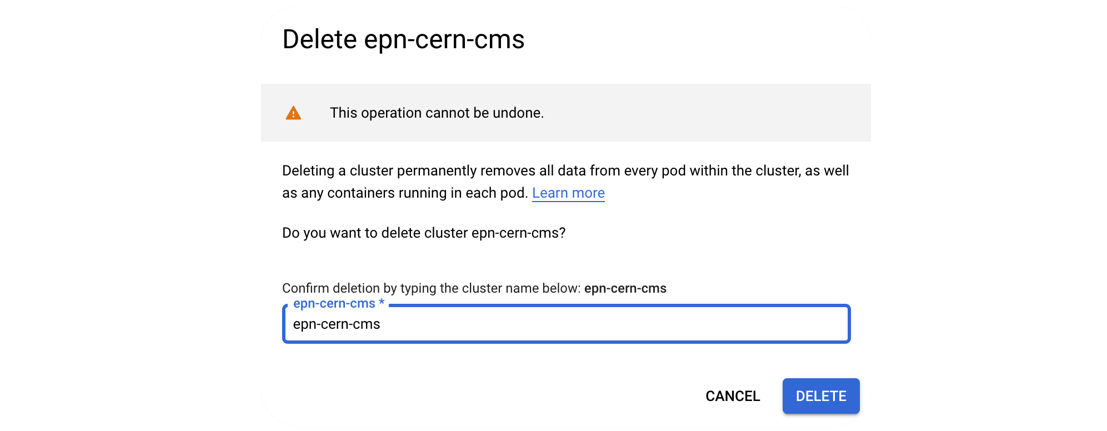
-
Confirm deletion:
-
Standby to see the complete deletion of the cluster:
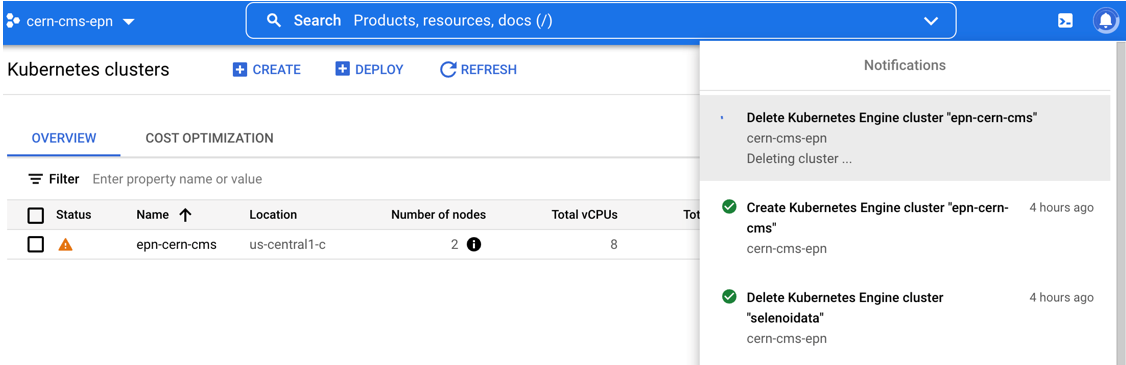 Perfect you’re ready to start over
Key Points
Cleaning your workspace in periods of time while you’re not running workflows will save you money.
With a couple commands it is easy to get back to square one.