All in One View
Content from Introduction
Last updated on 2025-02-06 | Edit this page
Overview
Questions
- What are public cloud providers?
- Why would you use them?
- What is Kubernetes?
- What else do you need?
Objectives
- Explain the motivation for using a Kubernetes cluster from public cloud providers.
- Explain the tools used to set up the Kubernetes cluster and run the processing workflow.
Introduction
This tutorial shows how to set up a CMS open data processing workflow using Kubernetes clusters from Google Cloud Platform (GCP).
To learn about CMS open data and the different data formats, work through the tutorials in one of our workshops.
Using public cloud resources is an option for you if you do not have enough computing resources and want to run some heavy processing. In this tutorial, we use as an example processing of CMS open data MiniAOD to a “custom” NanoAOD, including more information than the standard NanoAOD but still in the same flat file format.
We assume that you would want to download the output files to your local area and analyse them with your own resources. Note that analysis using GCP resources with your files stored on GCP is also possible, but is not covered in this tutorial.
Google Cloud Platform
Public cloud providers are companies that offers computing resources and services over the internet to multiple users or organizations. Google Cloud Platform (GCP) is one of them. You define and deploy the resources that you need and pay for what you use. As many other such resource providers (for example AWS, Azure, OHV), it offers some free getting-started “credits”.
GCP offers free trial credits for $300 for a new account. This credit is valid for 90 days.
This tutorial was set up using Google Cloud Research credits. You can apply for similar credits for your research projects. Take note that the credit has to be used within 12 months.
You can create, manage and delete resources using the Google Cloud
Console (a Web UI) or a command-line tool gcloud.
In this tutorial, we use gcloud commands to create the
persistent storage for the output data, and a Terraform script to
provision the Kubernetes cluster where the processing workflow will
run.
Terraform
Terraform is a tool to define, provision, and manage cloud infrastructure using configuration scripts.
In this tutorial, we use Terraform scripts to create the Kubernetes
cluster in a single step. The advantage - compared to plain command-line
gcloud commands - is that we can easily configure the
cluster using input variables. Also, after the workflow finishes, it is
easy to delete the resources in a single step.
Kubernetes
Kubernetes is a system to manage containerized workflows on computing
clusters. kubectl is the command-line tool to interact with
the cluster resources.
In this tutorial, we use kubectl commands to set up some
services and to observe the status of the cluster and the data
processing workflow.
Argo Workflows
The processing workflow consist of some sequential and parallel steps. We use Argo Workflows to define (or “orchestrate”) the workflow steps.
In this tutorial, the Argo Workflows services are set up using a
kubectl command. We use argo, the command-line
tool, to submit and manage the workflows.
Ready to go?
If you don’t have access to a Linux terminal or prefer not to install tools locally, you can use Google Cloud Shell. You’ll need a Google Cloud Platform (GCP) account and a GCP project. To open Cloud Shell, click the Cloud Shell icon in the top-right corner of the Google Cloud Console.
Cloud Shell comes pre-installed with gcloud, kubectl, terraform, and go. However, you’ll need to install the Argo CLI manually.
Remember that while using Cloud Shell is free, you will need to have credits (or pay) for the resources you deploy.
- Public cloud providers are companies that offer pay-as-you-go computing resources and services over the internet to multiple users or organizations.
- Terraform is an open-source tool to provision and delete computing infrastructure.
- Kubernetes is an open-source system for automating deployment, scaling, and management of containerized applications and their associated workflows across clusters of hosts.
- Argo Workflows is an open-source tool for orchestrating sequential and parallel jobs on Kubernetes.
Content from Persistent storage
Last updated on 2025-02-06 | Edit this page
Overview
Questions
- How to create a Google Cloud Storage bucket?
- What are the basic operations?
- What are the costs of storage and download?
Objectives
- Learn to create a Google Cloud Storage bucket.
- Learn to list the contents of a bucket.
- Understand the persistant storage costs.
Storage for the output files
The processing workflow writes the output files to a storage from which they can be downloaded afterwards.
For this tutorial, we use a Google Cloud Storage (GCS) bucket.
The storage is created separately from the cluster resources. You can then delete the cluster just after the processing and avoid unnecessary costs, but keep the output files.
Prerequisites
GCP account and project
Make sure that you are in the GCP account and project that you intend to use for this work. In your Linux terminal, type
The output shows your account and project.
Billing account?
If this is your first project or you created it from the Google Cloud Console Web UI, it will have a billing account linked to it, and you are ready to go.
If you created the project from the command line without specifying the billing account, you must link it to an existing billing account.
First list the billing accounts
Take the account id from the output, and check if your project is linked to it
If not, link your project to this account with
Create the bucket
Create a storage bucket with
You can test copying a file to it with
and list the contents of the bucket with
You can remove the file with
Note that the bucket is tied to your GCP project and you can only access it when authenticated.
Costs
Storage
The storage
cost of a GCS bucket depends on the data volume. The costs may vary
from a region to another. For europe-west4, the current
(October 2024) monthly cost is $0.020 / GB.
Operations
An operation
is an action that makes changes to or retrieves information from a
bucket and it has a tiny cost: $0.005 per 1000 operations. This applies,
for example, to listing the contents of the bucket on your terminal. The
traffic between GCP computing resources and storage within the same
region (e.g. in europe-west4) is free.
In the context of this tutorial, the operations costs are insignificant. However, keep this is mind if you plan to write scripts that list the bucket content from your terminal.
Networking and download
Downloading data from the GCS bucket to your computer can have a significant cost for large files: the current (October 2024) cost to internet locations (excluding China and Austalia) is $0.12 / GB.
In the context of the example of this tutorial, the resulting output files are approximately 30% of the original MiniAOD dataset volume. For example, downloading the 330 GB ouput from a processing of a 1.1 TB MiniAOD dataset will cost $40.
- Google Cloud Storage bucket can be used to store the output files.
- The storage cost depends on the volume stored and the duration of storage, and for this type of processing is very small.
- The download of big output files from the bucket can be costly.
Content from Disk image
Last updated on 2025-02-06 | Edit this page
Overview
Questions
- Why to build a disk image for cluster nodes?
- How to build a disk image?
Objectives
- Create a disk image with the container images.
Why a disk image?
The container image for the MiniAOD processing is very big and it needs to be pulled to the nodes of the cluster. It can take 30 mins to pull it. Making it available to the nodes of the cluster through a pre-built secondary disk image speeds up the workflow start.
We will follow the instructions provided by GCP to build the secondary disk image. All necessary steps are provided in this lesson.
Prerequisites
GCP account and project
Make sure that you are in the GCP account and project that you intend to use for this work. In your Linux terminal, type
The output shows your account and project.
Bucket for logs
To build an image disk, we will use a script that produces some logs.
Create a bucket for these logs (choose a name and substitute
<BUCKET_FOR_LOGS> with it in the following):
gcloud storage buckets create gs://<BUCKET_FOR_LOGS>/ --location europe-west4Go installed?
You should have go installed, see Software setup.
Enabling services
Before you can create resources on GCP, you will need to enable the corresponding services.
Your project usually has several services enabled already. You can list them with
You can list all available services with
but that’s a long list!
To build a disk image, you will need to enable Cloud Build API (cloudbuild.googleapis.com) and Compute Engine API (compute.googleapis.com) with
When services are enabled, some “service accounts” with specific roles get created. You can list them with
Often, the resources need to work with each other. In this case, the Cloud Build service builds the image and writes it to an image disk. Therefore, the Cloud Build service needs to have two additional roles to access Compute resources (the image disk belongs to that category).
Add them with
Get the code
Pull the code from https://github.com/GoogleCloudPlatform/ai-on-gke/tree/main/tools/gke-disk-image-builder
If you want only this directory and not the full repository, use the sparse checkout:
git init <your_new_folder>
cd <your_new_folder>
git remote add -f origin git@github.com:GoogleCloudPlatform/ai-on-gke.git
This takes a while.
git config core.sparseCheckout true
echo "tools/gke-disk-image-builder/" >>  .git/info/sparse-checkout
git pull origin main
cd tools/gke-disk-image-builder/
Create the image
To run the script to build the image, you must have go
installed.
Run the script with
BASH
go run ./cli --project-name=<PROJECT_ID> --image-name=pfnano-disk-image --zone=europe-west4-a --gcs-path=gs://<BUCKET_FOR_LOGS> --disk-size-gb=50 --container-image=docker.io/cernopendata/cernopendata-client:latest --container-image=docker.io/rootproject/root:latest --container-image=ghcr.io/cms-dpoa/pfnano-image-build:main --timeout 100mThe script will create a secondary disk images with the container images that are needed in the processing workflow:
-
cernopendata/cernopendata-clientfor getting the metadata -
ghcr.io/cms-dpoa/pfnano-image-build:mainfor the processing -
rootproject/rootfor an eventual test plot.
The container image pfnano-image-build is the standard
CMS Open
data container image with the PFNano processing code
compiled.
Note the timeout options, the default timeout of 20 mins
is not enough.
Note that while images can in most cases be “pulled” from Dockerhub
specifying only the image name
(e.g. cernopendata/cernopendata-client and
rootproject/root), in this script you must give the full
registry address starting with docker.io
and specify a tag (i.e. :latest).
Failure with errors of type
Code: QUOTA_EXCEEDED
Message: Quota 'N2_CPUS' exceeded.
can be due to requested machine type no being available in the requested zone. In that case, they have nothing to do with you quota.
Try in a different region or with a different machine type. You can
give them as parameters
e.g. --zone=europe-west4-a --machine-type=e2-standard-4.
Independent of the zone specified in parameters, the disk image will
have eu as the location, so any zone in europe
is OK (if you plan to create your cluster in a zone in
europe).
Note that the bucket for logs has to be in the same region so you
might need to create another one. Remove the old one with
gcloud storage rm -r gs://<BUCKET_FOR_LOGS>.
Once the image is built, you can see it in the list of available images with
That’s a long list, there are many images already available. Your new
image has your project name under “PROJECT” and
secondary-disk-image under “FAMILY”.
Costs
Computing
The script runs a Google Cloud Build process and there’s per-minute small cost. 120 minutes per day are included in the Free tier services.
Storage
The image is stored in Google Compute Engine image storage, and the cost is computed by the archive size of the image. The cost is very low: in our example case, the size is 12.25 GB, and the monthly cost is $0.05/GB.
There’s a minimal cost for the output logs GCS bucket. The bucket can be deleted after the build.
- A secondary boot disk with the container image preloaded can speed up the workflow start.
Content from Kubernetes cluster
Last updated on 2025-02-06 | Edit this page
Overview
Questions
- How to create a Google Kubernetes Engine cluster?
- How to access the cluster from the command line?
Objectives
- Learn to create a Google Kubernetes Engine cluster.
- Access the cluster and inspect it from the command line.
Prerequisites
GCP account and project
Make sure that you are in the GCP account and project that you intend to use for this work. In your Linux terminal, type
The output shows your account and project.
Enabling services
Before you can create resources on GCP, you will need to enable them
In addition to what was enabled in the previous section, we will now enable Kubernetes Engine API (container.googleapis.com):
Bucket
If you worked through Section 02, you have now a storage bucket for the output files.
List the buckets with
Secondary disk
If you worked through Section 03, you have a secondary boot disk image available
Get the code
The example Terraform scripts and Argo Workflow configuration are in https://github.com/cms-dpoa/cloud-processing/tree/main/standard-gke-cluster-gcs-imgdisk
Get them with
About Terraform
The resources are created by Terraform
scripts (with the file extension .tf) in the working
directory.
In the example case, they are very simple and the same could be
easily done with gcloud commands.
Terraform, however, makes it easy to change and keep track of the parameters. Read more about Terraform on Google Cloud in the Terraform overview.
The configurable parameters are defined in variables.tf
and can be modified in terraform.tfvars.
Create the cluster
Set the variables in the terraform.tfvars file for
example to
project_id          = "<PROJECT_ID>"
region              = "europe-west4-a"
name                = "1"
gke_num_nodes       = 2
With these parameters, a cluster named cluster-1 with 2
nodes will be created in the region europe-west4-a. Replace
<PROJECT_ID> with that of your GCP project.
To create the resources, run
and confirm “yes”.
Connect to the cluster and inspect
Once the cluster is created - it will take a while - connect to it with
BASH
gcloud container clusters get-credentials <CLUSTER_NAME> --region europe-west4-a --project <PROJECT_ID>You can inspect the cluster with kubectl commands, for
example the nodes:
and the namespaces:
You will see several namespaces, and most of them are used by
Kubernetes for different services. We will be using the
argo namespace.
For more information about kubectl, check the Quick
Reference and the links therein, or use the --help
option with any of the kubectl commands.
Costs
Cluster management fee
For the GKE “Standard” cluster, there’s a cluster management fee of $0.10 per hour.
CPU and memory
The cost is determined by the machine and disk type and is per time. For this small example cluster with two e2-standard-4 nodes (4 vCPUs and 16 GB memory) the cost the cost is 0.3$ per hour. Each node has a 100 GB disk, and the cost is for two of these disks is 0.006$ per hour, i.e. very small compared to the machine cost.
The cluster usage contributes to the cost through data transfer and networking, but for this example case it is minimal.
- Kubernetes clusters can be created with Terraform scripts.
-
kubectlis the tool to interact with the cluster.
Content from Set up workflow
Last updated on 2025-02-06 | Edit this page
Overview
Questions
- How to set up Argo Workflow engine?
- How to submit a test job?
- Where to find the output?
Objectives
- Deploy Argo Workflows services to the cluster.
- Submit a test job.
- Find the output in your bucket.
Prerequisites
GCP account and project
Make sure that you are in the GCP account and project that you intend to use for this work. In your Linux terminal, type
The output shows your account and project.
Bucket
If you worked through Section 02, you have now a storage bucket for the output files.
List the buckets with
Code
In the previous section, you pulled the code
and moved to your local
cloud-processing/standard-gke-cluster-gcs-imgdisk
directory.
Argo CLI installed?
You should have Argo CLI installed, see Software setup.
Deploy Argo Workflows service
Deploy Argo Workflows services with
BASH
kubectl apply -n argo  -f https://github.com/argoproj/argo-workflows/releases/download/v3.5.10/install.yaml
kubectl apply -f argo/service_account.yaml
kubectl apply -f argo/argo_role.yaml
kubectl apply -f argo/argo_role_binding.yaml
Wait for the services to start.
You should see the following:
BASH
$ kubectl get all -n argo
NAME                                       READY   STATUS    RESTARTS   AGE
pod/argo-server-5f7b589d6f-jkf4z           1/1     Running   0          24s
pod/workflow-controller-864c88655d-wsfr8   1/1     Running   0          24s

NAME                  TYPE        CLUSTER-IP      EXTERNAL-IP   PORT(S)    AGE
service/argo-server   ClusterIP   34.118.233.69   <none>        2746/TCP   25s

NAME                                  READY   UP-TO-DATE   AVAILABLE   AGE
deployment.apps/argo-server           1/1     1            1           24s
deployment.apps/workflow-controller   1/1     1            1           24s

NAME                                             DESIRED   CURRENT   READY   AGE
replicaset.apps/argo-server-5f7b589d6f           1         1         1       24s
replicaset.apps/workflow-controller-864c88655d   1         1         1       24s
About Argo Workflows
The data processing example is defined as an Argo workflow. You can learn about Argo Workflows in their documentation.
Every step in the workflow runs in a container, and there are several ways to pass the information between the steps.
The example configuration in argo/argo_bucket_run.yaml
has comments to help you to understand how the files and/or parameters
can be passed from a step to another.
Submit a test job
The workflow is defined in the argo/argo_bucket_run.yaml
file. It is composed of four steps:
-
get-metadata: gets the number of files and the file list for a given CMS Open Data 2016 MiniAOD record -
joblist: divides the file list into given number of jobs and coumputes the number of events per job (if not all) -
runpfnano: runs the processing in parallel jobs -
plot: creates some simple plots.
Edit the parameters in the argo/argo_bucket_run.yaml so
that they are
    parameters:
    - name: nEvents
      # Number of events in the dataset to be processed (-1 is all)
      value: 1000
    - name: recid
      # Record id of the dataset to be processed
      value: 30511
    - name: nJobs
      # Number of jobs the processing workflow should be split into
      value: 2
    - name: bucket
      # Name of cloud storage bucket for storing outputs
      value: <YOUR_BUCKET_NAME>
Now submit the workflow with
Observe its progress with
Once done, check the ouput in the bucket with
BASH
$ gcloud storage ls gs://<YOUR_BUCKET_NAME>/**
gs://<YOUR_BUCKET_NAME>/pfnano/30511/files_30511.txt
gs://<YOUR_BUCKET_NAME>/pfnano/30511/logs/1.logs
gs://<YOUR_BUCKET_NAME>/pfnano/30511/logs/2.logs
gs://<YOUR_BUCKET_NAME>/pfnano/30511/plots/h_num_cands.png
gs://<YOUR_BUCKET_NAME>/pfnano/30511/plots/h_pdgid_cands.png
gs://<YOUR_BUCKET_NAME>/pfnano/30511/scatter/pfnanooutput1.root
gs://<YOUR_BUCKET_NAME>/pfnano/30511/scatter/pfnanooutput2.root
You can copy the files with gcloud storage cp ....
Delete resources
Delete the workflow after each run so that the “pods” do not accumulate. They are not running anymore but still visible.
Do not delete the cluster if you plan to continue to the next section, but do not keep it idle. The cost goes by the time it exists, not by the time it is in use. You can always create a new cluster.
You can delete all resources created by the Terraform script with
Confirm with “yes”.
Costs
Cluster
Running the workflow in the cluster does not increase the cost, so for this small test, the estimates in the previous section are valid.
Data download
As detailed in Section 02, downloading data from the storage costs $0.12 / GB. The output file size - and consequently the download cost - for this quick example is small.
- Once the cluster is up, you will first deploy the Argo Workflows
services using
kubectl. - You will submit and monitor the workflow with
argo. - You can see the output in the bucket with
gcloudcommands or on Google Cloud Console Web UI.
Content from Scale up
Last updated on 2025-02-07 | Edit this page
Overview
Questions
- How to process a full dataset?
- What is an optimal cluster setup?
- What is an optimal job configuration?
Objectives
- Optimize the cluster setup for a full dataset processing.
- Learn about job configuration.
Resource needs
Create a small cluster and connect
If you do not have the cluster from the previous sections, create a
new one. Set the number of nodes gke_num_nodes to 2 in the
terraform.tfvars file and create the resources, run
and confirm “yes”.
Connect to it with
Run a test job
Run a small test as in the previous section, but set the number of
parallel jobs to one. The corresponding input parameter in
argo/argo_bucket_run.yaml is
- name: nJobs
      # Number of jobs the processing workflow should be split into
      value: 1
Submit the workflow with
While the job is running, observe the resources usage with
The big processing step - with runpfnano in the name -
defines the resource needs. The output indicates how much CPU (in units
of 1/1000 of a CPU) and memory the process consumes. Follow the resource
consumption during the job to see how it evolves.
The job configuration, i.e. how many jobs will be submitted in a node, is defined by the resouce requests in the workflow definition.
In this example, we have defined them as
      resources:
        requests:
          cpu: "780m"
          memory: "1.8Gi"
          ephemeral-storage: "5Gi"
and the main constraint here is the CPU. This request will guarantee that only 1 jobs will run on a CPU.
Cluster configuration
Input data
The optimal cluster configuration depends on the input dataset. Datasets consist of files, and the number of files can vary. Files consist of events, and the number of events can vary.
In practical terms, the input to the parallel processing steps is a list of files to be processed. We do not consider directing events from one file to different processing steps. It could be done, but would require a filtering list as an input to the processing.
In an ideal case, the parallel steps should take the same amount of time to complete. That would guarantee that the resources are used efficiently so that no idle nodes - for which we still pay for - remain while the longer jobs still continue. However, this is usually not the case because
- input files are not equal in size
- processing time per events can vary.
However, the best approach is to have the same amount of files in each parallel step. Eventually, the files could be sorted according to their size and their share to the nodes could be optimized.
In the example case, we have used the MuonEG MiniAOD dataset with 353 input files. For that number of files, we deployed a cluster with 90 nodes 4-vCPU nodes, providing a total of 360 vCPUs. We can therefore define a workflow with 353 parallel jobs and have a close to full occupation of the cluster.
The relevant Terraform input variables fur such cluster are
project_id          = "<PROJECT_ID>"
region              = "europe-west4"
gke_num_nodes       = 30
Note that as the “zone” (a, b or c in the location name, e.g. europe-west4-a) is not defined, the cluster will have 30 nodes in each zone, in total 90.
Alternatively, a smaller cluster would be less expensive per unit time but the processing takes a longer. In the benchmarking, a large cluster was found to be practical.
GCP sets quotas to resources, and you can either increase them - to a certain limit - or request a quota increase.
You will notice when you go beyond the predefined quota from this type of message during the cluster creation:
[...]
Error: error creating NodePool: googleapi: Error 403:
Error waiting for creating GKE cluster: Insufficient quota to satisfy the request:
If that happens, go to the Quotas & System Limits page at the Google Cloud Console. The link is also in the error message. Search for quotas that you need to increase.
For a cluster with a big number of nodes, you must increase the quotas for “CPUs” and “In-use regional external IPv4 addresses”. You might see something like this:
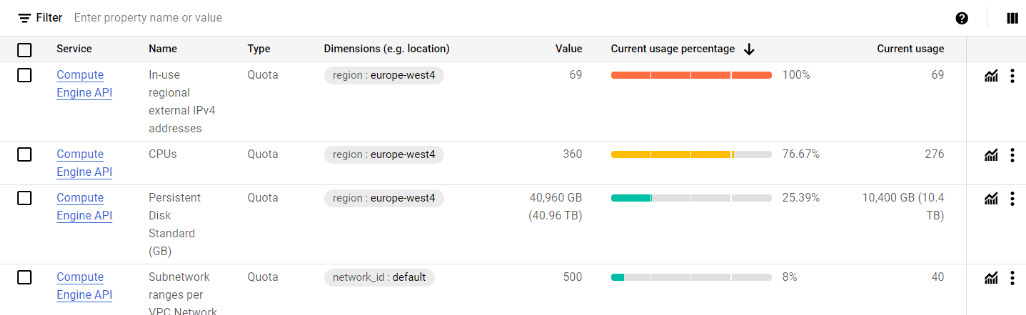
(In this case, the number of CPUs was increased, but the cluster creation failes because “In-use regional external IPv4 addresses” was too low.)
Once you find the quota line, click on the three vertical dots and choose “Edit quota”.
If you can’t increase them to desired value, submit a quota increase request through the form as explained in the Google Cloud quota documentation. You will receive an email with increase request approved (or rarely denied if the location is down in resources). It is usually immediate, but takes some minutes to propagate.
If the editable limits are too low and you cannot find the form, read to the discussion in the next section.
Autoscaling
The Terraform script gke.tf has the autoscaling
activated. This makes the cluster scale up or down according to
resources in use. This reduces the cost in particular for a cluster with
a big amount of nodes. It often happens that some jobs run longer than
the others, and in that case the cluster lifetime (and the cost) is
defined by the longest job. Autoscaling removes the nodes once they do
not have active processes running.
Costs
Cluster management fee
For the GKE “Standard” cluster, there’s a cluster management fee of $0.10 per hour.
CPU and memory
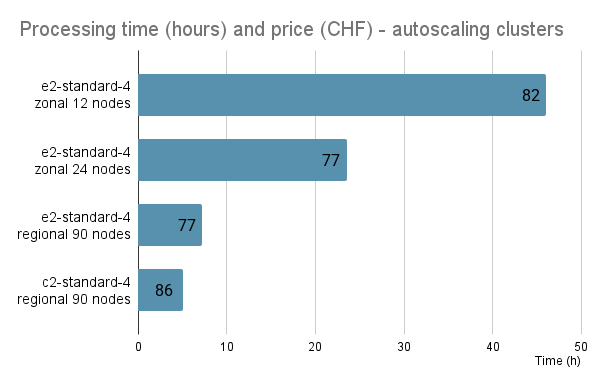
The cost is determined by the machine and disk type and is per time. Processing the full MuonEG MiniAOD dataset with 353 input files running 353 parallel jobs on a 90-node cluster costed around 80 USD and took 7 to 9 hours, depending on the chosen machine type.
The graph shows the time and price for clusters of 12, 24 and 90 nodes, the latter with two different machine types.
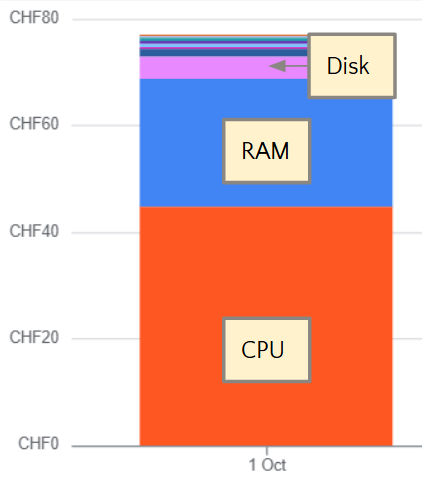
The cost for CPU is more than half of the total price, and the memory contributes one third of it, as shown in this example graph:
The cluster usage contributes to the cost through data transfer and networking, but for this example case it is minimal.
Data download
Downloading the resulting output files would have costed some 40 USD.
- The resource request should be set so that one job runs in one vCPU.
- Basic kubectl command
kubetcl top podscan be used to inspect the resource consumption during a test job. - The optimal number of nodes in a cluster depends on the number of files in the dataset, and it should be chosen so that each job has the same number of files.
- A large cluster running for a short time was found to be the most convenient.
- Autoscaling can reduce the cost as it shuts down and deletes the nodes when all jobs on the node have finished.
Content from Discussion
Last updated on 2025-02-07 | Edit this page
Overview
Questions
- What was the user experience?
- What worked well?
- What difficulties were observed?
Objectives
- Share the practical user experience with CMS open data and GCP while preparing for this tutorial.
What works well?
General setup
Implementing the processing workflow in the cloud environment was easy thanks to the availability of the CMSSW, CERN Open data client and ROOT software containers. Argo Workflows, being native for cloud environments, is well-adapted for the workflow definition on Kubernetes resources.
Google Cloud Platform and Google Kubernetes Engine
From the technical point of view, running the workflow was smooth. It
was our choice to work mainly with the command-line tool
(gcloud) to achieve a longer lifetime of validity compared
to instructions through a graphical UI. The provider-specific part of
the Terraform resource provisioning scripts were reasonably well
documented.
The resources were relatively stable, and we observed only few cluster-related failures during all the benchmarking process, which consisted of several processing runs over an entire dataset and numerous shorter runs.
Building the image disk with the large software container pre-installed worked fine using tools in a GitHub repository linked in the Google Cloud documentation.
Features such as autoscaling helps reduce costs and are easy to setup.
Further savings could be achieved with “spot” resources, i.e. selecting cheaper nodes that can get deleted without notice. That would require some further work for bookkeeping so that the failed jobs on deleted nodes could easily be restarted.
Data access
Data access through XRootD (streaming from the CERN open data eos area) was relatively stable. However, some failures were observed during the long runs, but diminished considerably after an update of resources on the CERN Open data eos file system side.
It should be noted that we requested as much CPU for the jobs as they would need when running non-parallel. That was basically on job per vCPU. Pushing more jobs on one vCPU can easily make jobs fail as they starting compete for resources, and data access can fail due to timeout.
What difficulties were observed?
Google Cloud Platform
It is useful to acknowledge that the testing was done on a Google account with a CERN email that had been used for CERN-related work earlier, and with a 5000 USD worth total credit available. When necessary, quota requests to increase the number of nodes and to use more performant machine types were immediately approved.
The final testing for these instructions were done with a fresh Google account connected to an institute email. We observed that the available quota, for example, for number of nodes or vCPUs was very low, and the quota increase request was not possible through the submission form that was available earlier. We got no reply (or wrong replies) from the Google support despite several inquiries, and were not able to increase the quota close to any useful value for a large-scale (i.e. full dataset) processing.
This leaves us very perplexed about the possibility of using Google Cloud Platform for small-scale processing by individual researchers. While we observed that - technically - deploying the resources, setting up the workflow and running the processing was very smooth, the usability might be limited by the lack of support as quota increase requires human intervention from the Google support staff. The goal of this work was to show how cloud resources can be used for a short-term need of powerful resources with a moderate cost, but this does not seem to be in the interest of Google as a service provider.
If there is interest, we can repeat this exercise with other cloud providers.
Data access
While rare, data access timeouts occur. As a test case, we processed a full dataset with 352 files and after the server-side update, most jobs ran through without failures. However, some datasets are larger and a proper bookkeeping should be added for the failed jobs.
- Technically, deploying the resources, setting up the workflow and running the processing on Google Cloud Platform was very smooth.
- Final testing on a new Google Cloud account revealed problems with resource quota increase requests, i.e. the willingness of Google support to help small customers.