Introduction
Overview
Teaching: 10 min
Exercises: 0 minQuestions
Where to find the pre-exercise material
Objectives
Read the workshop pre-exercise material to learn the basics of Kubernetes and Argo workflows
Set up a local environment for testing
Work through the cloud pre-exercise lesson of the CMS 2023 open data workshop.
Key Points
Having a local environment for testing your workflows saves time and money.
Creating a K8s cluster
Overview
Teaching: 5 min
Exercises: 20 minQuestions
How do I manually create a K8s cluster on the GCP
Objectives
Learn how to create a K8s cluster from scratch on GKE
Introduction
In this demonstration we will show you the very basic way in which you can create a computer cluster (a Kubernetes cluster to be exact) in the cloud so you can do some data processing and analysis using those resources. In the process we will make sure you learn about the jargon. During the hands-on session of the workshop (cloud computing), a cluster similar to this one will be provided to you for the exercises.
Creating your own cluster on GKE
For the hands-on part of this lesson you will not have to create the cluster for yourself, it will be already done for you. For pedagogical reasons, however, we will show an example of how to do it by hand. The settings below should be good and cheap enough for CMSSW-related workflows.
Here you will find some instructions on how to use preemptible machines in GKE. Preemptible VMs offer similar functionality to Spot VMs, but only last up to 24 hours after creation, this might be taken into account if reducing costs is of your concern.
- Get to the Console
- Create a new project or select one (if you already have one). Note that you will not be able to create clusters in the GCP project that we used for the workshop.
- Click on the Kubernetes engine/clusters section on the left side menu
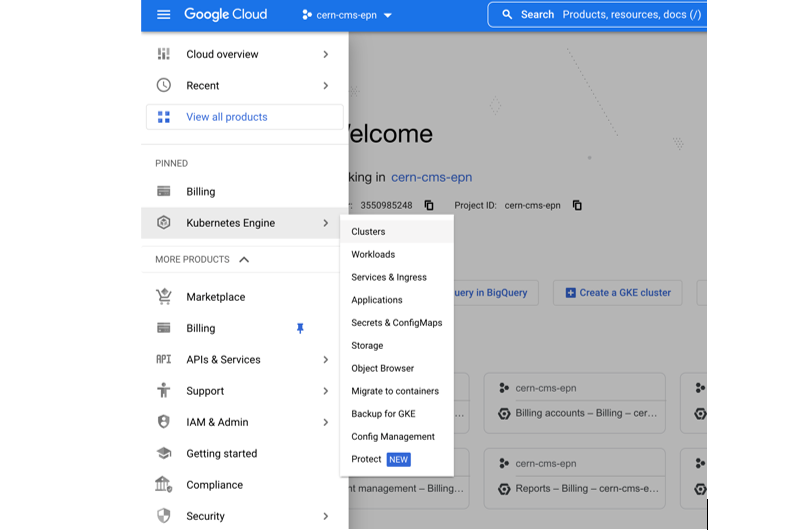
- Click Create
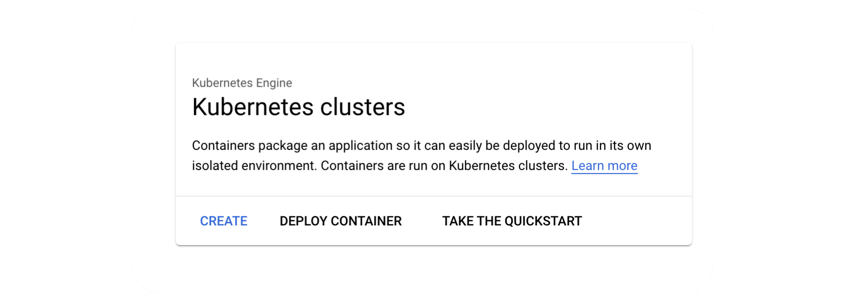
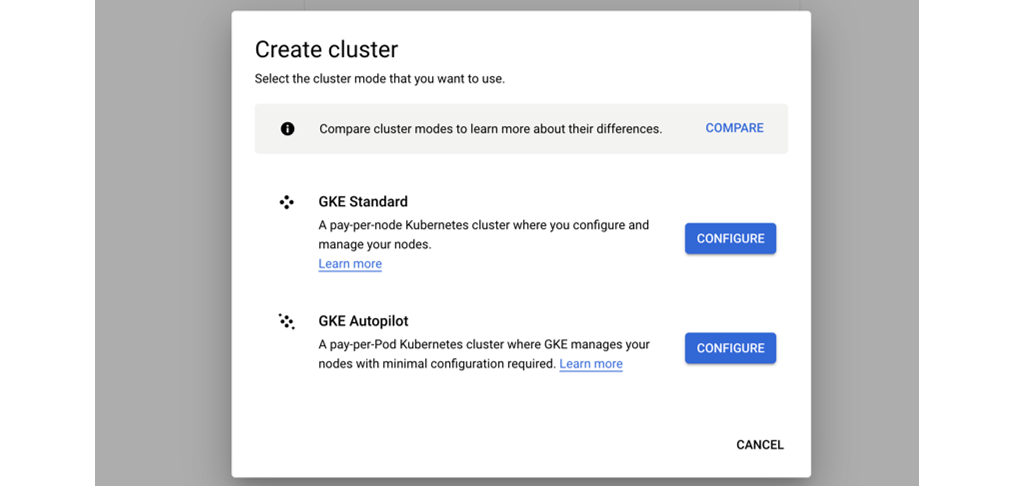
- Select Standard (not autopilot)
- Give it a name
- Change the zone to e.g.
europe-west1-b(for data streaming speed, choose a zone close to CERN)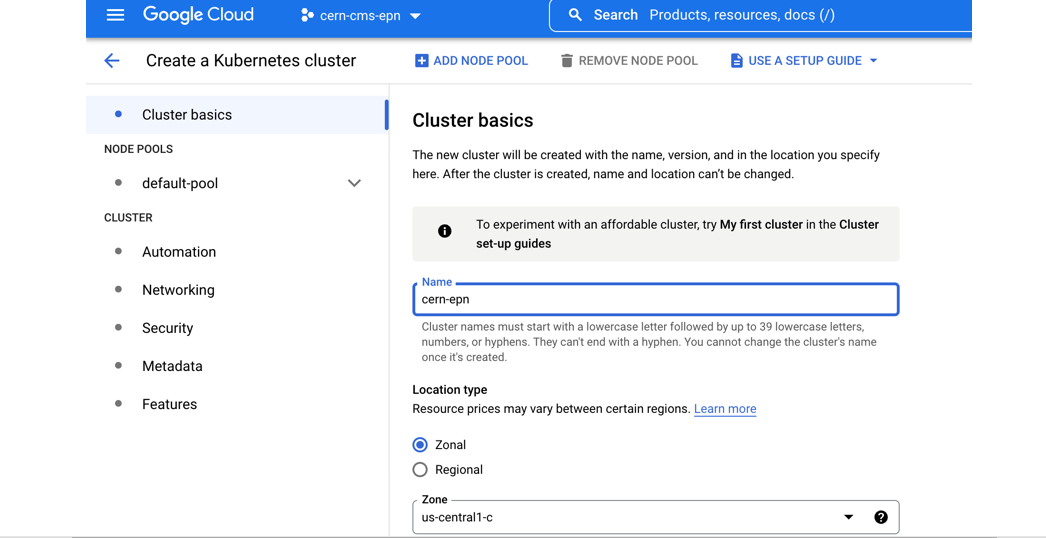
- Many ways to configure the cluster, but let’s try an efficient one with autoscaling
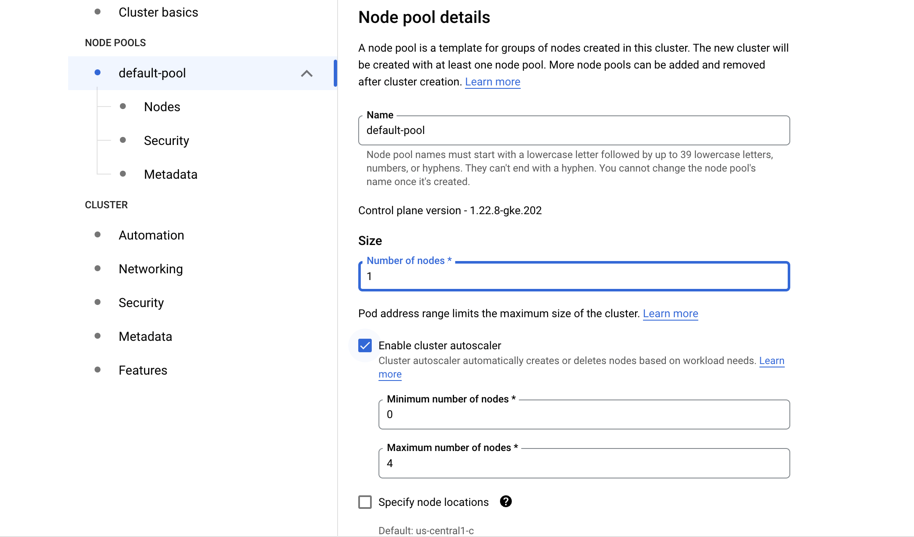
- Go to “Default pool”
- Choose size: 1 node
- Autoscaling 0 to 4
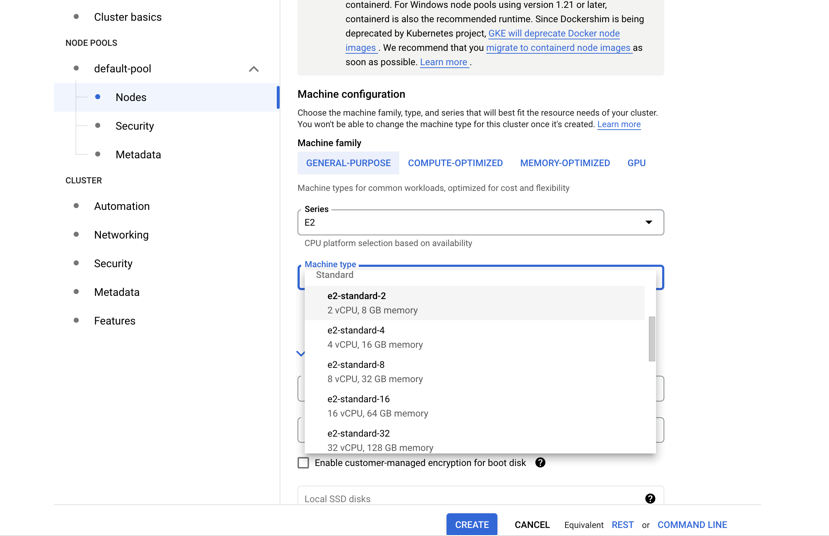
- Go to “Nodes”
- Choose a machine e2-standard-4
- Check “Enable spot VMs” down in the menu
- Leave the rest as it is
- Hit create
- Creation will take a while
While we wait, let us inspect the Cloud shell…
Cloud shell
GCP provides an access machine so you can interact with their different services, including our newly created K8s cluster. This machine (and the terminal) is not really part of the cluster. As was said, it is an entry point. From here you could connect to your cluster.
The
gcloudcommandThe gcloud command-line interface is the primary CLI tool to create and manage Google Cloud resources. You can use this tool to perform many common platform tasks either from the command line or in scripts and other automations.
Connect to your cluster
Once the cluster is ready (green check-mark should appear)
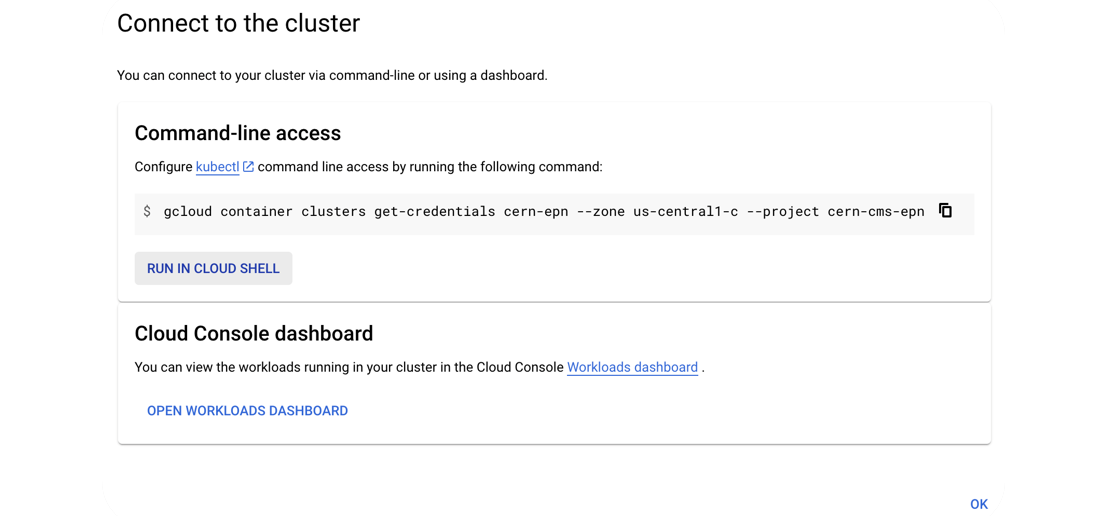
- Click on the connect button of your cluster:

- Execute that command in the cloud shell:
- You’ve connected to your shell, now press enter to link to your GKE cluster:
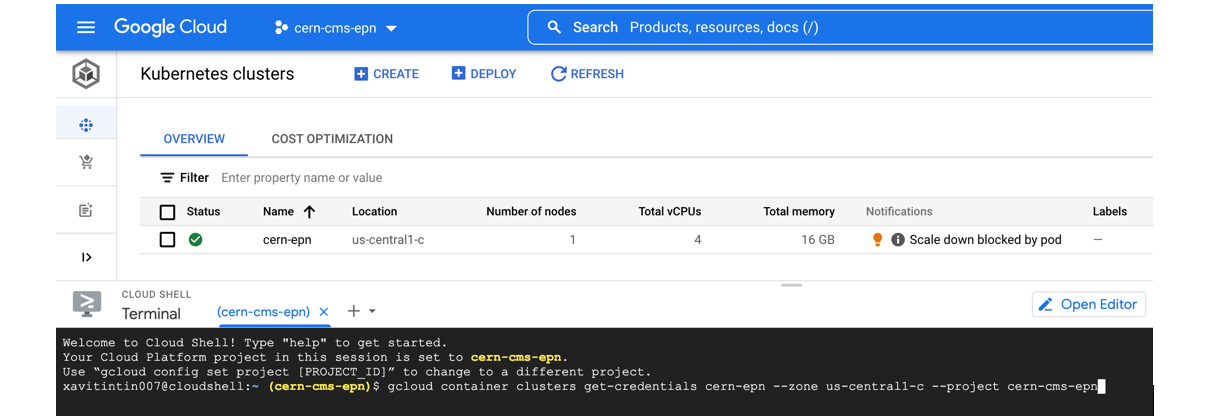
- Authorize Shell

Key Points
It takes just a few clicks to create you own K8s cluster
Storing a workflow output on Kubernetes
Overview
Teaching: 5 min
Exercises: 30 minQuestions
How to set up a common storage on a cloud cluster
Objectives
Understand how to set up shared storage and use it in a workflow
Kubernetes Cluster - Storage Volume
When running applications or workflows, it is often necessary to allocate disk space to store the resulting data. Kubernetes provides various options for managing storage volumes, allowing you to efficiently store and access data within your cluster.
In many applications or workflows, there is a need for disk space to store and persist results. While Google Kubernetes Engine (GKE) provides persistent disks as default storage for applications running in the cluster, local machines do not have such built-in persistent storage capabilities. To address this, we can create a persistent volume using an NFS disk, allowing us to store and access data from our local machines. It’s important to note that persistent volumes are not namespaced and are available to the entire Kubernetes cluster.
Create the volume (disk) we are going to use:
gcloud compute disks create --size=100GB --zone=europe-west1-b gce-nfs-disk-1
Set up an nfs server for this disk:
wget https://cms-opendata-workshop.github.io/workshop2023-lesson-introcloud/files/GKE/001-nfs-server.yaml
kubectl apply -n argo -f 001-nfs-server.yaml
Set up a nfs service, so we can access the server:
wget https://cms-opendata-workshop.github.io/workshop2023-lesson-introcloud/files/GKE/002-nfs-server-service.yaml
kubectl apply -n argo -f 002-nfs-server-service.yaml
Let’s find out the IP of the nfs server:
kubectl get -n argo svc nfs-server | grep ClusterIP | awk '{ print $3; }'
Let’s create a persistent volume out of this nfs disk. Note that persistent volumes are not namespaced they are available to the whole cluster.
We need to write that IP number above into the appropriate place in this file:
wget https://cms-opendata-workshop.github.io/workshop2023-lesson-introcloud/files/GKE/003-pv.yaml
vim 003-pv.yaml
Deploy:
kubectl apply -f 003-pv.yaml
Check:
kubectl get pv
Apps can claim persistent volumes through persistent volume claims (pvc). Let’s create a pvc:
wget https://cms-opendata-workshop.github.io/workshop2023-lesson-introcloud/files/GKE/003-pvc.yaml
kubectl apply -n argo -f 003-pvc.yaml
Check:
kubectl get pvc -n argo
Access the disk through a pod
To get files from the persistent volume, we can define a container, a “storage pod” and mount the volume there so that we can get access to it.
Get the pv-pod.yaml file with:
wget https://cms-opendata-workshop.github.io/workshop2023-lesson-introcloud/files/GKE/pv-pod.yaml
This file has the following content:
YAML File
# pv-pod.yaml
apiVersion: v1
kind: Pod
metadata:
  name: pv-pod
spec:
  volumes:
    - name: task-pv-storage
      persistentVolumeClaim:
        claimName: nfs-1
  containers:
  - name: pv-container
    image: busybox
    command: ["tail", "-f", "/dev/null"]
    volumeMounts:
    - mountPath: /mnt/data
      name: task-pv-storage
Create the storage pod and check the contents of the persistent volume
kubectl apply -f pv-pod.yaml -n argo
kubectl exec pv-pod -n argo -- ls /mnt/data
Once you have files in the volume, you could use
kubectl cp pv-pod:/mnt/data /tmp/poddata -n argo
to get them to a local /tmp/poddata directory.
Key Points
Persistant volume is used to store the workflow output
Hands-on
Overview
Teaching: 10 min
Exercises: 0 minQuestions
Where to find the hands-on exercises?
Objectives
Go through some hands-on exercises to run workflows for CMS open data processing on the cloud
Learn how to modify the example workflow
```
Work through the cloud computing lesson of the CMS 2023 open data workshop.
Key Points
The cloud computing lesson guides you through hands-on exercises with CMS open data on the cloud.
Cleaning up
Overview
Teaching: min
Exercises: 10 minQuestions
How do I clean my workspace?
How do I delete my cluster?
Objectives
Clean my workflows
Delete my storage volume
Cleaning workspace
Remember to delete your workflow again to avoid additional charges: Run this until you get a message indicating there are no more workflows.
argo delete -n argo @latest
Delete the argo namespace:
kubectl delete ns argo
If you are working on Cloud shell, it will keep your local files, such as yaml files that you downloaded. If you plan to use them afterwards, you can leave them there.
Delete your disk:
gcloud compute disks delete DISK_NAME [DISK_NAME …] [--region=REGION | --zone=ZONE]
Demo delete disk
To delete the disk ‘gce-nfs-disk-1’ in zone ‘europe-west1-b’ that was used as an example in this workshop, run:
gcloud compute disks delete gce-nfs-disk-1 --zone=europe-west1-b
Delete cluster
-
Click on the delete button of your cluster:

-
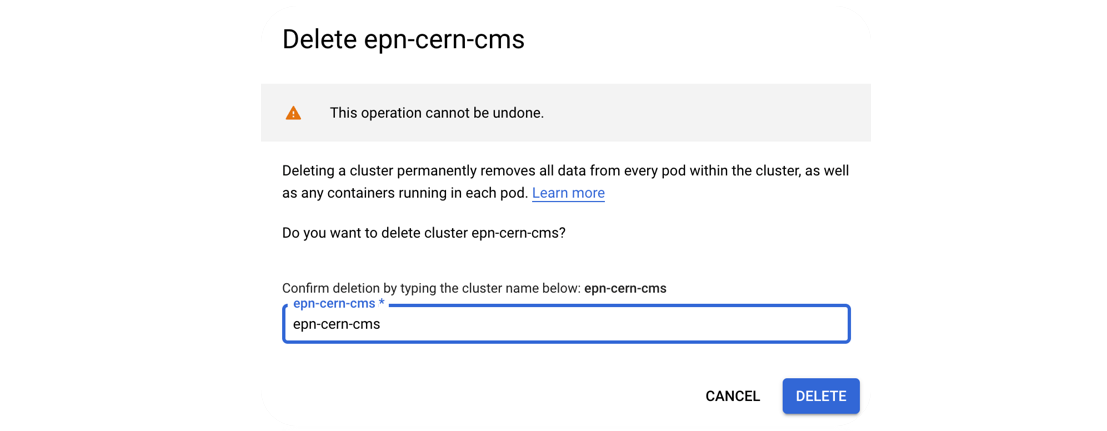
Confirm deletion:
-
Standby to see the complete deletion of the cluster:
 Perfect you’re ready to start over
Key Points
Cleaning your workspace in periods of time while you’re not running workflows will save you money.
With a couple of commands it is easy to get back to square one.