Choosing a trigger
Overview
Teaching: 0 min
Exercises: 35 minQuestions
How do I select triggers for my analysis?
Where can I find more information about my triggers so I can understand them?
Objectives
Learn how to inspect what triggers are available in a given dataset
Learn how to explore a trigger menu configuration in order to understand a specific trigger
Choosing the dataset
In the previous lesson you learned about datasets and are probably thinking already of a particular dataset you would like to use for your own analysis. In this lesson we recommend that you actually work with the dataset you like or picked, despite of the dataset we will actually use for this lesson, which will be the 2012 TauPlusX one. The instructions are, of course, similar.
Exploring the triggers in your dataset
As you saw, the first step in an analysis would be to pick a dataset that suits your scientific interest. Since in this workshop we will be trying to replicate (at least partially) the first version of the CMS search for Higgs to taus, then we will concentrate on the 2012 TauPlusX dataset. An example of this simplified analysis is already available at the CERN Open Portal. In this workshop we will walk you through many of the different ingredients you need to achieve a study like this.
After choosing the appropriate dataset, the first thing you need to decide is which trigger to use.
If you click on the 2012 TauPlusX dataset record, you will find a list triggers that were streamed to that dataset. Now, the question is, which one would you use for this analysis? Here’s where the physics starts playing a role. Since we will concentrate only on tau lepton pairs of which one tau lepton decays into a muon and two neutrinos and the other tau lepton hadronically, then we shall pick our trigger(s) accordingly. Note that the published CMS analysis considers additional decay channels.
Let’s try to click on one of those triggers, for instance HLT_IsoMu8_eta2p1_LooseIsoPFTau20. There is some additional information about this trigger. The first thing to notice, though, if you compare it to the 2012 run range, is that this trigger was only available towards the end of the data taking period.
So we have learned that triggers could be not persistent and be only available for certain runs. Besides, as it was mentioned, the trigger code evolves. There may be different versions of this trigger, for instance, HLT_IsoMu8_eta2p1_LooseIsoPFTau20_v1, or v2, v3, etc.
In order to check the trigger information we need to use the trigger tools provided in CMSSW. This record points you to some examples of the usage of such code. Let’s use, for instance, some of the snippets presented in the source file of the GeneralInfoAnalyzer package to dump all the triggers in our dataset.
First, make sure you go to your CMSSW_5_3_32/src and issue a cmsenv command, as you will always do.
To simplify the exercise, we will use the same source file we used for validation, the Demo/DemoAnalyzer/src/DemoAnalyzer.cc. Let’s modify it so we can use it to dump all the triggers in our dataset. In the process, let’s comment out some of what we did for extracting the muon energy so it does not clutter our output.
Insert the header for the HLTConfigProvider class:
//classes to extract Muon information
#include "DataFormats/MuonReco/interface/Muon.h"
#include "DataFormats/MuonReco/interface/MuonFwd.h"

//for trigger configuration
#include "HLTrigger/HLTcore/interface/HLTConfigProvider.h"

//the standard c++ vector class
#include<vector>
Next, insert the declaration of the variables we will need in our configuration file (process name, dataset name) and an object of class HLTConfigProvider, which we can use to extract the information about what the trigger configuration was for some run:
  virtual void beginLuminosityBlock(edm::LuminosityBlock const&, edm::EventSetup const&);
  virtual void endLuminosityBlock(edm::LuminosityBlock const&, edm::EventSetup const&);

  //declare the input tag for MuonCollection
  //edm::InputTag muonInput;

  // ----------member data ---------------------------
  //std::vector<float> muon_e;

  //for trigger config
  std::string   processName_;
  std::string   datasetName_;
  //HLT config provider object
  HLTConfigProvider hltConfig_;
Add the lines to read the configuration in the constructor and print it out (note the way it is done differs a bit from what we did earlier for the muons. They are, of course, equivalent):
// constructors and destructor
//
DemoAnalyzer::DemoAnalyzer(const edm::ParameterSet& iConfig):
processName_(iConfig.getParameter<std::string>("processName")),
datasetName_(iConfig.getParameter<std::string>("datasetName"))
{
   //now do what ever initialization is needed
   //muonInput = iConfig.getParameter<edm::InputTag>("InputCollection")
  using namespace std;
  using namespace edm;

  //Print the configuration just to check
  cout << "Here is the information passed to the constructor:" <<endl;
  cout << "Configuration: " << endl
       << "   ProcessName = " << processName_ << endl
       << "   DataSetName = " << datasetName_ << endl;


}
Don’t forget to comment out all the muon stuff in the analyze method so it does not bother us:
void
DemoAnalyzer::analyze(const edm::Event& iEvent, const edm::EventSetup& iSetup)
{
 using namespace edm;
 //clean the container
 //muon_e.clear();

 //define the handler and get by label
 //Handle<reco::MuonCollection> mymuons;
 //iEvent.getByLabel(muonInput, mymuons);

 //if collection is valid, loop over muons in event
 //if(mymuons.isValid()){
//    for (reco::MuonCollection::const_iterator itmuon=mymuons->begin(); itmuon!=mymuons->end(); ++itmuon){
//        muon_e.push_back(itmuon->energy());
//    }
 //}

 //print the vector
//  for(unsigned int i=0; i < muon_e.size(); i++){
//    std::cout <<"Muon # "<<i<<" with E = "<<muon_e.at(i)<<" GeV."<<std::endl;
 //}


#ifdef THIS_IS_AN_EVENT_EXAMPLE
   Handle<ExampleData> pIn;
   iEvent.getByLabel("example",pIn);
#endif

#ifdef THIS_IS_AN_EVENTSETUP_EXAMPLE
   ESHandle<SetupData> pSetup;
   iSetup.get<SetupRecord>().get(pSetup);
#endif
}
And, finally, modify the beginRun fuction giving a name to iRun and iSetup arguments and adding the trigger dump. Remember we have to check the triggers available at each change in runs:
// ------------ method called when starting to processes a run  ------------
void
DemoAnalyzer::beginRun(edm::Run const& iRun, edm::EventSetup const& iSetup)
{

  using namespace std;
  using namespace edm;

  //If the hltConfig can be initialized, then the below is an example of
  //how to extract the config information for the trigger from the
  //so-called provenance.

  // The trigger configuration can change from
  // run to run (during the run is the same),
  // so it needs to be called here.

  ///   "init" return value indicates whether intitialisation has succeeded
  ///   "changed" parameter indicates whether the config has actually changed

  bool changed(true);
  if (hltConfig_.init(iRun,iSetup,processName_,changed)) {
      if (changed) {
        const vector<string> triggerNamesInDS = hltConfig_.datasetContent(datasetName_);
         for (unsigned i = 0; i < triggerNamesInDS.size(); i++) {
            cout<<triggerNamesInDS[i]<<endl;
          }
	    }
  }

}
Before compiling, change your Demo/DemoAnalyzer/BuildFile.xml to include the HLTrigger/HLTcore package, where the HLTConfigProvider resides:
<use name="FWCore/Framework"/>
<use name="FWCore/PluginManager"/>
<use name="DataFormats/MuonReco"/>
<use name="FWCore/ParameterSet"/>
<use name="HLTrigger/HLTcore"/>
<flags EDM_PLUGIN="1"/>
<export>
   <lib name="1"/>
</export>
Compile the code the usual way:
scram b
Now, let’s modify the configuration file Demo/DemoAnalyzer/demoanalyzer_cfg.py to adapt it to our exercise. First, let’s go back to logging for each event (and not for every 5) and change the number of events to -1, so we can run over all of them. Alo, change the PoolSource file; replace it with a couple of files from your dataset selection. Also, comment out what we had done for extracting the muon information and adding the HLTHighLevel filter, and replace it with parameters we need at configuration. The config file should look something like:
import FWCore.ParameterSet.Config as cms

process = cms.Process("Demo")

process.load("FWCore.MessageService.MessageLogger_cfi")
process.MessageLogger.cerr.FwkReport.reportEvery = 1

process.maxEvents = cms.untracked.PSet( input = cms.untracked.int32(-1) )

process.source = cms.Source("PoolSource",
    # replace 'myfile.root' with the source file you want to use
    fileNames = cms.untracked.vstring(
    #    'file:myfile.root'
	#'root://eospublic.cern.ch//eos/opendata/cms/Run2011A/ElectronHad/AOD/12Oct2013-v1/20001/001F9231-F141-E311-8F76-003048F00942.root'
    'root://eospublic.cern.ch//eos/opendata/cms/Run2012B/TauPlusX/AOD/22Jan2013-v1/20000/0040CF04-8E74-E211-AD0C-00266CFFA344.root',
    'root://eospublic.cern.ch//eos/opendata/cms/Run2012C/TauPlusX/AOD/22Jan2013-v1/310001/0EF85C5C-A787-E211-AFC9-003048C6942A.root'
    )
)
#needed to cache the conditions data
process.load('Configuration.StandardSequences.FrontierConditions_GlobalTag_cff')
process.GlobalTag.connect = cms.string('sqlite_file:/cvmfs/cms-opendata-conddb.cern.ch/FT_53_LV5_AN1_RUNA.db')
process.GlobalTag.globaltag = 'FT_53_LV5_AN1::All'

process.mytrigger = cms.EDAnalyzer('DemoAnalyzer',
	#InputCollection = cms.InputTag("muons")
    processName = cms.string("HLT"),
    datasetName = cms.string("TauPlusX"), #specific dataset example (for dumping info)
)

#process.load("HLTrigger.HLTfilters.hltHighLevel_cfi")
#process.hltHighLevel.HLTPaths = cms.vstring('HLT_Mu15*')


#process.p = cms.Path(process.hltHighLevel+process.demo)
process.p = cms.Path(process.mytrigger)
Note that the process name is always HLT for data that was processed with the online system.
Let’s run:
cmsRun Demo/DemoAnalyzer/demoanalyzer_cfg.py > full_triggerdump.log 2>&1 &
Now check the output. Do you notice anything?
What kind of output did you get?
For us, with the selected dataset files we get:
28-Sep-2020 20:36:02 CEST  Successfully opened file root://eospublic.cern.ch//eos/opendata/cms/Run2012B/TauPlusX/AOD/22Jan2013-v1/20000/0040CF04-8E74-E211-AD0C-00266CFFA344.root
Here is the information passed to the constructor:
Configuration:
   ProcessName = HLT
   DataSetName = TauPlusX
HLT_Ele22_eta2p1_WP90NoIso_LooseIsoPFTau20_v2
HLT_Ele22_eta2p1_WP90Rho_LooseIsoPFTau20_v2
HLT_IsoMu15_eta2p1_L1ETM20_v5
HLT_IsoMu15_eta2p1_LooseIsoPFTau35_Trk20_Prong1_L1ETM20_v6
HLT_IsoMu17_eta2p1_LooseIsoPFTau20_v2
HLT_IsoMu18_eta2p1_MediumIsoPFTau25_Trk5_eta2p1_v7
HLT_Mu15_eta2p1_L1ETM20_v3
HLT_Mu17_eta2p1_LooseIsoPFTau20_v2
Begin processing the 1st record. Run 194075, Event 14880766, LumiSection 48 at 28-Sep-2020 20:36:11.193 CEST

....

28-Sep-2020 20:36:21 CEST  Successfully opened file root://eospublic.cern.ch//eos/opendata/cms/Run2012C/TauPlusX/AOD/22Jan2013-v1/310001/0EF85C5C-A787-E211-AFC9-003048C6942A.root
HLT_Ele22_eta2p1_WP90NoIso_LooseIsoPFTau20_v6
HLT_Ele22_eta2p1_WP90Rho_LooseIsoPFTau20_v6
HLT_IsoMu15_eta2p1_L1ETM20_v7
HLT_IsoMu15_eta2p1_LooseIsoPFTau35_Trk20_Prong1_L1ETM20_v9
HLT_IsoMu17_eta2p1_LooseIsoPFTau20_v6
HLT_IsoMu18_eta2p1_MediumIsoPFTau25_Trk1_eta2p1_v3
HLT_Mu15_eta2p1_L1ETM20_v5
HLT_Mu17_eta2p1_LooseIsoPFTau20_v6
Begin processing the 16127th record. Run 200041, Event 386077374, LumiSection 310 at 28-Sep-2020 20:36:27.618 CEST
In our example, we immediately notice that the configuration changes for different epochs in the 2012 data taking period: the trigger versions are different. This could mean a modification of some parameter in the trigger, which does not affect the main characteristics, but maybe make it more efficient. In the next section we will explore one of these triggers to get acquainted with the way we can find more information.
The bottom line is that one would need to inspect the triggers in this way in order to find a trigger or a set of triggers that are available during the whole run range of interest and make sure that they are available when we try to call them.
Understanding the triggers using a trigger menu config file
There is some information that we could extract from the names of the triggers in that list. For instance, the IsoMu or Mu in the names might indicate the presence of a muon, and the LoosePFTau string could indicate the requirement of a tau particle. If that is the case, then we could select, for instance the HLT_IsoMu17_eta2p1_LooseIsoPFTau20_v? incarnations of this trigger for our analysis (the ? wildcard takes the place of any digit). The numbers generally mean a minimum requirement in transverse momentum, pT. But how to be sure?
We can inspect further. If you go to the portal page of that trigger you will see the different versions and corresponding run ranges. Towards the bottom of that page you will find a link to the Trigger information for 2012 CMS open data, which will open a table like the one below:
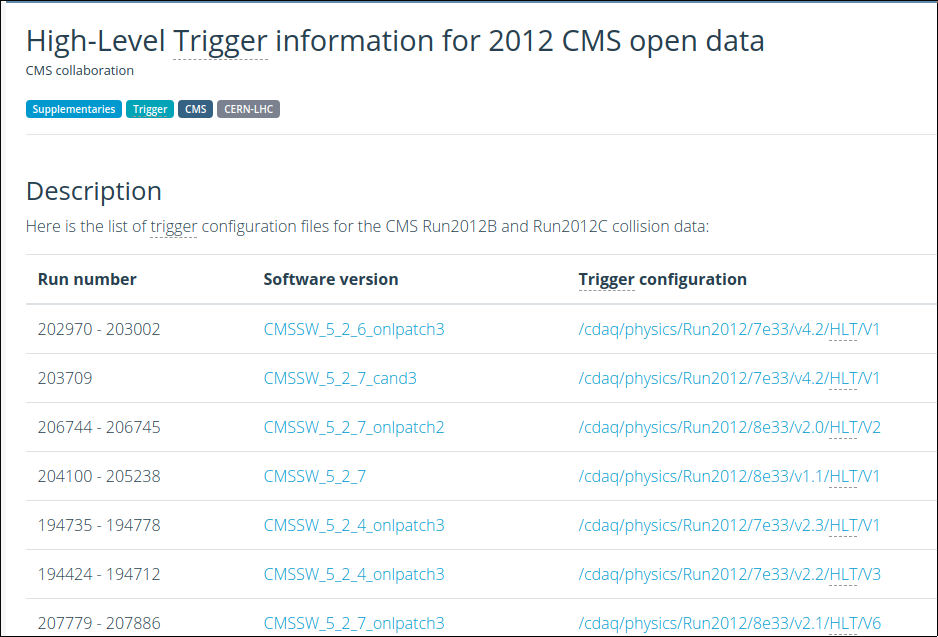
The page presents the HLT CMSSW configuration files (aka trigger menus) that were used for different run ranges. Although very, very long, those configuration files have the same structure as any CMSSW config file. I.e., we can see how the trigger was configured and check all the parameters that were used in defining its working software.
Let’s pretend we are interested in studying the v3of this trigger. That would correspond to the run range 198249 - 199021 in the page with the trigger menus. If we click on the config file we will be taken to this page from where we can download the config file.
Now, open the config file and search for HLT_IsoMu17_eta2p1_LooseIsoPFTau20_v3. You will immediately see that, indeed, this incarnation of the trigger exists in this config file.
Then, you can search for HLT_IsoMu17_eta2p1_LooseIsoPFTau20_v3 =. This will prompt you to see the line where the trigger path (in the CMSSW sense) is defined:
process.HLT_IsoMu17_eta2p1_LooseIsoPFTau20_v3 = cms.Path( process.HLTBeginSequence + process.hltL1sMu14erORMu16er + process.hltPreIsoMu17eta2p1LooseIsoPFTau20 + process.hltL1fL1sMu14erORMu16erL1Filtered0 + process.HLTL2muonrecoSequence + process.hltL2fL1sMu14erORMu16erL1f0L2Filtered14Q + process.HLTL3muonrecoSequence + process.hltL3fL1sMu14erORMu16erL1f0L2f14QL3Filtered17Q + process.HLTL3muoncaloisorecoSequenceNoBools + process.HLTL3muonisorecoSequence + process.hltL3crIsoL1sMu14erORMu16erL1f0L2f14QL3f17QL3crIsoRhoFiltered0p15 + process.HLTRecoJetSequencePrePF + process.hltTauJet5 + process.HLTPFJetTriggerSequenceMuTau + process.hltPFJet20 + process.HLTIsoMuLooseIsoPFTauSequence + process.HLTEndSequence )
It has several modules and sequences that make up its entire implementation. All those modules and sequences exist in the same config file, so you can search for them to find out more about the trigger. Right away, however, you can see that at least one of the taus is being consider as a jet, just like a hadronic decay would indicate. If you want to explore some module, for example hltPFJet20, you can search for it and find:
process.hltPFJet20 = cms.EDFilter( "HLT1PFJet",
  saveTags = cms.bool( False ),
  MinPt = cms.double( 20.0 ),
  MinN = cms.int32( 1 ),
  MaxEta = cms.double( 2.5 ),
  MinMass = cms.double( -1.0 ),
  inputTag = cms.InputTag( "hltAntiKT5PFJets" ),
  MinE = cms.double( -1.0 ),
  triggerType = cms.int32( 84 )
)
This module is an incarnation of a filter named HLT1PFJet, which, if you are getting certain intuition about CMSSW, will find out is a filter recast of the PFJet Producer.
Challenge!
You can complete this on overtime, no problem!
By searching for and exploring the second to last Sequence, i.e.,
HLTIsoMuLooseIsoPFTauSequence, can you name the module which is ultimately responsible for setting the17 GeVpT cut on the muon leg of these events?solution
After some searching within the config file, and connecting the dots, you will find that the name of that module is
hltL3fL1sMu14erORMu16erL1f0L2f14QL3Filtered17Q, which is an incarnation of theHLTMuonL3PreFilter.
Where you able to spot it?
Key Points
The most reliable way of inspecting the trigger information is through the CMSSW HLT trigger tools.
The details for a given trigger can be explored through the CMSSW configuration and/or C++ implementation.