Check access to TIFR (Jan 5)
Overview
Teaching: 0 min
Exercises: 0 minQuestions
Can you log in to TIFR to use condor?
Objectives
Learn the workshop login commands for TIFR and test your access.
Log in with ssh
For this lesson, many temporary accounts have been created on a TIFR computing cluster. The local facilitators will provide you with a username and password to use for this activity. If you are following this lesson apart from the local group at WHEPP, please reach out on the Mattermost channel to request login credentials.
In a terminal on your local computer (NOT inside a docker container), use ssh to connect to the cluster:
$ ssh userXX@ui3.indiacms.res.in # replace XX with the number provided to you
After entering the password, you should see the following on your screen:
bob@localpc:wheep2024$ ssh user1@ui3.indiacms.res.in
user1@ui3.indiacms.res.in's password:
Last login: Wed Jan  3 11:30:53 2024 from 14.139.98.164
Wed Jan  3 11:38:15 IST 2024
Welcome to the TIFR-INDIACMS computing cluster.
Please note that the persistant storage quota at the $HOME area is 5 GB.
Use $HOME/t3store/ for your storage needs.

For whepp participants, if you need access to the storage and computing resources post-expiration of your account, please contact the organizers of opendata-workshop.
[user1@ui3 ~]$
Discussion prompts
- How much storage space do these TIFR accounts have?
- How long will this TIFR account be active?
- How can I reach out for support?
Great! You’re now set up for the rest of the lesson on January 10.
Key Points
Logging in to the TIFR cluster is easy for workshop participants!
Logistics of an Open Data analysis (Jan 10)
Overview
Teaching: 20 min
Exercises: 0 minQuestions
What does a full CMS analysis workflow contain?
What is the role of distributed computing in an Open Data analysis?
What resources exist for Open Data distributed computing?
Objectives
Understand the scope of computation for a typical CMS analysis.
Identify elements of an analysis workflow that would benefit from distributed computing.
Access tutorials for HTCondor and Google Cloud workflows.
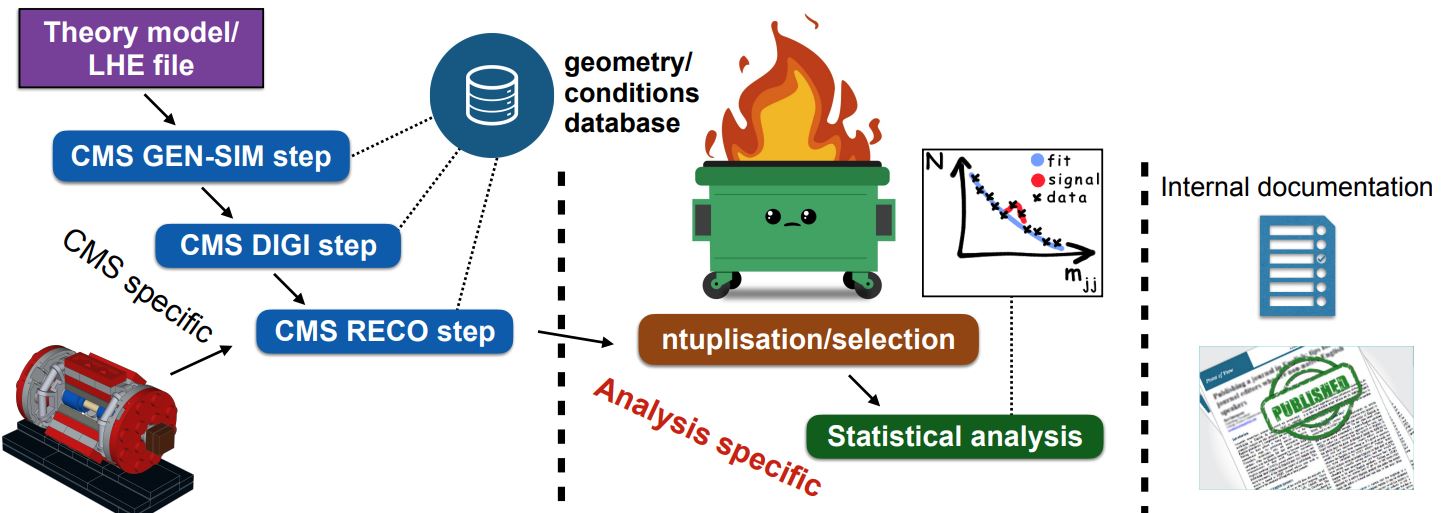
In the Simplified Run 2 analysis lesson you learned tools to take POET ROOT files and apply event and/or physics object selections to form an analysis. This is a key element of forming a search or measurement using CMS Open Data. How does it fit into the whole picture?
The image above shows where a user’s analysis falls in the grand scheme of CMS. The Open Data provides you with everything in the left column: all of the official CMS processing of the raw data has been done to produce AOD or MiniAOD ROOT files published on the Open Data Portal. The software behind these files is accessible to anyone who wishes to take a deep dive! From your own work, you are likely very familiar with the process described in the right column: documenting and publishing an analysis. What you have learned in this workshop is how to perform some of the steps required for the central, analysis specific, column.
We can’t tell you what to do!
As you might expect, the workflow of any analysis is, by definition, ``analysis specific”! This episode is intended to give you a flavor of a workflow, it’s not exhaustive.
An analysis workflow
There are as many unique analysis workflows as there are physicists! But here is one outline:
-
Skimming and flattening: you’ve seen how the POET software can perform this step in the Physics Objects lesson. To analyze Open Data from 2011 – 2015 this will always be the first step! In the future, CMS will also release
NanoAODfiles that are similar in structure to POET files so many users will not need to perform a ``flattening” step. - Generate observables: if POET or NanoAOD files are available, the next (or potentially first) analysis step is to use the physics object data in those ROOT files to generate observables of interest for a certain analysis.
- In the example top quark analysis, this step applied the event selection and computed the invariant mass of the hadronic top quark.
- Most CMS analysts compute many observables related to both signal and background event topologies, and might incorporate machine learning methods for additional event selection information and/or interesting observables.
- This analysis step can be done in C++ or python using software like ROOT and uproot that can interpret the input TTree objects.
- Analyze! This is the point at which analysis workflows become very unique based on the user’s needs. You might:
- Determine how to model background processes. If background will be modeled from data, separate selection regions are typically defined and fitted functions or transfer factors are computed to provide an estimate of background in a signal-enriched region.
- Measure efficiencies of various selection criteria to determine transfer factors and/or systematic uncertainties.
- Visualize your data by creating histograms or other plots, usually incorporating multiple data and simulation sources representing both signal and background.
- Train a machine learning technique to discriminate signal from background
- and many other possible tasks!
- Final observables: at this point you might need to loop back to “Generating observables” and add new variables to your analysis based on what you have learned from initial analysis of your data. Eventually, CMS analysts arrive at a set of final observables:
- Counting experiment: the simplest observable is the number of events passing a set of selection criteria. Event counts for signal and background processes, along with their uncertainties, can be extracted from histograms or functional forms.
- Histograms: signal and background distributions for an observable of interest can be stored as histograms so that event counts in multiple bins of a distribution can be used for statistical inference.
- Functional forms: in some analyses, the shape of the signal and/or background processes for the observable of interest might be described using functional forms.
- Statistical inference: the final step of most CMS analyses is to determine the rate of predicted signal that is consistent with the data, by fitting Data = BackgroundPrediction + Rate*SignalPrediction. The CMS ``Higgs Combine” software is publically accessible for performing such fits, and the bonus material for the example analysis shares a python-based option for performing statistical analysis
Incorporating distributed processing
Theoretically, any of the preceeding analysis elements can be done using distributed computing! But the early steps of processing AOD or MiniAOD files and generating observables stored in your preferred data formats benefit the most from parallelization. In many cases it would not be computationally feasible to analyze all the MiniAOD required for a typical analysis on one personal computer.
Previous CMS Open Data Workshops have presented an example workflow for parallelization that:
- Produces a POET file from AOD or MiniAOD
- Merges the POET files from many parallel jobs
- Produces an example plot from the merged file
With modern columnar analysis tools, it has become reasonably fast and accessible to perform later analysis steps on POET or NanoAOD files on a local machine, as you can see in the top quark analysis example.
Preparing and executing analysis jobs
After identifying or developing the processing you would like to perform on CMS Open Data files, such as running POET on MiniAOD files, the first task is to determine which datasets will be included.
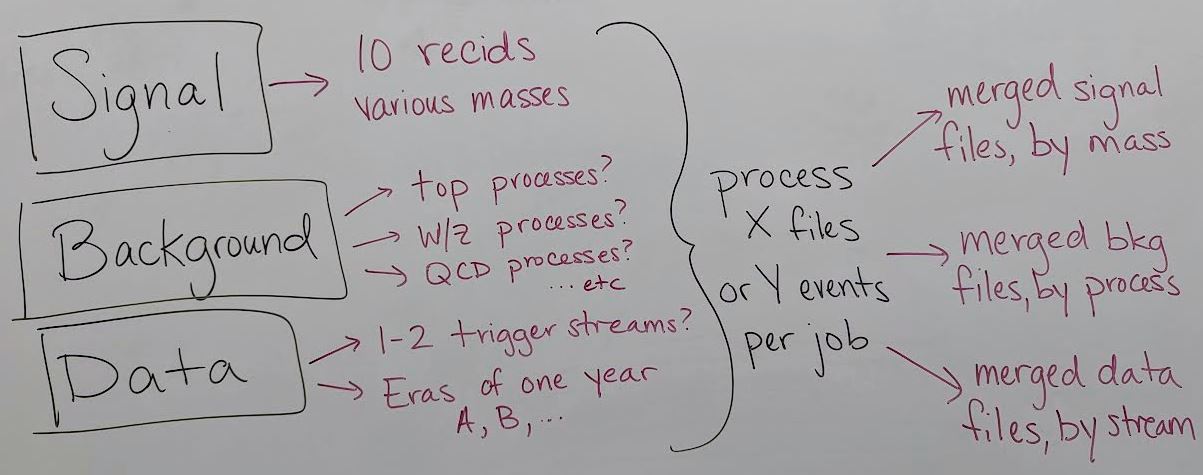
This image shows a list of records that might be used to search for a certain BSM signal, using simulation to model background. The simulated processes for signal and background need to be identified on the Portal as well as the collision data to which the simulation will be compared (review the dataset scouting lesson!). A simulation-driven analysis can easily build up 30 - 50 Open Data records to be processed, especially if systematic uncertainty variation samples exist for some background processes.
Testing your software on your personal machine is a good way to determine how much time is required to analyze a certain number of MiniAOD files, or a certain number of events. The distributed computing tools we will show you allow either type of division for your jobs.
Finally, the results of the parallel processing for each unique process can be merged such that the final result is a small number of data files representing each individual signal, background, and data process.
Google Cloud processing
The 2023 CMS Open Data Workshop featured a lesson on using Google Cloud services to perform Open Data analysis at scale. After any available free trial is used, this method incurs costs based on your usage.
HTCondor processing
Many researchers affiliated with universities or laboratories may have access to Linux computing clusters. As you saw in the pre-exercise, this workshop will use the TIFR cluster to submit analysis jobs.
Key Points
Computation for a CMS analysis is typically run in several steps: dataset skimming / flattening, observable creation, visualization, and statistical analysis.
Early steps such as dataset skimming and observable creation often particularly benefit from distributed computing.
The CMS Open Data Workshops provide tutorials for performing these analysis steps on either HTCondor or Google Cloud platforms.
HTCondor submission
Overview
Teaching: 20 min
Exercises: 0 minQuestions
How can I use the CMSSW docker container in a condor job?
How can I divide a dataset up into several jobs?
How do I track the progress of condor jobs?
Objectives
Understand the example scripts for running POET in a container on condor
Learn the basics of submitting and monitoring HTcondor jobs
Download example scripts
As you tested earlier in the workshop, please log in to the TIFR cluster:
$ ssh userXX@ui3.indiacms.res.in # replace XX with the number provided to you
The example scripts for this HTCondor exercise were prepared by one of the student facilitators, Aravind Sugunan. Download the scripts from Github:
$ git clone https://github.com/ats2008/condorLite
$ cd condorLite
Condor executable
HTCondor jobs execute a bash script on the workder node for each job. This script is called templates/runScript.tpl.sh. It is a template with many dummy variables that will be overwritten when a specific copy is made for each job.
The apptainer (previously singularity) software can be used to access software containers and execute scripts within those containers. Our condor executable has the following basic outline:
- Set environment variables and create a working directory
- Write a bash script containing POET analysis commands
- Execute the analysis script using
apptainer
POET analysis commands
The analysis script to be run inside the container is found in the middle of runScript.tpl.sh:
cd /code
source /cvmfs/cms.cern.ch/cmsset_default.sh
scram p CMSSW_7_6_7
cd CMSSW_7_6_7/src/
git clone -b 2015MiniAOD https://github.com/ats2008/PhysObjectExtractorTool.git
scram b -j 4
cmsenv    # Note: perform git access before this command!
cd $_CONDOR_SCRATCH_DIR
cmsRun /code/CMSSW_7_6_7/src/PhysObjectExtractorTool/PhysObjectExtractor/python/poet_cfg.py  @@ISDATA inputFiles=@@FNAMES maxEvents=@@MAXEVENTS outputFile=outfile_@@IDX.root tag=@@TAG
pwd
ls
cp *.root $DESTINATION
exit 1
Inside the Open Data docker container, this script will set up the CMS environment and create a CMSSW_7_6_7 software area, similar to what is done when you open the
container using docker on your own computer. The script will then clone the 2015 branch of the POET repository from Github and use
cmsRun to run POET with several arguments:
- the data or simulation flag
- an input file list
- the maximum number of events to process (-1 for all events)
- the output file name, tagged with a job number
- a ``tag”, or label, that you can use to mark this job in any way you wish
Finally, the script copies the POET output ROOT file to a specified destination directory.
I want to edit POET, what do I do?
Editing the POET configuration, for instance to apply a trigger filter or other event selection, is a great way to reduce the size of the output ROOT files! We recommend developing your POET revisions on your own computer, pushing them to your own fork of the POET Github repository, and cloning that version in the analysis commands here.
Clusters without interactive file system mounts
Some Linux clusters do not provide access to the interactive user file systems on the worker nodes. If this is the case on your home cluster, the
cpcommand can be replaced with a command appropriate for your system.
Execution with apptainer
Since the cmsRun command is not accessible in the operating system of the worker node, this prepared set of analysis
commands is run using apptainer:
cat container_runScript.sh  # this will display all the commands to be run in apptainer
chmod +x container_runScript.sh
apptainer exec --writable-tmpfs --bind $_CONDOR_SCRATCH_DIR --bind workdir/:/code --bind @@DESTINATION docker://cmsopendata/cmssw_7_6_7-slc6_amd64_gcc493 ./container_runScript.sh
The arguments include binding (similar to -v or –volume docker argument) several directories to which apptainer will have access. These directories include the working directory, output directory and the condor base directory. The other argumnets include dockerhub URL of the container needed for 2015 Open Data analysis, and the analysis script that is to be run inside the container.
What if my cluster doesn’t have Apptainer?
Consult with your computing system administrators to see if apptainer can be installed on the cluster. Follow our lesson on using Google Cloud resources for an alternative method of running over full datasets.
Can I do more than run POET?
Of course! In this example we have chosen to simply produce a POET root file from MiniAOD input files.
You can check out additional code repositories (note: do this before the cmsenv command, which affects the git path settings) and execute further analysis commands after creating a POET
root file.
Do I need apptainer after POET?
Maybe not. Python-based analysis scripts can likely be run directly on a condor worker node if the native python distribution can provide the packages you want to use. However, the
apptainerexecution command shown here for the CMSSW container can be adapted to use either the ROOT or Python containers that you have seen in this workshop.
Submitting the condor jobs
Now we will explore the condor submission script in scripts/makeCondorJobs.py. At the top of this script
is a template for a job control file:
condorScriptString="\
executable = $(filename)\n\
output = $Fp(filename)run.$(Cluster).stdout\n\
error = $Fp(filename)run.$(Cluster).stderr\n\
log = $Fp(filename)run.$(Cluster).log\n\
"
Condor job control files have lines that configure various job behaviors, such as which executable file to send to the worker node and what names to use for output and error files. Different condor clusters will allow different specific lines for requesting CPU or memory, for directing jobs to different queues within the cluster, for passing command line arguments to the executable, etc.
The official HTCondor Manual Quickstart Guide provides a good overview of the condor job submission syntax.
Arguments to configure
Our condor submission script can accept several arguments:
parser = argparse.ArgumentParser()
parser.add_argument('-s',"--submit", help="Submit file to condor pool", action='store_true' )
parser.add_argument('-r',"--resubmit", help="Re-Submit file to condor pool", action='store_true' )
parser.add_argument('-t',"--test", help="Test Job", action='store_true' )
parser.add_argument(     "--isData"     , help="is the job running over datafiles ?", action='store_true' )
parser.add_argument('-j',"--njobs", help="Number of jobs to make",default=-1,type=int)
parser.add_argument('-n',"--nFilesPerJob", help="Number of files to process per job",default=1,type=int)
parser.add_argument('-e',"--maxevents", help="Number of events per job",default=-1, type=int)
parser.add_argument('-f',"--flist", help="Files to process",default=None)
parser.add_argument(     "--recid", help="recid of the dataset to process",default=None)
parser.add_argument("--run_template", help="RunScript Template",default='')
parser.add_argument("--tag", help="Tag or vesion of the job",default='condor')

args = parser.parse_args()
In order to submit jobs you will need to provide either a text file with a list of Open Data ROOT files to process or the ``recid” of an Open Data dataset. You can create such a filelist by looking up your dataset on the Open Data Portal webpage or by using the command line tool presented in the dataset scouting lesson. The recid for any dataset can be found in the URL of that dataset on the portal website, and the cernopendata-client command line interface will be used to access the list of files for that dataset. All of the other arguments have a default value that you can configure as desired.
Installing cernopendata-client
On TIFR,
cernopendata-clientis accessible by default. To install it on your own system, see the installation instructions on the client’s user manual website. The installation can be checked by running:$ ./local/bin/cernopendata-client versionNote: you may need to edit
makeCondorJobs.pyto point to./local/bin/cernopendata-client/.Note: the instructions assume that python3 is the default python program on the system. If your system has python3 available but uses python2 as the default, use
pip3 installin place of the genericpip install.
Prepare tailored executable files
After parsing the user’s command-line arguments, and optionally generating a file list from cernopendata-client, the script will prepare individual executable files for each
job. The specified number of files per job will be taken in sequence from the file list, an output file directory will be prepared, and all of the dummy values in the template executable that begin with @@ will be overwritten:
print(f"Making Jobs in {runScriptTemplate} for files from {filelistName}")
jobid=0
while fileList and jobid < args.njobs:
    jobid+=1
    flsToProcess=[]
    for i in range(args.nFilesPerJob):
        if not fileList:
            break
        flsToProcess.append(fileList.pop())

    fileNames=','.join(flsToProcess)
    dirName  =f'{head}/Job_{jobid}/'
    if not os.path.exists(dirName):
        os.system('mkdir -p '+dirName)
    if not os.path.exists(destination):
        os.system('mkdir -p '+destination)

    runScriptName=dirName+f'/{htag}_{jobid}_run.sh'
    if os.path.exists(runScriptName+'.sucess'):
       os.system('rm '+runScriptName+'.sucess')
    runScript=open(runScriptName,'w')
    tmp=runScriptTxt.replace("@@DIRNAME",dirName)
    tmp=tmp.replace("@@TAG",str(args.tag))
    tmp=tmp.replace("@@ISDATA",str(args.isData))
    tmp=tmp.replace("@@PWD",pwd)
    tmp=tmp.replace("@@IDX",str(jobid))
    tmp=tmp.replace("@@FNAMES",fileNames)
    tmp=tmp.replace("@@MAXEVENTS",str(args.maxevents))
    tmp=tmp.replace("@@RUNSCRIPT",runScriptName)
    tmp=tmp.replace("@@DESTINATION",destination)
    runScript.write(tmp)
    runScript.close()
    os.system('chmod +x '+runScriptName)
Submit the jobs
Finally, the individual condor job control scripts are prepared to point to specific executable files, and
the condor_submit command is called to submit each control script to the condor job queue.
print("Condor Jobs can now be submitted by executing : ")
for fle in allCondorSubFiles:
    print('condor_submit '+fle)
    if args.submit or args.resubmit:
        os.system('condor_submit '+fle)
print("")
Key Points
The condor job control file can specify a docker container.
Each job’s executable file can specify code to access from Github to perform an analysis task.
References are included here to condor submission and monitoring guides.
Run your analysis
Overview
Teaching: 0 min
Exercises: 40 minQuestions
Can you run POET through apptainer in a condor job?
Can you merge the output files?
Can you export the merged files to your laptop?
Objectives
Test running condor jobs for the CMSSW Open Data container
Learn the
haddcommand for merging ROOT filesCopy files out of TIFR onto your personal machine
Let’s submit a job!
If you have logged out of TIFR, log back in and go to your condor script area:
$ ssh userXX@ui3.indiacms.res.in
$ cd condorLite/
One example file list has been created for you. Explore its contents in a text editor or using cat:
$ cat filelists/DYJetsToLL_13TeV_MINIAODSIM.fls
You will see many ROOT file locations with the ``eospublic” access URL:
root://eospublic.cern.ch//eos/opendata/cms/mc/RunIIFall15MiniAODv2/DYJetsToLL_M-50_TuneCUETP8M1_13TeV-madgraphMLM-pythia8/MINIAODSIM/PU25nsData2015v1_76X_mcRun2_asymptotic_v12_ext1-v1/10000/004544CB-6DD8-E511-97E4-0026189438F6.root
root://eospublic.cern.ch//eos/opendata/cms/mc/RunIIFall15MiniAODv2/DYJetsToLL_M-50_TuneCUETP8M1_13TeV-madgraphMLM-pythia8/MINIAODSIM/PU25nsData2015v1_76X_mcRun2_asymptotic_v12_ext1-v1/10000/0047FF1A-70D8-E511-B901-0026189438F4.root
root://eospublic.cern.ch//eos/opendata/cms/mc/RunIIFall15MiniAODv2/DYJetsToLL_M-50_TuneCUETP8M1_13TeV-madgraphMLM-pythia8/MINIAODSIM/PU25nsData2015v1_76X_mcRun2_asymptotic_v12_ext1-v1/10000/00EB960E-6ED8-E511-9165-0026189438E2.root
root://eospublic.cern.ch//eos/opendata/cms/mc/RunIIFall15MiniAODv2/DYJetsToLL_M-50_TuneCUETP8M1_13TeV-madgraphMLM-pythia8/MINIAODSIM/PU25nsData2015v1_76X_mcRun2_asymptotic_v12_ext1-v1/10000/025286B9-6FD8-E511-BDA0-0CC47A78A418.root
root://eospublic.cern.ch//eos/opendata/cms/mc/RunIIFall15MiniAODv2/DYJetsToLL_M-50_TuneCUETP8M1_13TeV-madgraphMLM-pythia8/MINIAODSIM/PU25nsData2015v1_76X_mcRun2_asymptotic_v12_ext1-v1/10000/02967670-70D8-E511-AAFC-0CC47A78A478.root
root://eospublic.cern.ch//eos/opendata/cms/mc/RunIIFall15MiniAODv2/DYJetsToLL_M-50_TuneCUETP8M1_13TeV-madgraphMLM-pythia8/MINIAODSIM/PU25nsData2015v1_76X_mcRun2_asymptotic_v12_ext1-v1/10000/02AB0BD2-6ED8-E511-835B-00261894393A.root
root://eospublic.cern.ch//eos/opendata/cms/mc/RunIIFall15MiniAODv2/DYJetsToLL_M-50_TuneCUETP8M1_13TeV-madgraphMLM-pythia8/MINIAODSIM/PU25nsData2015v1_76X_mcRun2_asymptotic_v12_ext1-v1/10000/02FE246D-71D8-E511-971A-0CC47A4D761A.root
root://eospublic.cern.ch//eos/opendata/cms/mc/RunIIFall15MiniAODv2/DYJetsToLL_M-50_TuneCUETP8M1_13TeV-madgraphMLM-pythia8/MINIAODSIM/PU25nsData2015v1_76X_mcRun2_asymptotic_v12_ext1-v1/10000/0626FEB3-70D8-E511-A5B1-0CC47A4D765A.root
...and more...
Submit condor jobs that will each process the first 5000 events from a list of 2 MiniAOD files. Since this is a small-scale test, cap the number of jobs at 4 (this will not process the entire Drell-Yan dataset). You have two options for submitting these jobs. First, you could reference the file list:
$ python3 scripts/makeCondorJobs.py -f filelists/DYJetsToLL_13TeV_MINIAODSIM.fls --tag DYJetsToLL_v1 -n 2 -j 4 -e 5000 --run_template templates/runScript.tpl.sh
Alternately, you can reference the recid of this Drell-Yan dataset:
$ python3 scripts/makeCondorJobs.py --recid 16446 --tag DYJetsToLL_v1 -n 2 -j 4 -e 5000 --run_template templates/runScript.tpl.sh
To test your script please try out executing one of made jobs : ( we recommend that you do this atleast once before submitting the jobs.)
$ ./Condor/odw_poet/poetV1_DYJetsToLL_v1/Job_1/poetV1_DYJetsToLL_v1_1_run.sh
To submit the jobs to the condor cluster you can either use the manual submission by using condor_submit command, or add -s while calling the scripts/makeCondorJobs.py script, as below
$ python3 scripts/makeCondorJobs.py --recid 16446 --tag DYJetsToLL_v1 -n 2 -j 4 -e 5000 --run_template templates/runScript.tpl.sh -s
You will first be asked to confirm that you really want to submit jobs, because we have included the -s argument in this command. Type y to confirm.
If you wish to inspect the submission scripts first, leave off -s and use the condor_submit command printed in the output to submit the jobs later.
You will see something like the following output when you submit jobs, with slight differences between the filelist -f and --recid submission options:
[userXX@ui3 condorLite]$ python3 scripts/makeCondorJobs.py  -f filelists/DYJetsToLL_13TeV_MINIAODSIM.fls --tag DYJetsToLL_v1 -n 2 -j 4 -e 5000 --run_template templates/runScript.tpl.sh -s
Do you really want to submit the jobs to condor pool ? y
 Number of jobs to be made  4
 Number of events to process per job   5000
 Tag for the job  DYJetsToLL_v1
 Output files will be stored at  /home/userXX/condorLite/results/odw_poet/poetV1_DYJetsToLL_v1/
 File list to process :  filelists/DYJetsToLL_13TeV_MINIAODSIM.fls

Making Jobs in templates/runScript.tpl.sh for files from filelists/DYJetsToLL_13TeV_MINIAODSIM.fls

4 Jobs made !
         submit file  : /home/userXX/condorLite/Condor/odw_poet/poetV1_DYJetsToLL_v1//jobpoetV1_DYJetsToLL_v1.sub


Condor Jobs can now be submitted by executing :
condor_submit /home/userXX/condorLite/Condor/odw_poet/poetV1_DYJetsToLL_v1//jobpoetV1_DYJetsToLL_v1.sub
Submitting job(s)....
4 job(s) submitted to cluster CLUSTERID.  # your CLUSTERID will be a number
Monitoring condor jobs
HTCondor supports many commands that can provide information on the status of job queues and a user’s submitted jobs. Details are availabel in the HTCondor manual for managing a job. Three extremely useful commands are shared here.
To see the status of your jobs:
$ condor_q
-- Schedd: ui3.indiacms.res.in : <144.16.111.98:9618?... @ 01/03/24 10:06:52
OWNER  BATCH_NAME      SUBMITTED   DONE    RUN    IDLE  TOTAL JOB_IDS
userXX ID: CLUSTERID  1/3  10:03      _      5      _      5  CLUSTERID.JOBIDs

Total for query: 5 jobs; 0 completed, 0 removed, 0 idle, 5 running, 0 held, 0 suspended
Total for userXX: 5 jobs; 0 completed, 0 removed, 0 idle, 5 running, 0 held, 0 suspended
Total for all users: 5 jobs; 0 completed, 0 removed, 0 idle, 5 running, 0 held, 0 suspended
This command shows the cluster identification number for each set of jobs, the submission time, how many jobs are running or idle, and the individual id numbers of the jobs.
To remove a job cluster that you would like to kill:
$ condor_rm CLUSTERID # use CLUSTERID.JOBID to kill a single job in the cluster
All jobs in cluster CLUSTERID have been marked for removal
Job output
These short test jobs will likely only take a few minutes to complete. The submission command output points out the directories that will contain the
condor job information and the eventual output files from the job. You can study the condor job’s executable script, resource use log,
error file, and output file in the newly created Condor folder:
[userXX@ui3 condorLite]$ ls Condor/odw_poet/poetV1_DYJetsToLL_v1/ # each unique "tag" you provide when submitting jobs will get a unique folder
Job_1  Job_2  Job_3  Job_4  jobpoetV1_DYJetsToLL_v1.sub

[userXX@ui3 condorLite]$ ls Condor/odw_poet/poetV1_DYJetsToLL_v1/Job_1
poetV1_DYJetsToLL_v1_1_run.sh  run.1195980.log  run.1195980.stderr  run.1195980.stdout
The output files can be found in the results folder:
[userXX@ui3 condorLite]$ ls -lh results/odw_poet/poetV1_DYJetsToLL_v1/
total 32M
-rw-r--r-- 1 user1 user1 7.8M Jan  3 21:47 outfile_1_DYJetsToLL_v1_numEvent5000.root
-rw-r--r-- 1 user1 user1 7.8M Jan  3 21:46 outfile_2_DYJetsToLL_v1_numEvent5000.root
-rw-r--r-- 1 user1 user1 7.9M Jan  3 21:46 outfile_3_DYJetsToLL_v1_numEvent5000.root
-rw-r--r-- 1 user1 user1 7.8M Jan  3 21:47 outfile_4_DYJetsToLL_v1_numEvent5000.root
We can take advantage of the fact that the TIFR cluster also has ROOT installed by default to inspect one of these output files:
[userXX@ui3 condorLite]$ root results/odw_poet/poetV1_DYJetsToLL_v1/outfile_1_DYJetsToLL_v1_numEvent5000.root

   ------------------------------------------------------------------
  | Welcome to ROOT 6.24/08                        https://root.cern |
  | (c) 1995-2021, The ROOT Team; conception: R. Brun, F. Rademakers |
  | Built for linuxx8664gcc on Sep 29 2022, 13:04:57                 |
  | From tags/v6-24-08@v6-24-08                                      |
  | With c++ (GCC) 4.8.5 20150623 (Red Hat 4.8.5-44)                 |
  | Try '.help', '.demo', '.license', '.credits', '.quit'/'.q'       |
   ------------------------------------------------------------------

root [0]
Attaching file results/odw_poet/poetV1_DYJetsToLL_v1/outfile_1_DYJetsToLL_v1_numEvent5000.root as _file0...
(TFile *) 0x2b35240
root [1] _file0->ls()  # list the contents of the TFile object
TFile**         results/odw_poet/poetV1_DYJetsToLL_v1/outfile_1_DYJetsToLL_v1_numEvent5000.root
 TFile*         results/odw_poet/poetV1_DYJetsToLL_v1/outfile_1_DYJetsToLL_v1_numEvent5000.root
  KEY: TDirectoryFile   myelectrons;1   myelectrons
  KEY: TDirectoryFile   mymuons;1       mymuons
  KEY: TDirectoryFile   mytaus;1        mytaus
  KEY: TDirectoryFile   myphotons;1     myphotons
  KEY: TDirectoryFile   mypvertex;1     mypvertex
  KEY: TDirectoryFile   mygenparticle;1 mygenparticle
  KEY: TDirectoryFile   myjets;1        myjets
  KEY: TDirectoryFile   myfatjets;1     myfatjets
  KEY: TDirectoryFile   mymets;1        mymets
Each of these TDirectoryFile objects are directories that contain a tree called Events.
For any of the folders, we can access the tree on the command line for quick tests by
creating a TTree object:
root [4] TTree *tree = (TTree*)_file0->Get("myelectrons/Events");

root [5] tree->GetEntries() # Confirm the number of events in the tree
(long long) 5000

root [6] tree->Print()  # Print out the list of branches available
******************************************************************************
*Tree    :Events    : Events                                                 *
*Entries :     5000 : Total =         2096486 bytes  File  Size =     893419 *
*        :          : Tree compression factor =   2.34                       *
******************************************************************************
*Br    0 :numberelectron : Int_t number of electrons                         *
*Entries :     5000 : Total  Size=      20607 bytes  File Size  =       3509 *
*Baskets :        1 : Basket Size=      32000 bytes  Compression=   5.72     *
*............................................................................*
*Br    1 :electron_e : vector<float> electron energy                         *
*Entries :     5000 : Total  Size=     100130 bytes  File Size  =      49609 *
*Baskets :        4 : Basket Size=      32000 bytes  Compression=   2.01     *
*............................................................................*
*Br    2 :electron_pt : vector<float> electron transverse momentum           *
*Entries :     5000 : Total  Size=     100150 bytes  File Size  =      49382 *
*Baskets :        4 : Basket Size=      32000 bytes  Compression=   2.02     *
*............................................................................*

... and more ...
Merge output files
The output files from condor jobs can be many in number, and we might want to combine multiple output root files into a single file.
A sample use case will be an instance when we want to merge the POET output files from a specific dataset into a single file.
We can use ROOT’s hadd tool to achieve this. Since TIFR has ROOT installed, you can try the hadd command directly in your results area:
$ hadd results/DYJetsToLL_v1.root results/odw_poet/poetV1_DYJetsToLL_v1/*.root
hadd Target file: DYJetsToLL_v1.root
hadd compression setting for all output: 1
hadd Source file 4: results/odw_poet/poetV1_DYJetsToLL_v1/outfile_1_DYJetsToLL_v1_numEvent5000.root
hadd Source file 5: results/odw_poet/poetV1_DYJetsToLL_v1/outfile_2_DYJetsToLL_v1_numEvent5000.root
hadd Source file 6: results/odw_poet/poetV1_DYJetsToLL_v1/outfile_3_DYJetsToLL_v1_numEvent5000.root
hadd Source file 8: results/odw_poet/poetV1_DYJetsToLL_v1/outfile_5_DYJetsToLL_v1_numEvent5000.root
hadd Target path: DYJetsToLL_v1.root:/
hadd Target path: DYJetsToLL_v1.root:/myelectrons
hadd Target path: DYJetsToLL_v1.root:/mymuons
hadd Target path: DYJetsToLL_v1.root:/mytaus
hadd Target path: DYJetsToLL_v1.root:/myphotons
hadd Target path: DYJetsToLL_v1.root:/mypvertex
hadd Target path: DYJetsToLL_v1.root:/mygenparticle
hadd Target path: DYJetsToLL_v1.root:/myjets
hadd Target path: DYJetsToLL_v1.root:/myfatjets
hadd Target path: DYJetsToLL_v1.root:/mymets
This commad will produce a root file, DYJetsToLL_v1.root, merging the trees available inside all the files matching results/odw_poet/poetV1_DYJetsToLL_v1/*.root
What if my cluster doesn’t have ROOT?
If your cluster does not have ROOT installed, which includes the
haddcommand, you can use the ROOT docker container viaapptainer. To access thehaddcommand from the ROOT container, we launch a container instance interactively:$ apptainer shell --bind results/:/results docker://gitlab-registry.cern.ch/cms-cloud/root-vnc:latestHere we mount the
resultsfolder as/resultsfolder inside the container. Now we are able to execute any command available in the docker container:Apptainer $ hadd /results/DYJetsToLL_v1.root /results/odw_poet/poetV1_DYJetsToLL_v1/*.root
My output files are large
POET output files can be easily be many MB, scaling with the number of events processed. If your files are very large, merging them is not recommended – it requires additional storage space in your account (until the unmerged files can be deleted) and can make transfering the files out very slow.
Copy output files out of TIFR
As we’ve shown in earlier lessons, analysis of the POET ROOT files can be done with ROOT or Python tools, typically on your local machine.
To extract files from TIFR for local analysis, use the scp command:
$ scp -r userXX@ui3.indiacms.res.in:/home/userXX/condorLite/results/odw_poet/poetV1_DYJetsToLL_v1/ .
user1@ui3.indiacms.res.in's password:
outfile_2_DYJetsToLL_v1_numEvent5000.root     100% 7977KB   2.5MB/s   00:03
outfile_3_DYJetsToLL_v1_numEvent5000.root     100% 7997KB   5.3MB/s   00:01
outfile_1_DYJetsToLL_v1_numEvent5000.root     100% 7979KB   5.8MB/s   00:01
outfile_4_DYJetsToLL_v1_numEvent5000.root     100% 7968KB   6.0MB/s   00:01
You can also transfer individual files, such as a single merged file per dataset. Now you’re ready to dive in to your physics analysis!
Key Points
The
haddcommand allows you to merge ROOT files that have the same internal structureFiles can be extracted from TIFR to your local machine using
scpYou can then analyze the POET ROOT files using other techniques from this workshop