Introduction
Overview
Teaching: 7 min
Exercises: 0 minQuestions
What is CMSSW?
How is CMSSW structured?
Objectives
Understand what CMSSW is and how it is organized
Overview
The CMS Software (CMSSW) is a collection of software libraries that the CMS experiment uses in order to acquire, produce, process and even analyze its data. The program is written in C++ but its configuration is manipulated using the Python language.
CMSSW is built around a Framework, an Event Data Model (EDM), and Services needed by the simulation, calibration and alignment, and reconstruction modules that process event data so that physicists can perform analysis. The primary goal of the Framework and EDM is to facilitate the development and deployment of reconstruction and analysis software.
The CMSSW repository is on Github. You can browse this huge amount of code, search through it using the CMSSW Software Cross Reference or explore the documentation here.
CMSSW is a continuously-evolving project. Historically, there has been many releases, which are handled on Github using branches. Be aware that in this workshop we will use release CMSSW_5_3_32 (the official release for 2011/2012 open data), which can be found in the CMSSW_5_3_X branch of the repository. This branch may differ a little or a lot compared to the bleeding-edge one in the master branch, so make sure you are always referencing to the historical one.
Structure and architecture
As it was mentioned above, the CMSSW software is used for almost all computing activities in CMS. From data acquisition to data analysis, using different pieces of CMSSW is very intuitive. Different modules (or plugins) have different functionalities. Some, for instance, are in charge of setting up certain services like the magnetic field configuration (we call this type of code Setup), while others help you create some object that was not there before (EDProducers) or analyze final data (EDAnalyzers). You can find details here. In this workshop, we are only going to look at EDAnalyzers.
As an example of modularity, take a look at the package used for reconstructing tracks. It has many sub-packages that put in evidence the many bits involved in making a track from detector sensor information. One of those sub-packages is the TrackProducer, which is in charge of putting (recording) the track information in the event. Note the structure of this sub-package:
![]()
It has the usual look of a C++ repository. Commonly, you can find a src directory with the bulk of the C++ programming (*.cc files), an interface directory with mostly the header files (*.h files) matching the code in the src, and a python directory, where configuration files, written in Python, are stored. Some other accesories are in other directories. Of course, this is not a standard rule, and many times the structure follow a different logic. There is also a Buildfile, which controls the package dependencies.
All these packages are, in a sense, plugins to the main Framework, which is also a package by itself.
The event data architecture is modular, just as the framework is. Different data layers (using different data formats) can be configured, and a given application can use any layer or layers. The following diagram illustrates this concept if one thinks about how the information from tracks of charged particles is organized:

All the information regarding the physics of a collision is stored in the Event. Computationally, one can think of the Event as an object from which you can pull all the information you need from the collision.
CMS uses different data formats, which are arranged in tiers. Currently CMS open data comes only in the AOD format, therefore that is the format we will be mostly using in this workshop.
Key Points
The CMS SoftWare (CMSSW) is the software used by the CMS experiment for acquiring, producing, processing and analyzing its data.
CMSSW is built in a modular fashion around a main Framework.
Installation and Execution
Overview
Teaching: 0 min
Exercises: 20 minQuestions
How do I install CMSSW?
How do I compile and execute CMSSW?
Objectives
Review the steps necessary to setup a CMSSW area.
Learn how to compile and execute CMSSW jobs.
Setting up your CMSSW area
If you completed the lessons on virtual machines or Docker you should already have a working CMSSW area.
-
If you are using the VM:
-
turn on your virtual machine and go to the right shell according to the validation instructions:
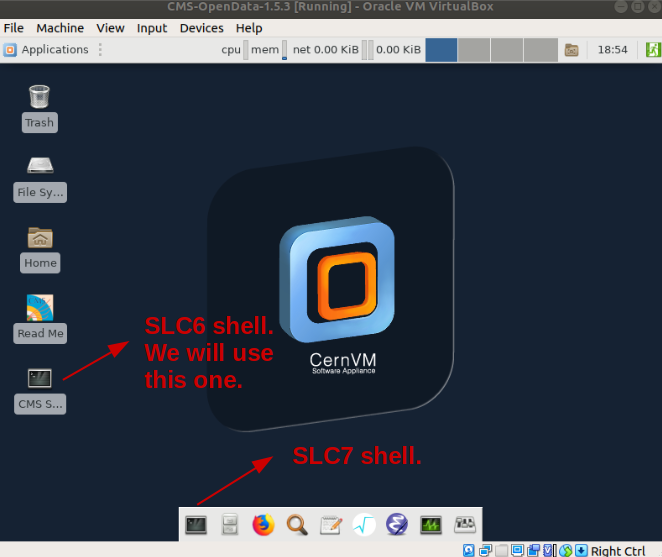
-
-
If you are using Docker:
- Start the container with:
docker start -i <theNameOfyourContainer>
- Start the container with:
Make sure you change directories to the CMSSW_5_3_32/src area; for instance, in Docker:
cd /home/cmsusr/CMSSW_5_3_32/src
Note that we are not really “installing” CMSSW but setting up an environment for it. CMSSW was already installed. This is why every time you open a new shell you will have to issue the cmsenv command, which is just a script that runs to set some environmental variables for your working area:
cmsenv
Now you can check, for instance, where your CMSSW_RELEASE_BASE variable points to:
echo $CMSSW_RELEASE_BASE
The variable may point to a local CMSSW install if you are using a Docker container:
/opt/cms/slc6_amd64_gcc472/cms/cmssw/CMSSW_5_3_32
or to a place in the shared cvmfs area if working in a virtual machine:
/cvmfs/cms.cern.ch/slc6_amd64_gcc472/cms/cmssw/CMSSW_5_3_32
cmsRun, the CMSSW executable
All the packages that comprise the CMSSW release in use have been already compiled and linked to one single executable, which is called cmsRun. So, unless you want to create your own plugin (addition) for the software, you won’t even have to re-compile. You can actually try to execute this command by itself, but it will give you a configuration error:
cmsRun
cmsRun: No configuration file given.
For usage and an options list, please do 'cmsRun --help'.
So, inevitably, the cmsRun executable needs a configuration file. This configuration file must be written in Python. Do not worry, we will learn all about configuration in a next episode of this lesson.
Run with a configuration
Now try to run, but this time with a configuration file.
Solution
We could simply repeat what we already did while setting up our VM or container: run with the
Demo/DemoAnalyzer/demoanalyzer_cfg.pypython configuration file. However, this time we could store the output in adummy.logfile and run it in the background. Notice the bash redirector>, the redirection ofstderrtostdout(2>&1), and the trailing run-in-the-background control operator&.cmsRun Demo/DemoAnalyzer/demoanalyzer_cfg.py > dummy.log 2>&1 &You can check the development of your job with
tail -f dummy.logWhen finished, if you dump the content of
dummy.logcat dummy.logyou’ll get an output similar to:
01-Jul-2021 04:51:59 CEST  Initiating request to open file root://eospublic.cern.ch//eos/opendata/cms/Run2012B/DoubleMuParked/AOD/22Jan2013-v1/10000/1EC938EF-ABEC-E211-94E0-90E6BA442F24.root
01-Jul-2021 04:52:03 CEST  Successfully opened file root://eospublic.cern.ch//eos/opendata/cms/Run2012B/DoubleMuParked/AOD/22Jan2013-v1/10000/1EC938EF-ABEC-E211-94E0-90E6BA442F24.root
Begin processing the 1st record. Run 195013, Event 24425389, LumiSection 66 at 01-Jul-2021 04:52:14.775 CEST
Begin processing the 2nd record. Run 195013, Event 24546773, LumiSection 66 at 01-Jul-2021 04:52:14.776 CEST
Begin processing the 3rd record. Run 195013, Event 24679037, LumiSection 66 at 01-Jul-2021 04:52:14.776 CEST
Begin processing the 4th record. Run 195013, Event 24839453, LumiSection 66 at 01-Jul-2021 04:52:14.777 CEST
Begin processing the 5th record. Run 195013, Event 24894477, LumiSection 66 at 01-Jul-2021 04:52:14.778 CEST
Begin processing the 6th record. Run 195013, Event 24980717, LumiSection 66 at 01-Jul-2021 04:52:14.778 CEST
Begin processing the 7th record. Run 195013, Event 25112869, LumiSection 66 at 01-Jul-2021 04:52:14.779 CEST
Begin processing the 8th record. Run 195013, Event 25484261, LumiSection 66 at 01-Jul-2021 04:52:14.780 CEST
Begin processing the 9th record. Run 195013, Event 25702821, LumiSection 66 at 01-Jul-2021 04:52:14.780 CEST
Begin processing the 10th record. Run 195013, Event 25961949, LumiSection 66 at 01-Jul-2021 04:52:14.781 CEST
01-Jul-2021 04:52:14 CEST  Closed file root://eospublic.cern.ch//eos/opendata/cms/Run2012B/DoubleMuParked/AOD/22Jan2013-v1/10000/1EC938EF-ABEC-E211-94E0-90E6BA442F24.root

=============================================

MessageLogger Summary

type     category        sev    module        subroutine        count    total
---- -------------------- -- ---------------- ----------------  -----    -----
    1 fileAction           -s file_close                             1        1
    2 fileAction           -s file_open                              2        2

 type    category    Examples: run/evt        run/evt          run/evt
 ---- -------------------- ---------------- ---------------- ----------------
    1 fileAction           PostEndRun
    2 fileAction           pre-events       pre-events

Severity    # Occurrences   Total Occurrences
--------    -------------   -----------------
System                  3                   3
Compilation
We use scram, the release management tool used for CMSSW, to compile (build) the code:
scram b
Reading cached build data
>> Local Products Rules ..... started
>> Local Products Rules ..... done
>> Building CMSSW version CMSSW_5_3_32 ----
>> Entering Package Demo/DemoAnalyzer
>> Creating project symlinks
  src/Demo/DemoAnalyzer/python -> python/Demo/DemoAnalyzer
>> Leaving Package Demo/DemoAnalyzer
>> Package Demo/DemoAnalyzer built
>> Subsystem Demo built
>> Local Products Rules ..... started
>> Local Products Rules ..... done
gmake[1]: Entering directory `/home/cmsusr/CMSSW_5_3_32'
>> Creating project symlinks
  src/Demo/DemoAnalyzer/python -> python/Demo/DemoAnalyzer
>> Done python_symlink
>> Compiling python modules cfipython/slc6_amd64_gcc472
>> Compiling python modules python
>> Compiling python modules src/Demo/DemoAnalyzer/python
>> All python modules compiled
>> Pluging of all type refreshed.
>> Done generating edm plugin poisoned information
gmake[1]: Leaving directory `/home/cmsusr/CMSSW_5_3_32'
Note that scram only goes into the Demo/DemoAnalyzer package that we created locally to validate our setup in a previous lesson. All the rest of the packages in the release were already compiled. Since there is nothing new to compile, it finishes very quickly. In a later episode we will modify this DemoAnalyzer and will need to compile again.
Point to be made: if you compile at main
srclevel, all the packages in there will compiled. However, if you go inside a specific package or sub-package, like ourDemo/DemoAnalyzer, only the code in that subpackage will be compiled.
Note: if you are using a soft link to an area that is perhaps mounted from the host machine (like in the example from the Docker lesson), you must compile at the main
srclevel, i.e.,/home/cmsusr/CMSSW_5_3_32/src, otherwise the compilation will fail. A small price to pay for convenience.
Additional goodies
Your CMSSW environment comes with other executable scripts/tools that can be very useful. An example of those is the mkedanlzr script that we use already to create the DemoAnalyzer package. This script creates skeletons for EDAnalyzers that can later be modified or expanded. Notice that this package, DemoAnalyzer, has a similar structure as any of the CMSSW packages we mentioned before.
One can find out about other scripts like mkedanlzr by typing mked and hitting the Tab key:
mked + Tab
mkedanlzr mkedfltr mkedlpr mkedprod
In this workshop, however, we will not be using those other ones.
There are also additional scripts, like the Event Data Model(EDM) utilities, the hltGetConfiguration trigger dumper, or the cmsDriver, which can be very useful. We will talk a bit about these later in the workshop, but now let’s check an example.
Finding the EventSize of a ROOT EDM file
Now, as a simple exercise, use one of the EDM utilities mentioned above to find out about the number of events in the ROOT file that is in the
Demo/DemoAnalyzer/demoanalyzer_cfg.pyconfig file of your analyzer package.Solution
After checking the documentation above, the following one-liner will work.
edmEventSize -v root://eospublic.cern.ch//eos/opendata/cms/Run2012B/DoubleMuParked/AOD/22Jan2013-v1/10000/1EC938EF-ABEC-E211-94E0-90E6BA442F24.root |grep EventsFile root://eospublic.cern.ch//eos/opendata/cms/Run2012B/DoubleMuParked/AOD/22Jan2013-v1/10000/1EC938EF-ABEC-E211-94E0-90E6BA442F24.root Events 12279So the ROOT file has 12279 events.
Key Points
A CMSSW area is not really installed but set up.
cmsRunis the CMSSW executable. There are also utilitarian scripts.You can compile CMSSW with
scram b
EDAnalyzers
Overview
Teaching: 7 min
Exercises: 1 minQuestions
What is an EDAnalyzer and what does it contain?
What files are relevant in a EDAnalyzer?
Objectives
Learn what an EDAnalyzer is and how it is structured
Learn what c++, python and xml files are relevant.
Structure
First, make sure you start up your VM or container like it was discussed in the previous episode.
EDAnalyzers are modules that allow read-only access to the Event. They are useful to produce histograms, reports, statistics, etc. Take a look at the DemoAnalyzer package that we created while validating our CMSSW working environment; it is an example of an EDAnalyzer.
Go to your CMSSW_5_3_32/src area and make sure you issue the cmsenv command (if you are in the same session as the previous episode, there is no need to issue the command again but it never hurts doing it again):
cd <mybasepath>/CMSSW_5_3_32/src
cmsenv
Let’s explore the DemoAnalyzer package:
ls Demo/DemoAnalyzer/
BuildFile.xml demoanalyzer_cfg.py doc interface python src test
ls Demo/DemoAnalyzer/src
DemoAnalyzer.cc
Note that it has a similar structure as any of the CMSSW packages we mentioned before. In this sense, our DemoAnalyzer is just one more CMSSW package. However, the headers and implementation of our simple DemoAnalyzer are coded in one single file under the src directory. The file was automatically named DemoAnalyzer.cc
CMSSW could be very picky about the structure of its packages. Most of the time, scripts or other tools expect to have a
Package/Sub-Packagestructure, just like ourDemo/DemoAnalyzerexample.
We also notice we have a python configuration file called demoanalyzer_cfg.py (unlike its cousins, it is not inside the python directory). This is the default configurator for the DemoAnalyzer.cc code.
Finally, there is a BuildFile.xml, where we can include any dependencies if needed.
All EDAnalyzers are created equal; of course, if made with the same mkedanlzr, they will look identical. The DemoAnalyzer.cc is a skeleton, written in C++, that contains all the basic ingredients to use CMSSW libraries. So, in order to perform a physics analysis, and extract information from our CMS open data, we just need to understand what to add to this code and how to configure it.
Key Points
An EDAnalyzer is a an edm class that generates a template for any analysis code using CMSSW.
There are essentially three important files in an EDAnalyzer package, the source code in c++, the python config file and a Buildfile for tracking dependencies.
The Source
Overview
Teaching: 10 min
Exercises: 30 minQuestions
What are the elements of the source of an EDAnalyzer?
How do I modify the source to get additional information?
Objectives
Learn the basic structure of the C++ implementation of an EDAnalyzer.
Learn the basics on how to modify the source in order to perform analysis.
Playing with the DemoAnalyzer.cc file
The DemoAnalyzer.cc file is the main file of our EDAnalyzer. As it was mentioned, the default structure is always the same. Let’s look at what is inside using an editor like nano:
nano Demo/DemoAnalyzer/src/DemoAnalyzer.cc
The first thing that you will see is a set of includes:
// system include files
#include <memory>

// user include files
#include "FWCore/Framework/interface/Frameworkfwd.h"
#include "FWCore/Framework/interface/EDAnalyzer.h"

#include "FWCore/Framework/interface/Event.h"
#include "FWCore/Framework/interface/MakerMacros.h"

#include "FWCore/ParameterSet/interface/ParameterSet.h"
These are the most basic Framework classes that are needed to mobilize the CMSSW machinery. In particular, notice the Event.h class. This class contains essentially all the accessors that are needed to extract information from the Event, i.e., from the particle collision. Another important class is the ParameterSet.h. This one will allow us to extract configuration parameters, which can be manipulated using the Demo/DemoAnalyzer/demoanalyzer_cfg.py python file.
Something important to take into account is that you can learn a lot about the kind of information you have access to by exploring the code in the CMSSW repository on Github. For instance, you can look at the Event.h header and check all the available methods. You will notice, for instance, the presence of the getByLabel accessors; we will be using one these to access physics objects.
When exploring CMSSW code on Github, remember to choose the CMSSW_5_3_X branch.
Including muon headers
Let’s pretend that we are interested in extracting the energy of all the muons in the event. We would need to add the appropriate classes for this. After quickly reviewing this chapter of the CMS Open Data Guide (which is still under construction), we conclude that we need to add these two header lines to our analyzer:
//classes to extract Muon information
#include "DataFormats/MuonReco/interface/Muon.h"
#include "DataFormats/MuonReco/interface/MuonFwd.h"
Let’s add them at the end of the header section together with the standard vector C++ library:
#include<vector>So our header section becomes:
// system include files
#include <memory>

// user include files
#include "FWCore/Framework/interface/Frameworkfwd.h"
#include "FWCore/Framework/interface/EDAnalyzer.h"

#include "FWCore/Framework/interface/Event.h"
#include "FWCore/Framework/interface/MakerMacros.h"

#include "FWCore/ParameterSet/interface/ParameterSet.h"


//classes to extract Muon information
#include "DataFormats/MuonReco/interface/Muon.h"
#include "DataFormats/MuonReco/interface/MuonFwd.h"

#include<vector>
Next, you will see the class declaration:
//
// class declaration
//

class DemoAnalyzer : public edm::EDAnalyzer {
   public:
      explicit DemoAnalyzer(const edm::ParameterSet&);
      ~DemoAnalyzer();

      static void fillDescriptions(edm::ConfigurationDescriptions& descriptions);


   private:
      virtual void beginJob() ;
      virtual void analyze(const edm::Event&, const edm::EventSetup&);
      virtual void endJob() ;

      virtual void beginRun(edm::Run const&, edm::EventSetup const&);
      virtual void endRun(edm::Run const&, edm::EventSetup const&);
      virtual void beginLuminosityBlock(edm::LuminosityBlock const&, edm::EventSetup const&);
      virtual void endLuminosityBlock(edm::LuminosityBlock const&, edm::EventSetup const&);

      // ----------member data ---------------------------
};
The first thing one notices is that our class inherits from the edm::EDAnalyzer class. It follows the same structure as any class in C++. The declaration of the methods reflect the functionality needed for particle physics analysis. Their implementation are further below in the same file.
Declaring info containers
Let’s add the declaration of a vector for our energy values:
std::vector<float> muon_e;This section becomes:
//
// class declaration
//

class DemoAnalyzer : public edm::EDAnalyzer {
   public:
      explicit DemoAnalyzer(const edm::ParameterSet&);
      ~DemoAnalyzer();

      static void fillDescriptions(edm::ConfigurationDescriptions& descriptions);


  private:
     virtual void beginJob() ;
     virtual void analyze(const edm::Event&, const edm::EventSetup&);
     virtual void endJob() ;

     virtual void beginRun(edm::Run const&, edm::EventSetup const&);
     virtual void endRun(edm::Run const&, edm::EventSetup const&);
     virtual void beginLuminosityBlock(edm::LuminosityBlock const&, edm::EventSetup const&);
     virtual void endLuminosityBlock(edm::LuminosityBlock const&, edm::EventSetup const&);

     // ----------member data ---------------------------

     std::vector<float> muon_e; //energy values for muons in the event
};
Next, we can see the constructor and destructor of our DemoAnalyzer class:
// constructors and destructor
//
DemoAnalyzer::DemoAnalyzer(const edm::ParameterSet& iConfig)

{
   //now do what ever initialization is needed

}


DemoAnalyzer::~DemoAnalyzer()
{

   // do anything here that needs to be done at desctruction time
   // (e.g. close files, deallocate resources etc.)

}
Note that a ParameterSet object is passed to the constructor. This is then the place where we will read any configuration we might end up implementing through our Demo/DemoAnalyzer/demoanalyzer_cfg.py python configuration file.
The heart of the source file is the analyze method:
// ------------ method called for each event  ------------
void
DemoAnalyzer::analyze(const edm::Event& iEvent, const edm::EventSetup& iSetup)
{
   using namespace edm;


#ifdef THIS_IS_AN_EVENT_EXAMPLE
   Handle<ExampleData> pIn;
   iEvent.getByLabel("example",pIn);
#endif

#ifdef THIS_IS_AN_EVENTSETUP_EXAMPLE
   ESHandle<SetupData> pSetup;
   iSetup.get<SetupRecord>().get(pSetup);
#endif
}
Anything that goes inside this routine will loop over all available events. The CMSSW Framework will take care of that, so you do not really have to write a for loop to go over all events. Note that an edm::Event object and a edm::EventSetup object are passed by default. While from the Event we can extract information like physics objects, from the EventSetup we can get information like trigger prescales.
Get the muons energy
Now let’s add a few lines in the analyzer so we can retrieve the energy of all the muons in each event. We will print out this information as an example. Again, after checking out this guide, the analyze method becomes:
// ------------ method called for each event  ------------
void DemoAnalyzer::analyze(const edm::Event& iEvent, const edm::EventSetup& iSetup)
{
 using namespace edm;

 //clean the container
 muon_e.clear();

 //define the handler and get by label
 Handle<reco::MuonCollection> mymuons;
 iEvent.getByLabel("muons", mymuons);

 //if collection is valid, loop over muons in event
 if(mymuons.isValid()){
    for (reco::MuonCollection::const_iterator itmuon=mymuons->begin(); itmuon!=mymuons->end(); ++itmuon){
        muon_e.push_back(itmuon->energy());
    }
 }

 //print the vector
 for(unsigned int i=0; i < muon_e.size(); i++){
    std::cout <<"Muon # "<<i<<" with E = "<<muon_e.at(i)<<" GeV."<<std::endl;
 }

#ifdef THIS_IS_AN_EVENT_EXAMPLE
  Handle<ExampleData> pIn;
  iEvent.getByLabel("example",pIn);
#endif

#ifdef THIS_IS_AN_EVENTSETUP_EXAMPLE
  ESHandle<SetupData> pSetup;
  iSetup.get<SetupRecord>().get(pSetup);
#endif
}
The other methods are designed to execute instructions according to their own name description.
// ------------ method called once each job just before starting event loop  ------------
void
DemoAnalyzer::beginJob()
{
}

// ------------ method called once each job just after ending the event loop  ------------
void
DemoAnalyzer::endJob()
{
}

// ------------ method called when starting to processes a run  ------------
void
DemoAnalyzer::beginRun(edm::Run const&, edm::EventSetup const&)
{
}

// ------------ method called when ending the processing of a run  ------------
void
DemoAnalyzer::endRun(edm::Run const&, edm::EventSetup const&)
{
}

// ------------ method called when starting to processes a luminosity block  ------------
void
DemoAnalyzer::beginLuminosityBlock(edm::LuminosityBlock const&, edm::EventSetup const&)
{
}

// ------------ method called when ending the processing of a luminosity block  ------------
void
DemoAnalyzer::endLuminosityBlock(edm::LuminosityBlock const&, edm::EventSetup const&)
{
}
For instance, any instructions placed inside the beginRun routine will be executed every time the Framework sees a new Run (a Run is determined by the start and stop of the acquisition of the CMS detector). One may use the beginJob and endJob routines to, for example, book histograms or write output files.
Let’s compile (heads-up: it will fail; see below)
scram b
Work assignment
The compilation will invariably fail. This is because the Muon classes we added introduced some dependencies that need to be taken care of in the
BuildFile.xml. We will deal with this in a moment. Now, however, it is a good time to submit your assignment for this lesson. Please copy the compilation error message you got and paste it to the corresponding section in our assignment form; remember you must sign in and click on the submit button in order to save your work. You can go back to edit the form at any time.
So let’s modify the Demo/DemoAnalyzer/BuildFile.xml to include DataFormats/MuonReco dependencies. It should look like:
<use name="FWCore/Framework"/>
<use name="FWCore/PluginManager"/>
<use name="DataFormats/MuonReco"/>
<use name="FWCore/ParameterSet"/>
<flags EDM_PLUGIN="1"/>
<export>
   <lib name="1"/>
</export>
Now, if you compile again, it should work. Then, we can run with the cmsRun executable:
cmsRun Demo/DemoAnalyzer/demoanalyzer_cfg.py > mylog.log 2>&1 &
Let’s check the log file:
cat mylog.log
02-Jul-2021 06:41:46 CEST  Initiating request to open file root://eospublic.cern.ch//eos/opendata/cms/Run2012B/DoubleMuParked/AOD/22Jan2013-v1/10000/1EC938EF-ABEC-E211-94E0-90E6BA442F24.root
02-Jul-2021 06:41:50 CEST  Successfully opened file root://eospublic.cern.ch//eos/opendata/cms/Run2012B/DoubleMuParked/AOD/22Jan2013-v1/10000/1EC938EF-ABEC-E211-94E0-90E6BA442F24.root
Begin processing the 1st record. Run 195013, Event 24425389, LumiSection 66 at 02-Jul-2021 06:42:00.346 CEST
Muon # 0 with E = 8.47069 GeV.
Begin processing the 2nd record. Run 195013, Event 24546773, LumiSection 66 at 02-Jul-2021 06:42:00.410 CEST
Muon # 0 with E = 36.431 GeV.
Muon # 1 with E = 32.3631 GeV.
Begin processing the 3rd record. Run 195013, Event 24679037, LumiSection 66 at 02-Jul-2021 06:42:00.411 CEST
Muon # 0 with E = 16.5536 GeV.
Muon # 1 with E = 12.5258 GeV.
Begin processing the 4th record. Run 195013, Event 24839453, LumiSection 66 at 02-Jul-2021 06:42:00.411 CEST
Muon # 0 with E = 5.19378 GeV.
Muon # 1 with E = 13.6549 GeV.
Begin processing the 5th record. Run 195013, Event 24894477, LumiSection 66 at 02-Jul-2021 06:42:00.412 CEST
Muon # 0 with E = 10.3546 GeV.
Begin processing the 6th record. Run 195013, Event 24980717, LumiSection 66 at 02-Jul-2021 06:42:00.412 CEST
Muon # 0 with E = 25.2733 GeV.
Muon # 1 with E = 10.7545 GeV.
Begin processing the 7th record. Run 195013, Event 25112869, LumiSection 66 at 02-Jul-2021 06:42:00.413 CEST
Muon # 0 with E = 165.026 GeV.
Muon # 1 with E = 145.994 GeV.
Begin processing the 8th record. Run 195013, Event 25484261, LumiSection 66 at 02-Jul-2021 06:42:00.413 CEST
Muon # 0 with E = 130.171 GeV.
Muon # 1 with E = 73.1873 GeV.
Begin processing the 9th record. Run 195013, Event 25702821, LumiSection 66 at 02-Jul-2021 06:42:00.414 CEST
Muon # 0 with E = 24.0889 GeV.
Muon # 1 with E = 14.4771 GeV.
Begin processing the 10th record. Run 195013, Event 25961949, LumiSection 66 at 02-Jul-2021 06:42:00.414 CEST
Muon # 0 with E = 189.134 GeV.
Muon # 1 with E = 38.8268 GeV.
02-Jul-2021 06:42:00 CEST  Closed file root://eospublic.cern.ch//eos/opendata/cms/Run2012B/DoubleMuParked/AOD/22Jan2013-v1/10000/1EC938EF-ABEC-E211-94E0-90E6BA442F24.root

=============================================

MessageLogger Summary

 type     category        sev    module        subroutine        count    total
 ---- -------------------- -- ---------------- ----------------  -----    -----
    1 fileAction           -s file_close                             1        1
    2 fileAction           -s file_open                              2        2

 type    category    Examples: run/evt        run/evt          run/evt
 ---- -------------------- ---------------- ---------------- ----------------
    1 fileAction           PostEndRun
    2 fileAction           pre-events       pre-events

Severity    # Occurrences   Total Occurrences
--------    -------------   -----------------
System                  3                   3
Key Points
The C++ source file of an EDAnalyzer is taylored for particle physics analysis under the CMSSW Framework.
This source file needs to be modified according to the analyzer needs
The Configuration
Overview
Teaching: 20 min
Exercises: 30 minQuestions
What are the key elements of a CMSSW configuration file?
What kind of elements can I control at the configuration level?
Objectives
Learn the basic structure of the Python implementation of a CMSSW configuration file.
Learn how to modify a config file in order to change parameters and/or run additional code.
CMSSW configuration Framework
The CMS software framework uses a “software bus” model. A single executable, cmsRun, is used, and the modules are loaded at runtime. A configuration file, fully written in Python, defines which modules are loaded, in which order they are run, and with which configurable parameters they are run. Note that this is not an interactive system. The entire configuration is defined once, at the beginning of the job, and cannot be changed during running. This is the file that you “feed” cmRun when it is executed.
Playing with the demoanalyzer_cfg.py file
In the case of our DemoAnalyzer we have been working with, its configuration file is the demoanalyzer_cfg.py, which resides in the Demo/DemoAnalyzer/ directory of your CMSSW Demo package. Note that it does not reside in the Demo/DemoAnalyzer/python directory (which is usually the case for python configuration files). This does not really matter though. There is a specific situation where this is important, and we will look at it later.
Meanwhile, if we explore what is in the Demo/DemoAnalyzer/python directory:
ls Demo/DemoAnalyzer/python
we will get:
__init__.py __init__.pyc demoanalyzer_cfi.py demoanalyzer_cfi.pyc
You will note that there is a demoanalyzer_cfi.py in there. We will not pay attention to this file now, but it instructive to point out that the _cfg and _cfi descriptors are meaningful. While the former one defines a top level configuration, the latter works more like a module initialization file. There are also _cff files which bear pieces of configuration and so they are dubbed config fragments. You can read a bit more about it in this subsection of the Workbook.
Ok, so the file we will play around with is just the Demo/DemoAnalyzer/demoanalyzer_cfg.py. Let’s take a look with the nano editor:
nano Demo/DemoAnalyzer/demoanalyzer_cfg.py
The first instructions that you will find in all the top level CMSSW config files are the lines
import FWCore.ParameterSet.Config as cms

process = cms.Process("Demo")
The first line imports our CMS-specific Python classes and functions, and the second one creates a process object. This refers to a CMSSW process (the one we will be configuring, of course). Essentially, the main idea is that we will be feeding our process all the tasks that we need done by the CMSSW software or its plugins. The process needs always a name. It could be any short word, but it is usually chosen so it is meaningful. For instance, if the main task would be to process the high level trigger information, an adequate name will be “HLT”; if the process is actually the full reconstruction of the data, then it is most likely assigned the name “RECO”. For our demo, we will leave our creativity aside and just call it “Demo” (you can, of course, change it to your linking).
Then, you will notice a line that loads something:
process.load("FWCore.MessageService.MessageLogger_cfi")
Actually, because of the _cfi tag, we know it is presumably a piece of Python code that initializes some module. Indeed, it is the MessageLogger service. As the name describes, it controls how the message logging is handled during the job execution. The string "FWCore.MessageService.MessageLogger_cfi" tells you exactly where to look for it on Github if you needed it. Note the structure matches the repository’s, except that the python directory name is always omitted when loading modules this way (this is why it is often important to put config files in the python directory).
There is a whole Workbook section regarding this module, but let’s just look at a simple example.
Changing the logging frequency in our CMSSW job
Suppose you want the Framework to report every 5 events instead of each event. Then one can simply add this line
process.MessageLogger.cerr.FwkReport.reportEvery = 5right below the load line:
process.load("FWCore.MessageService.MessageLogger_cfi")
process.MessageLogger.cerr.FwkReport.reportEvery = 5
Note that all we are doing is loading the MessageLogger module and changing just one parameter, the one in this line, instead of going with the default value, which is one.
For the next line
process.maxEvents = cms.untracked.PSet( input = cms.untracked.int32(10) )
it is easy to guess that it controls the number of events that are going to be processed in our CMSSW job. It is worth noting that maxEvents is a untracked variable within the Framework. In general, the system keeps track of what parameters are used to create each data item in the Event and saves this information in the output files. This can be used later to help understand how the data was made. However, sometimes a parameter will have no effect on the final objects created. Such parameters are declared untracked. More information can be found in the Workbook.
Let’s change the number of events to 100:
process.maxEvents = cms.untracked.PSet( input = cms.untracked.int32(100) )
Next, there is the first module (also an object by itself) we are attaching to our process object:
process.source = cms.Source("PoolSource",
    # replace 'myfile.root' with the source file you want to use
    fileNames = cms.untracked.vstring(
    #    'file:myfile.root'
        'root://eospublic.cern.ch//eos/opendata/cms/Run2012B/DoubleMuParked/AOD/22Jan2013-v1/10000/1EC938EF-ABEC-E211-94E0-90E6BA442F24.root'
    )
)
Inside the process object there must be exactly one object assigned that has Python type Source and is used for data input. There may be zero or more objects for each of many other Python types. In the official production configurations there can be hundreds or even thousands of objects attached to the process. Your job is configured by your choice of objects to construct and attach to the process, and by the configuration of each object. (This may be done via import statements or calls to the load function, instead of or in addition to object construction.) Some of the Python types that may be used to create these objects are listed in the Workbook.
Explore the PoolSource C++
Generally, all modules in our python configuration are associated with its corresponding C++ code. By searching the CMSSW Github repository, will you be able to point exactly to the line of C++ code where the
fileNamesparameter is read?solution
You will find that the label first appearing in a Python CMSSW module is actually the name of the C++ code. So, we would expect that there be a class
PoolSource.h(and perhaps its implementation asPoolSource.C) associated with the “PoolSource” label. Let’s then go to the Github CMSSW repository and simply search forPoolSource.Cusing the search field of that page. Immediately, in the search results, we notice there is aIOPool/Input/src/PoolSource.ccfile that we can browse. After looking for the variablefileNames, we find that this parameter is read in this line. Note that it is in the constructor of the object where theParameterSetobjects are read.
Note also that the fileNames variable is a vstring, i.e., a vector of strings in the C++ sense. In Python, it is a list, so you can very well input a comma separated list of files. There is a drawback, though. In general, our open datasets will contain more than 255 files, which is the limit for the number of arguments a Python function can take, so very long vstrings cannot be created in one step. There are various alternatives to circumvent this problem. To run over massive amounts of ROOT files, one will usually use the FileUtils module to load index files instead of individual ROOT files.
Configure our DemoAnalyzer
The second to last line in our configuration
process.demo = cms.EDAnalyzer('DemoAnalyzer'
)
has to do with our recently created DemoAnalyzer. This module is now just a declaration of existance because it is empty. Let’s put it to work:
Making our EDAnalyzer configurable
Let’s pretend that for some reason you will need to run your job either for extracting the energy of RECO muons from beam collisions or from cosmic rays. Note that CMS has information from both. If you go back to the guide we used earlier to help us with the muon information extraction, you will notice that there is the possibility to use an
InputTagthat ismuonsFromCosmicsinstead of justmuons. Your job is to make this configurable in ourdemoanalyzer_cfg.pyso we don’t have to re-compile every time we want to make the switch.Solution
Since we are going to make our DemoAnalyzer configurable, the first thing we need to do is to modify the C++ source of our analyzer in order to accommodate configurability. Let’s modify then the
Demo/DemoAnalyzer/src/DemoAnalyzer.ccfile. Again, following the logic in the Physics Ojects guide and using an editor, we should add the declaration for a muon InputTag. We could include this declaration right below the declaration of our member functions:virtual void endLuminosityBlock(edm::LuminosityBlock const&, edm::EventSetup const&); //declare the input tag for MuonCollection edm::InputTag muonInput; // ----------member data --------------------------- std::vector<float> muon_e;Then we will have to read this InputTag from the configuration. As it was noted above, this is done in the constructor. It will become:
//constructors and destructor
//
DemoAnalyzer::DemoAnalyzer(const edm::ParameterSet& iConfig)

{
  //now do what ever initialization is needed
  muonInput = iConfig.getParameter<edm::InputTag>("InputCollection");
}
Here we will be reading the
InputCollectionvariable from configuration (which is of typeedm::InputTag, which is essentially a string) and will store it in themuonInputcontainer.Next, we will modify the
analyzefunction replacing this line
iEvent.getByLabel("muons", mymuons);,where the InputTag is hard-coded as “muons”, with
iEvent.getByLabel(muonInput, mymuons);,where we use the configurable
muonInputvariable.The section of interest in the
analyzefunction will then look like:void DemoAnalyzer::analyze(const edm::Event& iEvent, const edm::EventSetup& iSetup){ using namespace edm; //clean the container muon_e.clear(); //define the handler and get by label Handle<reco::MuonCollection> mymuons; iEvent.getByLabel(muonInput, mymuons); //if collection is valid, loop over muons in event if(mymuons.isValid()){ for (reco::MuonCollection::const_iterator itmuon=mymuons->begin(); itmuon!=mymuons->end(); ++itmuon){ muon_e.push_back(itmuon->energy()); } } //print the vector . . .Finally, let’s change the
Demo/DemoAnalyzer/demoanalyzer_cfg.pyby replacing our empty module statement:
process.demo = cms.EDAnalyzer('DemoAnalyzer')with
process.demo = cms.EDAnalyzer('DemoAnalyzer',
       InputCollection = cms.InputTag("muons")
)
In this way, we are now able to enter “muons” or “muonsFromCosmics”, depending on our needs.
Now, before re-compiling our code, let’s check that our python configuration is ok. We can validate the syntax of your configuration using python:
python Demo/DemoAnalyzer/demoanalyzer_cfg.py
If there are no errors, you are good to go.
Now let’s compile the code; again, with scram:
scram b
If everything goes well, you should see something like:
Reading cached build data
>> Local Products Rules ..... started
>> Local Products Rules ..... done
>> Building CMSSW version CMSSW_5_3_32 ----
>> Entering Package Demo/DemoAnalyzer
>> Creating project symlinks
  src/Demo/DemoAnalyzer/python -> python/Demo/DemoAnalyzer
>> Compiling edm plugin /home/cmsusr/CMSSW_5_3_32/src/Demo/DemoAnalyzer/src/DemoAnalyzer.cc
>> Building edm plugin tmp/slc6_amd64_gcc472/src/Demo/DemoAnalyzer/src/DemoDemoAnalyzer/libDemoDemoAnalyzer.so
Leaving library rule at Demo/DemoAnalyzer
@@@@ Running edmWriteConfigs for DemoDemoAnalyzer
--- Registered EDM Plugin: DemoDemoAnalyzer
>> Leaving Package Demo/DemoAnalyzer
>> Package Demo/DemoAnalyzer built
>> Subsystem Demo built
>> Local Products Rules ..... started
>> Local Products Rules ..... done
gmake[1]: Entering directory `/home/cmsusr/CMSSW_5_3_32'
>> Creating project symlinks
  src/Demo/DemoAnalyzer/python -> python/Demo/DemoAnalyzer
>> Done python_symlink
>> Compiling python modules cfipython/slc6_amd64_gcc472
>> Compiling python modules python
>> Compiling python modules src/Demo/DemoAnalyzer/python
>> All python modules compiled
@@@@ Refreshing Plugins:edmPluginRefresh
>> Pluging of all type refreshed.
>> Done generating edm plugin poisoned information
gmake[1]: Leaving directory `/home/cmsusr/CMSSW_5_3_32'
Finally, let’s run the CMSSW job:
cmsRun Demo/DemoAnalyzer/demoanalyzer_cfg.py > mylog.log 2>&1 &
If you check the development of the job with
tail -f mylog.log
Eventually, as the job progresses, you will see something like:
...
Begin processing the 21st record. Run 195013, Event 24568715, LumiSection 66 at 02-Jul-2021 07:30:04.173 CEST
Muon # 0 with E = 80.9343 GeV.
Muon # 1 with E = 57.3367 GeV.
Muon # 0 with E = 64.6396 GeV.
Muon # 1 with E = 784.396 GeV.
Muon # 0 with E = 174.626 GeV.
Muon # 1 with E = 52.107 GeV.
Muon # 0 with E = 254.615 GeV.
Muon # 1 with E = 115.981 GeV.
Muon # 0 with E = 17.6325 GeV.
Muon # 1 with E = 43.1466 GeV.
Begin processing the 26th record. Run 195013, Event 25773019, LumiSection 66 at 02-Jul-2021 07:30:08.037 CEST
Muon # 0 with E = 896.068 GeV.
Muon # 1 with E = 30.0968 GeV.
Muon # 0 with E = 31.7867 GeV.
Muon # 1 with E = 45.007 GeV.
Muon # 0 with E = 144.005 GeV.
Muon # 1 with E = 32.4624 GeV.
Muon # 0 with E = 109.775 GeV.
Muon # 1 with E = 29.5543 GeV.
Muon # 0 with E = 3.44853 GeV.
Begin processing the 31st record. Run 195013, Event 25407425, LumiSection 66 at 02-Jul-2021 07:30:08.039 CEST
Muon # 0 with E = 38.4875 GeV.
Muon # 1 with E = 37.2395 GeV.
Muon # 0 with E = 58.2166 GeV.
Muon # 1 with E = 64.7743 GeV.
Muon # 0 with E = 73.7936 GeV.
Muon # 1 with E = 48.7898 GeV.
Muon # 0 with E = 9.98582 GeV.
Muon # 1 with E = 20.2956 GeV.
Muon # 2 with E = 34.8767 GeV.
Muon # 0 with E = 79.7684 GeV.
Muon # 1 with E = 49.3363 GeV.
Begin processing the 36th record. Run 195013, Event 24586506, LumiSection 66 at 02-Jul-2021 07:30:08.042 CEST
Muon # 0 with E = 11.7313 GeV.
Muon # 1 with E = 22.7098 GeV.
Muon # 2 with E = 8.99836 GeV.
Muon # 0 with E = 29.3587 GeV.
Muon # 1 with E = 40.9274 GeV.
Muon # 0 with E = 200.812 GeV.
Muon # 1 with E = 159.71 GeV.
Muon # 0 with E = 70.8434 GeV.
Muon # 1 with E = 66.9168 GeV.
Muon # 0 with E = 11.5945 GeV.
Muon # 1 with E = 9.92587 GeV.
Begin processing the 41st record. Run 195013, Event 24369161, LumiSection 66 at 02-Jul-2021 07:30:08.044 CEST
Muon # 0 with E = 8.64982 GeV.
Muon # 1 with E = 61.2678 GeV.
Muon # 0 with E = 54.6933 GeV.
Muon # 1 with E = 14.3586 GeV.
Muon # 2 with E = 23.4211 GeV.
Muon # 0 with E = 61.2773 GeV.
Muon # 1 with E = 22.6716 GeV.
Muon # 0 with E = 5.82828 GeV.
Muon # 1 with E = 31.43 GeV.
Muon # 0 with E = 16.4137 GeV.
Muon # 1 with E = 16.8835 GeV.
Begin processing the 46th record. Run 195013, Event 25119433, LumiSection 66 at 02-Jul-2021 07:30:08.046 CEST
Muon # 0 with E = 63.0295 GeV.
Muon # 1 with E = 98.7107 GeV.
Muon # 0 with E = 123.7 GeV.
Muon # 1 with E = 38.6976 GeV.
Muon # 0 with E = 64.3109 GeV.
Muon # 1 with E = 6.35752 GeV.
Muon # 2 with E = 35.0825 GeV.
Muon # 0 with E = 54.5795 GeV.
Muon # 1 with E = 27.9381 GeV.
Muon # 0 with E = 23.4076 GeV.
Muon # 1 with E = 12.5354 GeV.
Muon # 2 with E = 11.035 GeV.
...
Change the InputTag
Now, change the name of the
InputColletionfrom “muons” to “muonsFromCosmics” in your configuration and run again without re-compiling the code. Do you see any difference?Solution
For the corresponding part of your output you should see something like:
Begin processing the 21st record. Run 195013, Event 24568715, LumiSection 66 at 02-Jul-2021 07:52:18.760 CEST
Muon # 0 with E = 10.4927 GeV.
Muon # 1 with E = 184.426 GeV.
Muon # 0 with E = 147.191 GeV.
Muon # 1 with E = 67.3018 GeV.
Muon # 0 with E = 116.842 GeV.
Muon # 1 with E = 45.4152 GeV.
Muon # 0 with E = 337.88 GeV.
Muon # 1 with E = 69.1135 GeV.
Muon # 0 with E = 16.551 GeV.
Muon # 1 with E = 8.40728 GeV.
Begin processing the 26th record. Run 195013, Event 25773019, LumiSection 66 at 02-Jul-2021 07:52:24.478 CEST
Muon # 0 with E = 41.8064 GeV.
Muon # 1 with E = 32.0273 GeV.
Muon # 0 with E = 13.2664 GeV.
Muon # 1 with E = 47.2524 GeV.
Muon # 0 with E = 279.381 GeV.
Muon # 1 with E = 21.9792 GeV.
Muon # 0 with E = 42.3392 GeV.
Muon # 1 with E = 12.1255 GeV.
Muon # 0 with E = 2.4193 GeV.
Muon # 1 with E = 11.1408 GeV.
Muon # 2 with E = 8.58694 GeV.
Begin processing the 31st record. Run 195013, Event 25407425, LumiSection 66 at 02-Jul-2021 07:52:24.484 CEST
Muon # 0 with E = 1.28078 GeV.
Muon # 1 with E = 0.490253 GeV.
Muon # 2 with E = 11.24 GeV.
Muon # 0 with E = 64.1598 GeV.
Muon # 1 with E = 38.7984 GeV.
Muon # 0 with E = 47.81 GeV.
Muon # 1 with E = 332.486 GeV.
Muon # 0 with E = 1.2533 GeV.
Muon # 1 with E = 692.389 GeV.
Muon # 0 with E = 44.5196 GeV.
Muon # 1 with E = 42.2221 GeV.
Muon # 2 with E = 12.1866 GeV.
Muon # 3 with E = 40.4421 GeV.
Begin processing the 36th record. Run 195013, Event 24586506, LumiSection 66 at 02-Jul-2021 07:52:24.487 CEST
Muon # 0 with E = 11.959 GeV.
Muon # 1 with E = 2.41103 GeV.
Muon # 0 with E = 27.0548 GeV.
Muon # 1 with E = 0.92917 GeV.
Muon # 0 with E = 233.519 GeV.
Muon # 1 with E = 162.572 GeV.
Muon # 0 with E = 78.6423 GeV.
Muon # 1 with E = 17.4387 GeV.
Muon # 0 with E = 36.8009 GeV.
Begin processing the 41st record. Run 195013, Event 24369161, LumiSection 66 at 02-Jul-2021 07:52:24.488 CEST
Muon # 0 with E = 46.8979 GeV.
Muon # 1 with E = 7.55877 GeV.
Muon # 0 with E = 0.350877 GeV.
Muon # 1 with E = 53.5919 GeV.
Muon # 2 with E = 26.9923 GeV.
Muon # 0 with E = 16.298 GeV.
Muon # 1 with E = 59.6772 GeV.
Muon # 0 with E = 9.12645 GeV.
Muon # 0 with E = 0.239425 GeV.
Muon # 1 with E = 6.8176 GeV.
Begin processing the 46th record. Run 195013, Event 25119433, LumiSection 66 at 02-Jul-2021 07:52:24.490 CEST
Muon # 0 with E = 130.738 GeV.
Muon # 1 with E = 40.4002 GeV.
Muon # 0 with E = 14.8666 GeV.
Muon # 1 with E = 134.785 GeV.
Muon # 0 with E = 32.0047 GeV.
Muon # 1 with E = 52.7379 GeV.
Muon # 0 with E = 75.797 GeV.
Muon # 1 with E = 53.8169 GeV.
Muon # 0 with E = 7.53448 GeV.
Muon # 1 with E = 14.8669 GeV.
Running some already-available CMSSW code
The last line in our Demo/DemoAnalyzer/demoanalyzer_cfg.py is
process.p = cms.Path(process.demo)
The “software bus” model that was mentioned in the introduction of this episode can be made evident in this line. CMSSW executes its code using Paths (which in turn could be arranged in Schedules). Each Path can execute a series of modules (or Sequences of modules). In our example we have just one Path named p that executes the demo process, which corresponds to our DemoAnalyzer.
In general, however, we could add more modules. For instance, the Path line could look like
process.mypath = cms.Path (process.m1+process.m2+process.s1+process.m3)
, where m1, m2, m3 could be CMSSW modules (individual EDAnalyzers, EDFilters, EDProducers, etc.) and s1 could be a modules Sequence.
Adding a Trigger Filter
In CMSSW, there are other types of code one can execute. Some of these are known as EDFilters. As the name implies, they can be used to filter events. For instance, one could use the HLTHighLevel filter class to only run over events that have passed a certain kind of trigger.
We can get a hint of its usage by scooping around the corresponding python directory of that package. We immediately notice the hltHighLevel_cfi.py module, so let’s load it with the line
process.load("HLTrigger.HLTfilters.hltHighLevel_cfi")Let’s configure the
HLTPathsparameter in that module so it will only pass events that fired any trigger bit with the patternHLT_Mu15*:
process.hltHighLevel.HLTPaths = cms.vstring('HLT_Mu15*')Now, let’s add the module to our running Path:
process.p = cms.Path(process.hltHighLevel+process.demo)The full config file
Do not forget to switch back to “muons” for the InputTag. The full config file will then look like:
import FWCore.ParameterSet.Config as cms

process = cms.Process("Demo")

process.load("FWCore.MessageService.MessageLogger_cfi")
process.MessageLogger.cerr.FwkReport.reportEvery = 5

process.maxEvents = cms.untracked.PSet( input = cms.untracked.int32(100) )

process.source = cms.Source("PoolSource",
   # replace 'myfile.root' with the source file you want to use
   fileNames = cms.untracked.vstring(
   #    'file:myfile.root'
       'root://eospublic.cern.ch//eos/opendata/cms/Run2012B/DoubleMuParked/AOD/22Jan2013-v1/10000/1EC938EF-ABEC-E211-94E0-90E6BA442F24.root'
   )
)

# If working with the Docker container you won't have these global tag lines yet.
# If working in the Virtual Machine, you can comment them out (we do not need them here for now) They will be needed and explained later
#process.load('Configuration.StandardSequences.FrontierConditions_GlobalTag_cff')
#process.GlobalTag.connect = cms.string('sqlite_file:/cvmfs/cms-opendata-conddb.cern.ch/FT53_V21A_AN6_FULL.db')
#process.GlobalTag.globaltag = 'FT53_V21A_AN6::All'

process.demo = cms.EDAnalyzer('DemoAnalyzer',
       InputCollection = cms.InputTag("muons")
)

process.load("HLTrigger.HLTfilters.hltHighLevel_cfi")
process.hltHighLevel.HLTPaths = cms.vstring('HLT_Mu7*')

process.p = cms.Path(process.hltHighLevel+process.demo)
Without even having to compile again, the execution of the trigger path will stop if the
hltHighLevelfilter module throws aFalseresult. The output becomes... Begin processing the 21st record. Run 195013, Event 24568715, LumiSection 66 at 02-Jul-2021 08:25:24.637 CEST Begin processing the 26th record. Run 195013, Event 25773019, LumiSection 66 at 02-Jul-2021 08:25:24.638 CEST Begin processing the 31st record. Run 195013, Event 25407425, LumiSection 66 at 02-Jul-2021 08:25:24.639 CEST Begin processing the 36th record. Run 195013, Event 24586506, LumiSection 66 at 02-Jul-2021 08:25:29.337 CEST Begin processing the 41st record. Run 195013, Event 24369161, LumiSection 66 at 02-Jul-2021 08:25:29.343 CEST Begin processing the 46th record. Run 195013, Event 25119433, LumiSection 66 at 02-Jul-2021 08:25:29.346 CEST ...It happens that for these few events we are testing, the filter clearly prevents the execution of our EDAnalyzer.
Congratulations!!, you have made it to the end the lesson.
Key Points
The Python implementation of the configuration of CMSSW is fundamentally modular.
The CMSSW configuration allows for the usage of already available code and/or make changes to yours without having to recompile.