Introduction
Overview
Teaching: 15 min
Exercises: 0 minQuestions
What is the CMS trigger system and why is it needed?
What is a trigger path in CMS?
How does the trigger depend on instantaneous luminosity and why are prescales necessary?
What do streams and datasets have to do with triggers?
Objectives
Learn about what the CMS trigger system is
Understand the basic concept of trigger paths
Understand the necessity of prescaling
Learn how the trigger system allows for the organization of CMSSW data in streams and datasets.
The CMS acquisition and trigger systems
Collisions at the LHC happen at a rate close to 40 million per second (40 MHz). Once each collision is sensed by the different subdetectors, the amount of information they generate for each one of them corresponds to about what you can fit in a 1 MB file. If we were to record every single collision, it is said (you can do the math) that one can probably fill out all the available disk space in the world in a few days!
Fortunately, as you know, not all collisions that happen at the LHC are interesting, so we do not have to record every single one of them. We want to keep the interesting ones and, most importantly, do not miss the discovery-quality ones. In order to achieve that we need a Trigger.
Before we jump into the details for the trigger system, let’s agree on some terminology:
-
Fill: Every time the LHC injects beams in the machine it marks the beginning of what is known as a Fill. When they dump the beams, it marks the end of that Fill. Each Fill is given a unique number. Some of these fills are declared stable and good for physics and that is when we, the detectors, collect the data good for doing quality research.
-
Run: As collisions happen in the LHC, CMS (and the other detectors) decide whether they start recording data. Every time the start button is pushed, a new Run starts and it is given a unique number. The Run can stop for a variety of reasons, like if the LHC dumps the fill, but usually it is because there is some glitch in one the thousands of electronics channels in the detector that causes the acquisition to stop. This is why the recorded (by the detectors) and delivered data (by the LHC) is not usually the same. When the acquisition is restarted, a new run number is assigned.
- Lumi section: while colliding, the LHC’s delivered instantaneous luminosity gets degraded (in general, it decreases) due to different reasons. I.e., it is not constant over time. For practical reasons, CMS groups the events it collects in luminosity sections, where the luminosity values can be considered constant.
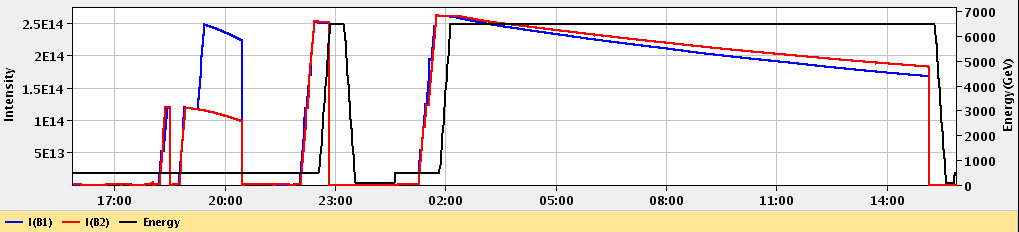
In the plot you can see the different beam (B) injections. For this particular case, around 2 am that day, collisions were declared stable and lasted until around 15H. The luminosity (which is dependent on the intensity of the proton bunches)starts decreasing as time goes by for this example fill.
The trigger system
Deciding on which events to record is the main purpose of the trigger system. It is like deciding which events to record by taking a quick picture of it and, even though a bit blurry, decide whether it is interesting to keep or not for a future, more thorough inspection.
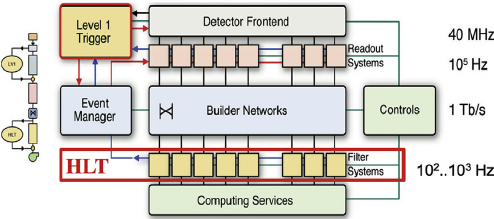
CMS does this in two main steps. The first one, the Level 1 trigger (L1), implemented in hardware (fast FPGAs), reduces the input rate of 40 Mhz to around 100 KHz. The other step is the High Level Trigger (HLT), run on commercial machines with good-old C++ and Python, where the input rate is leveled around the maximum available budget of around 1-2 KHz.
There are hundreds of different triggers in CMS. Each one of them is designed to pick certain types of events, with different intensities and topologies. For instance the HLT_Mu15 trigger, will select events with at least one muon with 15 GeV of transverse momentum. But how can one know this? We will try to answer that later.
For now, let’s just mention that these triggers are implemented using CMSSW code (remember, the CMS experiment uses CMSSW to acquire, produce, process and even analyze its data), using pieces of it (modules) that can be arranged to achieve the desired result: selecting specific kinds of events. Therefore, computationally, triggers are just Paths in the CMSSW sense, and one could extract a lot of information by exploring the Python configuration of these paths.
Rember, in the CMSSW pre-exercise we saw that, at the end of the configuration file, we could have something like
process.mypath = cms.Path (process.m1+process.m2+process.s1+process.m3)
, where m1, m2, m3 could be CMSSW modules (individual EDAnalyzers, EDFilters, EDProducers, etc.) and s1 could be a Sequence of modules.
An example of such an arrangement for an HLT trigger looks like:
process.HLT_Mu15_v2 = cms.Path( process.HLTBeginSequenceBPTX + process.hltL1sL1SingleMu10 + process.hltPreMu15 + process.hltL1SingleMu10L1Filtered0 + process.hltL2Mu10L2Filtered10 + process.HLTL2muonrecoSequence + process.hltL3Muon15 + process.HLTL3muonrecoSequence + process.HLTEndSequence )

Finally, triggers are code, and those pieces of code are constantly changing. Modifications to a trigger could imply a different version identifier. For instance, our HLT_Mu15 could actually be HLT_Mu15_v2 or HLT_Mu15_v3, etc., depending on the version. Therefore, it is completely normal that the trigger names can change from run to run.
Prescales
The need for prescales (and its meaning) is evident if one thinks of different physics processes having different cross sections. Roughly speaking, we are a lot more likely to record one minimum bias event, than an event where a Z boson is produced. Even less likely is to record an event with a Higgs boson. We could have triggers named, say, HLT_ZBosonRecorder for the one in charge of filtering Z-carrying events, or HLT_HiggsBosonRecorder for the one accepting Higgses (the actual names are more sophisticated and complex than that, of course.) The prescales are designed to keep these inputs under control by, for instance, recording just 1 out of 100 collisions that produce a likely Z boson, or 1 out of 1 collisions that produce a potential Higgs boson. In the former case, the prescale would be 100, while for the latter it would be 1; if a trigger has a prescale of 1, i.e., records every single event it identifies, we call it unprescaled.
Maybe not so evident is the need for trigger prescale changes for keeping up with luminosity changes. As the luminosity drops, prescales can be relaxed, and therefore can change from to run in the same fill.
A trigger can be prescaled at L1 as well as the HLT levels. L1 triggers have their own nomenclature and can be used as HLT trigger seeds.
Triggers, streams and datasets
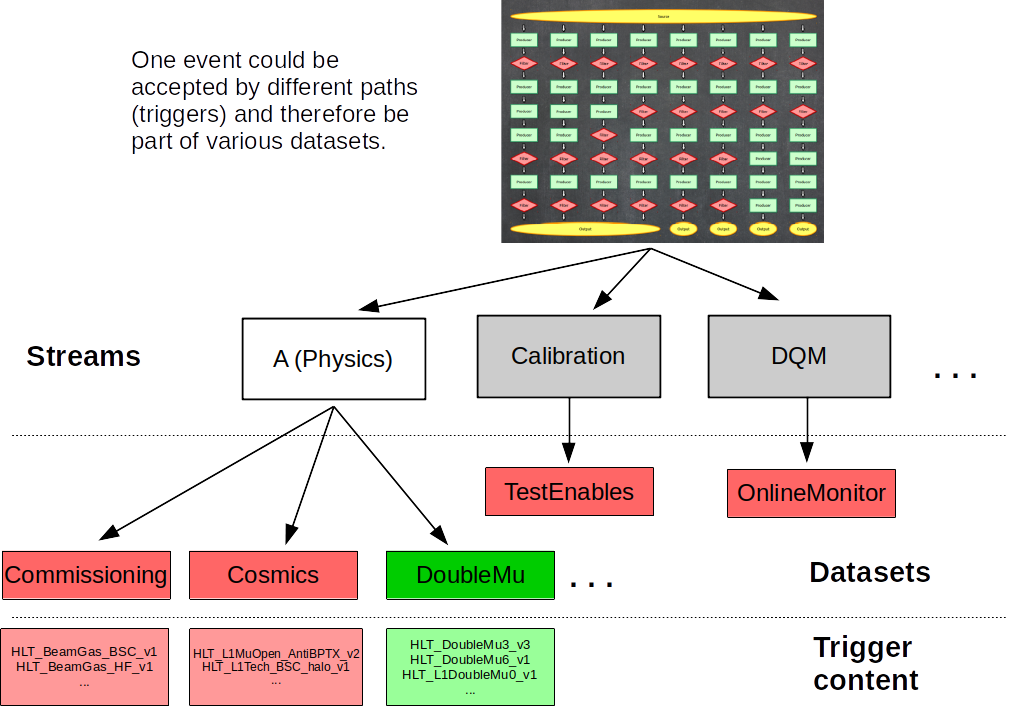
After events are accepted by possibly more than one type of trigger, they are streamed in different categories, called streams and then classified and arranged in primary datasets. Most, but not all, of the datasets belonging to the stream A, the physics stream, are or will become available as CMS Open Data. There are many more datasets and streams than depicted in the figure below. Datasets in read are examples of those we do not plan to release as open data, while the one in green is an example of those that we do.
Finally, it is worth mentioning that:
- an event can be triggered by many trigger paths
- trigger paths are unique to each dataset
- the same event can arrive in two different datasets (this is speciall important if working with many datasets as event duplication can happen)
Key Points
The CMS trigger system filters uninteresting events, keeping the budget high for the flow of interesting data.
Computationally, a trigger is a CMSSW path, which is composed of several software modules.
Trigger prescales allow the data acquisition to adjust to changes in instantaneous luminosity while keeping the rate of incomming data under control
The trigger systems allows for the classification and organization of datasets by physics objects of interest
Choosing a trigger
Overview
Teaching: 0 min
Exercises: 35 minQuestions
How do I select triggers for my analysis?
Where can I find more information about my triggers so I can understand them?
Objectives
Learn how to inspect what triggers are available in a given dataset
Learn how to explore a trigger menu configuration in order to understand a specific trigger
Choosing the dataset
During the workshop you will learn more about datasets. For this exercise, however, imagine that we are interested in searching for Higgs to taus. Since we will have these heavy charged leptons in the final step, we will choose the 2012 TauPlusX datasets. An example of this simplified analysis is already available at the CERN Open Portal.
Exploring the triggers in your dataset
After choosing the appropriate dataset for you analysis, the first thing you need to decide is which trigger to use.
If you click on the 2012 TauPlusX dataset record, you will find a list triggers that were streamed to that dataset. Now, the question is, which one would you use for this analysis? Here’s where the physics starts playing a role. Let’s imagine we concentrate only on tau lepton pairs of which one tau lepton decays into a muon and two neutrinos and the other tau lepton hadronically, then we shall pick our trigger(s) accordingly. Note that the published CMS analysis considers additional decay channels.
Let’s try to click on one of those triggers, for instance HLT_IsoMu8_eta2p1_LooseIsoPFTau20; there, you can find additional information about this trigger. One thing to notice, if you check the 2012 run range, is that this trigger was only available towards the end of the data taking period. As a matter of fact, since we have only released half of the 2012 data, you will not find that trigger yet in the current releases.
So we have learned that triggers could be not persistent and be only available for certain runs. Besides, as it was mentioned, the trigger code evolves. There may be different versions of this trigger, for instance, HLT_IsoMu8_eta2p1_LooseIsoPFTau20_v1, or v2, v3, etc.
In order to check the trigger information we need to use the trigger tools provided in CMSSW. This record points you to some examples of the usage of such code. Let’s use, for instance, some of the snippets presented in the source file of the GeneralInfoAnalyzer package to dump all the triggers in our dataset.
First, make sure you go to your CMSSW_5_3_32/src area and issue a cmsenv command, as you will always do.
To simplify the exercise, we will use the same source file we used for validation, the Demo/DemoAnalyzer/src/DemoAnalyzer.cc. Let’s modify it so we can use it to dump all the triggers in our dataset. In the process, let’s comment out some of what we did for extracting the muon energy so it does not clutter our output.
Insert the header for the HLTConfigProvider class:
//classes to extract Muon information
#include "DataFormats/MuonReco/interface/Muon.h"
#include "DataFormats/MuonReco/interface/MuonFwd.h"

//for trigger configuration
#include "HLTrigger/HLTcore/interface/HLTConfigProvider.h"

//the standard c++ vector class
#include<vector>
Next, insert the declaration of the variables we will need in our configuration file (process name, dataset name) and an object of class HLTConfigProvider, which we can use to extract the information about what the trigger configuration was for some run:
  virtual void beginLuminosityBlock(edm::LuminosityBlock const&, edm::EventSetup const&);
  virtual void endLuminosityBlock(edm::LuminosityBlock const&, edm::EventSetup const&);

  //declare the input tag for MuonCollection
  //edm::InputTag muonInput;

  // ----------member data ---------------------------
  //std::vector<float> muon_e;

  //for trigger config
  std::string   processName_;
  std::string   datasetName_;
  //HLT config provider object
  HLTConfigProvider hltConfig_;
Add the lines to read the configuration in the constructor and print it out (note the way it is done differs a bit from what we did earlier for the muons. They are, of course, equivalent):
// constructors and destructor
//
DemoAnalyzer::DemoAnalyzer(const edm::ParameterSet& iConfig):
processName_(iConfig.getParameter<std::string>("processName")),
datasetName_(iConfig.getParameter<std::string>("datasetName"))
{
   //now do what ever initialization is needed
   //muonInput = iConfig.getParameter<edm::InputTag>("InputCollection")
  using namespace std;
  using namespace edm;

  //Print the configuration just to check
  cout << "Here is the information passed to the constructor:" <<endl;
  cout << "Configuration: " << endl
       << "   ProcessName = " << processName_ << endl
       << "   DataSetName = " << datasetName_ << endl;


}
Don’t forget to comment out all the muon stuff in the analyze method so it does not bother us:
void
DemoAnalyzer::analyze(const edm::Event& iEvent, const edm::EventSetup& iSetup)
{
 using namespace edm;
 //clean the container
 //muon_e.clear();

 //define the handler and get by label
 //Handle<reco::MuonCollection> mymuons;
 //iEvent.getByLabel(muonInput, mymuons);

 //if collection is valid, loop over muons in event
 //if(mymuons.isValid()){
//    for (reco::MuonCollection::const_iterator itmuon=mymuons->begin(); itmuon!=mymuons->end(); ++itmuon){
//        muon_e.push_back(itmuon->energy());
//    }
 //}

 //print the vector
//  for(unsigned int i=0; i < muon_e.size(); i++){
//    std::cout <<"Muon # "<<i<<" with E = "<<muon_e.at(i)<<" GeV."<<std::endl;
 //}


#ifdef THIS_IS_AN_EVENT_EXAMPLE
   Handle<ExampleData> pIn;
   iEvent.getByLabel("example",pIn);
#endif

#ifdef THIS_IS_AN_EVENTSETUP_EXAMPLE
   ESHandle<SetupData> pSetup;
   iSetup.get<SetupRecord>().get(pSetup);
#endif
}
And, finally, modify the beginRun fuction giving a name to iRun and iSetup arguments and adding the trigger dump. Remember we have to check the triggers available at each change in runs:
// ------------ method called when starting to processes a run  ------------
void
DemoAnalyzer::beginRun(edm::Run const& iRun, edm::EventSetup const& iSetup)
{

  using namespace std;
  using namespace edm;

  //If the hltConfig can be initialized, then the below is an example of
  //how to extract the config information for the trigger from the
  //so-called provenance.

  // The trigger configuration can change from
  // run to run (during the run is the same),
  // so it needs to be called here.

  ///   "init" return value indicates whether intitialisation has succeeded
  ///   "changed" parameter indicates whether the config has actually changed

  bool changed(true);
  if (hltConfig_.init(iRun,iSetup,processName_,changed)) {
      if (changed) {
        const vector<string> triggerNamesInDS = hltConfig_.datasetContent(datasetName_);
         for (unsigned i = 0; i < triggerNamesInDS.size(); i++) {
            cout<<triggerNamesInDS[i]<<endl;
          }
	    }
  }

}
Before compiling, change your Demo/DemoAnalyzer/BuildFile.xml to include the HLTrigger/HLTcore package, where the HLTConfigProvider resides:
<use name="FWCore/Framework"/>
<use name="FWCore/PluginManager"/>
<use name="DataFormats/MuonReco"/>
<use name="FWCore/ParameterSet"/>
<use name="HLTrigger/HLTcore"/>
<flags EDM_PLUGIN="1"/>
<export>
   <lib name="1"/>
</export>
Compile the code the usual way:
scram b
Now, let’s modify the configuration file Demo/DemoAnalyzer/demoanalyzer_cfg.py to adapt it to our exercise. First, let’s go back to logging for each event (and not for every 5) and change the number of events to -1, so we can run over all of them. Also, change the PoolSource file; replace it with a couple of files from our dataset selection. In addition, comment out what we had done for extracting the muon information and adding the HLTHighLevel filter, and replace it with parameters we need at configuration. Do not forget to notice that we are naming our process mytrigger now, and not demo.
Also, make absolutely sure you have access to the conditions database information needed for 2012, which is different than that for 2011. Here is where there is a key difference between using the Virtual Machine or the Docker container. When using the Virtual Machine, you have to replace the three lines that have GlobalTag in them with:
#needed to access the conditions data from the Virtual Machine
process.load('Configuration.StandardSequences.FrontierConditions_GlobalTag_cff')
process.GlobalTag.connect = cms.string('sqlite_file:/cvmfs/cms-opendata-conddb.cern.ch/FT53_V21A_AN6_FULL.db')
process.GlobalTag.globaltag = 'FT53_V21A_AN6::All'
On the other hand, if you are using the Docker container add these lines:
#needed to access the conditions data from the Docker container
process.load('Configuration.StandardSequences.FrontierConditions_GlobalTag_cff')
process.GlobalTag.connect = cms.string('sqlite_file:/opt/cms-opendata-conddb/FT53_V21A_AN6_FULL_data_stripped.db')
process.GlobalTag.globaltag = 'FT53_V21A_AN6_FULL::All'
These lines, with the GlobaTag string in them, have to do with being able to read CMS database information. We call this the conditions data as we may find values for calibration, alignment, trigger prescales, etc., in there . One can think of the GlobalTag as a label that contains a set of database snapshots that need to be adequate for a point in time in the history of the CMS detector. For the 2012 open data release, the global tag is FT53_V21A_AN6 or FT53_V21A_AN6_FULL (the ::All string is a flag that tells the frameworks to read All the information associated with the tag). You can find more information in this CODP guide.
The connect variable in one of those lines just modifies they way in which the framework is going to access these snapshots. For the VM we access them through the shared files system area at CERN (cvmfs). Read in this way, the conditions will be cached locally in your virtual machine the first time you run and so the CMSSW job will be slow. Fortunately, we already did this while setting up our VM, so our jobs will run much faster. In addition, those soft links he had to make are simply pointers to these areas.
On the other hand, in the Docker container, these database snapshots live locally in your /opt/cms-opendata-conddb directory. Running over them is much quicker.
Feel free to just replace the whole config file with the final version below (if using the VM, uncomment and comment out the section in question appropriately).
The final config file should look something like:
import FWCore.ParameterSet.Config as cms

process = cms.Process("Demo")

process.load("FWCore.MessageService.MessageLogger_cfi")
process.MessageLogger.cerr.FwkReport.reportEvery = 1

process.maxEvents = cms.untracked.PSet( input = cms.untracked.int32(-1) )

process.source = cms.Source("PoolSource",
    # replace 'myfile.root' with the source file you want to use
    fileNames = cms.untracked.vstring(
    #    'file:myfile.root'
	  #'root://eospublic.cern.ch//eos/opendata/cms/Run2012B/DoubleMuParked/AOD/22Jan2013-v1/10000/1EC938EF-ABEC-E211-94E0-90E6BA442F24.root'
    'root://eospublic.cern.ch//eos/opendata/cms/Run2012B/TauPlusX/AOD/22Jan2013-v1/20000/0040CF04-8E74-E211-AD0C-00266CFFA344.root',
    'root://eospublic.cern.ch//eos/opendata/cms/Run2012C/TauPlusX/AOD/22Jan2013-v1/310001/0EF85C5C-A787-E211-AFC9-003048C6942A.root'
    )
)

#uncomment to access the conditions data from the Virtual Machine (and comment out the Docker container set below)
#process.load('Configuration.StandardSequences.FrontierConditions_GlobalTag_cff')
#process.GlobalTag.connect = cms.string('sqlite_file:/cvmfs/cms-opendata-conddb.cern.ch/FT53_V21A_AN6_FULL.db')
#process.GlobalTag.globaltag = 'FT53_V21A_AN6::All'

#needed to access the conditions data from the Docker container
process.load('Configuration.StandardSequences.FrontierConditions_GlobalTag_cff')
process.GlobalTag.connect = cms.string('sqlite_file:/opt/cms-opendata-conddb/FT53_V21A_AN6_FULL_data_stripped.db')
process.GlobalTag.globaltag = 'FT53_V21A_AN6_FULL::All'

process.mytrigger = cms.EDAnalyzer('DemoAnalyzer',
	#InputCollection = cms.InputTag("muons")
    processName = cms.string("HLT"),
    datasetName = cms.string("TauPlusX"), #specific dataset example (for dumping info)
)

#process.load("HLTrigger.HLTfilters.hltHighLevel_cfi")
#process.hltHighLevel.HLTPaths = cms.vstring('HLT_Mu15*')


#process.p = cms.Path(process.hltHighLevel+process.demo)
process.p = cms.Path(process.mytrigger)
Note that the process name is always HLT for data that was processed with the online system.
Let’s run:
cmsRun Demo/DemoAnalyzer/demoanalyzer_cfg.py > full_triggerdump.log 2>&1 &
Now check the output. Do you notice anything?
What kind of output did you get?
With the selected dataset files we get:
28-Sep-2020 20:36:02 CEST  Successfully opened file root://eospublic.cern.ch//eos/opendata/cms/Run2012B/TauPlusX/AOD/22Jan2013-v1/20000/0040CF04-8E74-E211-AD0C-00266CFFA344.root
Here is the information passed to the constructor:
Configuration:
   ProcessName = HLT
   DataSetName = TauPlusX
HLT_Ele22_eta2p1_WP90NoIso_LooseIsoPFTau20_v2
HLT_Ele22_eta2p1_WP90Rho_LooseIsoPFTau20_v2
HLT_IsoMu15_eta2p1_L1ETM20_v5
HLT_IsoMu15_eta2p1_LooseIsoPFTau35_Trk20_Prong1_L1ETM20_v6
HLT_IsoMu17_eta2p1_LooseIsoPFTau20_v2
HLT_IsoMu18_eta2p1_MediumIsoPFTau25_Trk5_eta2p1_v7
HLT_Mu15_eta2p1_L1ETM20_v3
HLT_Mu17_eta2p1_LooseIsoPFTau20_v2
Begin processing the 1st record. Run 194075, Event 14880766, LumiSection 48 at 28-Sep-2020 20:36:11.193 CEST

....

28-Sep-2020 20:36:21 CEST  Successfully opened file root://eospublic.cern.ch//eos/opendata/cms/Run2012C/TauPlusX/AOD/22Jan2013-v1/310001/0EF85C5C-A787-E211-AFC9-003048C6942A.root
HLT_Ele22_eta2p1_WP90NoIso_LooseIsoPFTau20_v6
HLT_Ele22_eta2p1_WP90Rho_LooseIsoPFTau20_v6
HLT_IsoMu15_eta2p1_L1ETM20_v7
HLT_IsoMu15_eta2p1_LooseIsoPFTau35_Trk20_Prong1_L1ETM20_v9
HLT_IsoMu17_eta2p1_LooseIsoPFTau20_v6
HLT_IsoMu18_eta2p1_MediumIsoPFTau25_Trk1_eta2p1_v3
HLT_Mu15_eta2p1_L1ETM20_v5
HLT_Mu17_eta2p1_LooseIsoPFTau20_v6
Begin processing the 16127th record. Run 200041, Event 386077374, LumiSection 310 at 28-Sep-2020 20:36:27.618 CEST
In our example, we immediately notice that the configuration changes for different epochs in the 2012 data taking period: the trigger versions are different. This could mean a modification of some parameter in the trigger, which does not affect the main characteristics, but maybe make it more efficient. In the next section we will explore one of these triggers to get acquainted with the way we can find more information.
The bottom line is that one would need to inspect the triggers in this way in order to find a trigger or a set of triggers that are available during the whole run range of interest and make sure that they are available when we try to call them.
Understanding the triggers using a trigger menu config file
There is some information that we could extract from the names of the triggers in that list. For instance, the IsoMu or Mu in the names might indicate the presence of a muon, and the LoosePFTau string could indicate the requirement of a tau particle. If that is the case, then we could select, for instance the HLT_IsoMu17_eta2p1_LooseIsoPFTau20_v? incarnations of this trigger for our analysis (the ? wildcard takes the place of any digit). The numbers generally mean a minimum requirement in transverse momentum, pT. But how to be sure?
We can inspect further. If you go to the portal page of that trigger, you will see the different versions and corresponding run ranges. Towards the bottom of that page you will find a link to the Trigger information for 2012 CMS open data, which will open a table like the one below:
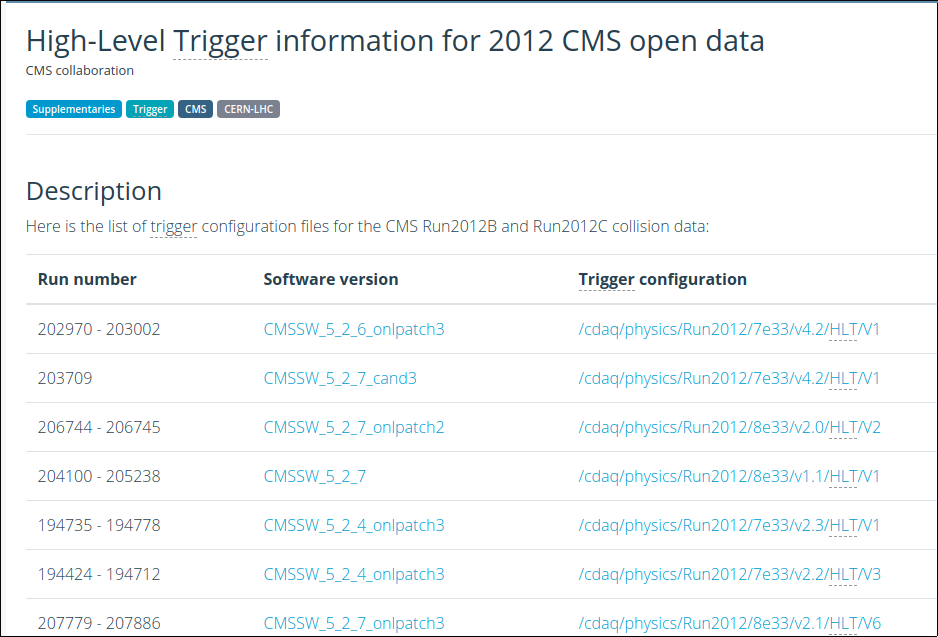
The page presents the HLT CMSSW configuration files (aka trigger menus) that were used for different run ranges. Although very, very long, those configuration files have the same structure as any CMSSW config file. I.e., we can see how the trigger was configured and check all the parameters that were used in defining its working software.
Let’s pretend we are interested in studying the v3of this trigger. That would correspond to the run range 198249 - 199021 in the page with the trigger menus. If we click on the config file, we will be taken to this page from where we can download the config file.
Now, open the config file and search for HLT_IsoMu17_eta2p1_LooseIsoPFTau20_v3. You will immediately see that, indeed, this incarnation of the trigger exists in this config file.
Then, you can search for HLT_IsoMu17_eta2p1_LooseIsoPFTau20_v3 =. This will prompt you to see the line where the trigger path (in the CMSSW sense) is defined:
process.HLT_IsoMu17_eta2p1_LooseIsoPFTau20_v3 = cms.Path( process.HLTBeginSequence + process.hltL1sMu14erORMu16er + process.hltPreIsoMu17eta2p1LooseIsoPFTau20 + process.hltL1fL1sMu14erORMu16erL1Filtered0 + process.HLTL2muonrecoSequence + process.hltL2fL1sMu14erORMu16erL1f0L2Filtered14Q + process.HLTL3muonrecoSequence + process.hltL3fL1sMu14erORMu16erL1f0L2f14QL3Filtered17Q + process.HLTL3muoncaloisorecoSequenceNoBools + process.HLTL3muonisorecoSequence + process.hltL3crIsoL1sMu14erORMu16erL1f0L2f14QL3f17QL3crIsoRhoFiltered0p15 + process.HLTRecoJetSequencePrePF + process.hltTauJet5 + process.HLTPFJetTriggerSequenceMuTau + process.hltPFJet20 + process.HLTIsoMuLooseIsoPFTauSequence + process.HLTEndSequence )
It has several modules and sequences that make up its entire implementation. All those modules and sequences exist in the same config file, so you can search for them to find out more about the trigger. Right away, however, you can see that at least one of the taus is being consider as a jet, just like a hadronic decay would indicate. If you want to explore some module, for example hltPFJet20, you can search for it and find:
process.hltPFJet20 = cms.EDFilter( "HLT1PFJet",
  saveTags = cms.bool( False ),
  MinPt = cms.double( 20.0 ),
  MinN = cms.int32( 1 ),
  MaxEta = cms.double( 2.5 ),
  MinMass = cms.double( -1.0 ),
  inputTag = cms.InputTag( "hltAntiKT5PFJets" ),
  MinE = cms.double( -1.0 ),
  triggerType = cms.int32( 84 )
)
This module is an incarnation of a filter named HLT1PFJet, which, if you are getting certain intuition about CMSSW, will find out is a filter recast of the PFJet Producer.
Challenge!
By searching for and exploring the second to last Sequence, i.e.,
HLTIsoMuLooseIsoPFTauSequence, can you name the module which is ultimately responsible for setting the17 GeVpT cut on the muon leg of these events?solution
After some searching within the config file, and connecting the dots, you will find that the name of that module is
hltL3fL1sMu14erORMu16erL1f0L2f14QL3Filtered17Q, which is an incarnation of theHLTMuonL3PreFilter.
Were you able to spot it?
Key Points
The most reliable way of inspecting the trigger information is through the CMSSW HLT trigger tools.
The details for a given trigger can be explored through the CMSSW configuration and/or C++ implementation.
Getting trigger prescales
Overview
Teaching: 0 min
Exercises: 25 minQuestions
How do I get the prescales for my triggers?
Objectives
Learn how to extract the prescales for you triggers
The TriggerInfoTool
The CERN Open Data portal maintains some records that explain how to use certain tools for analysis. One of those is the record about the TriggerInfoTool. It eventually points to the TriggerInfoTool repository on Github. This is a place where you can find a few examples and explore the way the code is used for extracting trigger information.
Getting the Prescales and the acceptance bit
Let’s work on one of the examples stored in the repository above. In particular, we are going to look at the TriggerSimplePrescalesAnalyzer example (package). The following directions can also be found in that repository.
First make sure you are at the top of your CMSSW_5_3_32/src area and that you have issued the cmsenv command.
Now let’s clone the 2011 branch of this repository, which will be good for the 2012 data we are working with (except for a couple of changes):
git clone -b 2011 git://github.com/cms-opendata-analyses/TriggerInfoTool.git
Compile:
scram b
Edit the config file to choose the triggers we are interested in (you can use nano or other editor). Remember, we will exercise the TriggerSimplePrescalesAnalyzer example:
nano TriggerInfoTool/TriggerSimplePrescalesAnalyzer/python/simpleprescalesinfoanalyzer_cfg.py
Replace the PoolSource files with the ones we used in our last episode, replace the triggerPatterns parameter with a simpler trigger, like "HLT_Mu12_v??" (note the wildcard at the end ??, so we can get the prescales for all versions of this trigger).
The wildcards follow traditional convention: “?” will match any single character, while “*” will match any string after.
As in the last section, make absolutely sure you have access to the conditions database information needed for 2012, which is different than that for 2011. Here is where there is a key difference between using the Virtual Machine or the Docker container. When using the Virtual Machine, you have to replace the three lines that have GlobalTag in them with:
#needed to access the conditions data from the Virtual Machine
process.load('Configuration.StandardSequences.FrontierConditions_GlobalTag_cff')
process.GlobalTag.connect = cms.string('sqlite_file:/cvmfs/cms-opendata-conddb.cern.ch/FT53_V21A_AN6_FULL.db')
process.GlobalTag.globaltag = 'FT53_V21A_AN6::All'
On the other hand, if you are using the Docker container replace them with:
#needed to access the conditions data from the Docker container
process.load('Configuration.StandardSequences.FrontierConditions_GlobalTag_cff')
process.GlobalTag.connect = cms.string('sqlite_file:/opt/cms-opendata-conddb/FT53_V21A_AN6_FULL_data_stripped.db')
process.GlobalTag.globaltag = 'FT53_V21A_AN6_FULL::All'
Remember: These lines, with the
GlobaTagstring in them, have to do with being able to read CMS database information. We call this the conditions data as we may find values for calibration, alignment, trigger prescales, etc., in there . One can think of theGlobalTagas a label that contains a set of database snapshots that need to be adequate for a point in time in the history of the CMS detector. For the 2012 open data release, the global tag isFT53_V21A_AN6orFT53_V21A_AN6_FULL(the::Allstring is a flag that tells the frameworks to read All the information associated with the tag). You can find more information in this CODP guide. Theconnectvariable in one of those lines just modifies they way in which the framework is going to access these snapshots. For the VM we access them through the shared files system area at CERN (cvmfs). Read in this way, the conditions will be cached locally in your virtual machine the first time you run and so the CMSSW job will be slow. Fortunately, we already did this while setting up our VM, so our jobs will run much faster. In addition, those soft links he had to make are simply pointers to these areas. On the other hand, in the Docker container, these database snapshots live locally in your/opt/cms-opendata-conddbdirectory. Running over them is much quicker. Feel free to just replace the whole config file with the final version below (if using the VM, uncomment and comment out the section in question appropriately).
Take a look at the full config file
The config file should look like:
import FWCore.ParameterSet.Config as cms

process = cms.Process("TriggerInfo")

process.load("FWCore.MessageService.MessageLogger_cfi")
#if more events are activated, choose to print every 1000:
#process.MessageLogger.cerr.FwkReport.reportEvery = 1000

process.maxEvents = cms.untracked.PSet( input = cms.untracked.int32(100) )

process.source = cms.Source("PoolSource",
    fileNames = cms.untracked.vstring(
        'root://eospublic.cern.ch//eos/opendata/cms/Run2012B/TauPlusX/AOD/22Jan2013-v1/20000/0040CF04-8E74-E211-AD0C-00266CFFA344.root',
        'root://eospublic.cern.ch//eos/opendata/cms/Run2012C/TauPlusX/AOD/22Jan2013-v1/310001/0EF85C5C-A787-E211-AFC9-003048C6942A.root'
    )
)

#uncomment to access the conditions data from the Virtual Machine (and comment out the Docker container set below)
#process.load('Configuration.StandardSequences.FrontierConditions_GlobalTag_cff')
#process.GlobalTag.connect = cms.string('sqlite_file:/cvmfs/cms-opendata-conddb.cern.ch/FT53_V21A_AN6_FULL.db')
#process.GlobalTag.globaltag = 'FT53_V21A_AN6::All'

#needed to access the conditions data from the Docker container
process.load('Configuration.StandardSequences.FrontierConditions_GlobalTag_cff')
process.GlobalTag.connect = cms.string('sqlite_file:/opt/cms-opendata-conddb/FT53_V21A_AN6_FULL_data_stripped.db')
process.GlobalTag.globaltag = 'FT53_V21A_AN6_FULL::All'


#configure the analyzer
#inspired by https://github.com/cms-sw/cmssw/blob/CMSSW_5_3_X/HLTrigger/HLTfilters/interface/HLTHighLevel.h
process.gettriggerinfo = cms.EDAnalyzer('TriggerSimplePrescalesAnalyzer',
                              processName = cms.string("HLT"),
                             triggerPatterns = cms.vstring("HLT_Mu12_v??"), #if left empty, all triggers will run
                              triggerResults = cms.InputTag("TriggerResults","","HLT"),
                              triggerEvent   = cms.InputTag("hltTriggerSummaryAOD","","HLT")
                              )


process.triggerinfo = cms.Path(process.gettriggerinfo)
process.schedule = cms.Schedule(process.triggerinfo)
Let’s run:
cmsRun TriggerInfoTool/TriggerSimplePrescalesAnalyzer/python/simpleprescalesinfoanalyzer_cfg.py > full_prescales.log 2>&1 &
Let’s check the output
HLTConfig has changed . . .
Begin processing the 1st record. Run 194075, Event 14880766, LumiSection 48 at 07-Jul-2021 01:36:43.256 CEST
Currently analyzing trigger HLT_Mu12_v16
analyzeSimplePrescales: path HLT_Mu12_v16 [121] prescales L1T,HLT: 400,30
 Trigger path status: WasRun=1 Accept=0 Error =0
Begin processing the 2nd record. Run 194075, Event 14844046, LumiSection 48 at 07-Jul-2021 01:36:43.269 CEST
Currently analyzing trigger HLT_Mu12_v16
analyzeSimplePrescales: path HLT_Mu12_v16 [121] prescales L1T,HLT: 400,30
 Trigger path status: WasRun=1 Accept=0 Error =0
...
Note that the L1 prescale was 400 for that particular run, whereas the HLT prescale was 30. We would have to run on many more events to see an
Accept=1, which would mean the event was accepted by this trigger.
Challenge!
How about now you run with the triggers we were interested in, i.e., the
HLT_IsoMu17_eta2p1_LooseIsoPFTau20_v?ones. What do you get?Solution and work assignment
Life is not so easy sometimes. While there was no problem getting the HLT prescale (it seems to be 1), i.e., the trigger is unprescaled at the HLT, we can’t say anything about the L1 because there is a limitation in our software. You will get an error message. Please copy this error message and paste it into the corresponding section in our assignment form; remember you must sign in and click on the submit button in order to save your work. You can go back to edit the form at any time.
Fortunately, there is a backup solution for us to check on the prescales. Details will not be covered here, but you can find more information in this guide of the CODP.
Explore the TriggerSimplePrescalesAnalyzer!
On overtime, you could explore the implementation of the code we just used. Play around with it, what else can you learn?
Key Points
Prescales can be extracted using the trigger tools in CMSSW and/or from the brilcalc tool (not covered here).