Test and validate
Overview
Teaching: 10 min
Exercises: 30 minQuestions
What is in the CMS VM?
How do I test and validate my virtual machine?
Objectives
Learn about the details of the CMS virtual machine
Test and validate the CMS VM by running a CMSSW job.
Helpline
Remember that we are always available to help. Our Mattermost channel is open.
Know your VM
The virtual machine we just installed provides CMS computing environment to be used with the 2011 and 2012 CMS open data. The virtual machine is based on the CernVM and uses Scientific Linux CERN. As it was mentioned before, it comes equipped with the ROOT framework and CMSSW.
An important feature of the VM is the availability of the CernVM File System. Thanks to the cvmfs client installed, the VM gets the CMS software (CMSSW) from the shared /cvmfs/cms.cern.ch area (physically at CERN but mounted locally) and the jobs, running on the CMS open data VM, read the conditions data from /cvmfs/cms-opendata-conddb.cern.ch. Access to the data is through XRootD.
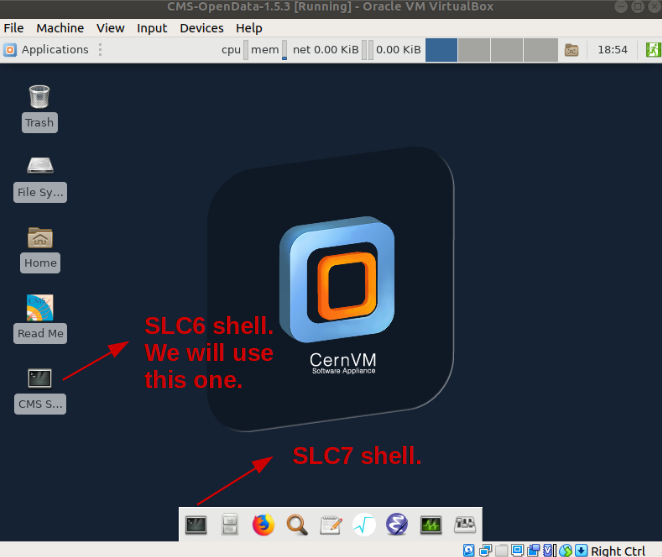
The VM has a 40G virtual hard disk and a 20G cvmfs cache, which is large enough for condition data for full event range for 2012 data (see the CMS guide to the condition database for further details). It has an embedded Scientific Linux CERN 6 (slc6) shell, where all CMS software specific commands should be executed. Additionally, it has a CERN Scientific Linux CERN 7 (slc7) shell, which can be used in the same session.
Run a simple demo for testing and validating
The validation procedure tests that the CMS environment is installed and operational on your virtual machine, and that you have access to the CMS Open Data files. It also access the conditions data from the shared cvmfs area and caches them. This last action will save us time during the workshop. These steps also give you a quick introduction to the CMS environment.
In the VM, open a terminal from the CMS Shell icon from the desktop (note that the X terminal emulator from an icon bottom-left of the VM screen opens a shell with an operating system incompatible with the CMS software release to be used).
Execute the following command; this command builds the local release area (the directory structure) for CMSSW, and only needs to be run once (note that it may take a while):
cmsrel CMSSW_5_3_32
Note that if you get a warning message about the current OS being SLC7, you are using a wrong terminal. Open a “CMS Shell” terminal as explained above and execute the cmsrel command there.
Change to the CMSSW_5_3_32/src/ directory:
cd CMSSW_5_3_32/src/
Then, run the following command to create the CMS runtime variables:
cmsenv
Create a working directory for the demo analyzer, change to that directory and create a skeleton for the analyzer:
mkdir Demo
cd Demo
mkedanlzr DemoAnalyzer
Come back to the main src area:
cd ../
Compile the code:
scram b
You can safely ignore the warning.
IMPORTANT NOTE: Depending on your system, there could be some issues with the shared clipboard between the host machine and the virtual machine. This means that it is possible that you cannot copy the instructions in this episode directly into your VM session. The quickest workaround is to use the text dump file of the lesson. You can download this file directly in your VM, e.g., the
wgetcommand, and follow along to copy the necessary commands directly from the text file.
Alternative solution to the clipboard problem
Another possibility is to use the
sshand/orscpcommands to copy the required files to some other machine that you have access to, from the VM as well as from the host machine. For instance, if you had access to anlxpluscomputer at cern, you could copy a certain file from the VM to the lxplus computer. On the VM you could do:scp myfile.txt myusername@lxplus.cern.ch:.to copy a hypothetical file
myfile.txtto lxplus, and then on the hostscp myusername@lxplus.cern.ch:myfile.txt .to copy the same file back to your host machine. Then you can edit the file locally and reverse the process to get it back to your VM.
It could also be possible to have direct access from the host to the VM. This youtube tutorial might be of help for that option.
Before launching the job, let’s modify the configuration file (do not worry, you will learn about all this stuff in a different lesson) so it is able access a CMS open data file and cache the conditions data. As it was mentioned, this will save us time later.
Open the demoanalyzer_cfg.py file using the vi editor (here you can find a good cheatsheet for that editor). Note that other editors like emacs or nano are also avilable in the VM.
vi Demo/DemoAnalyzer/demoanalyzer_cfg.py
Replace file:myfile.root with root://eospublic.cern.ch//eos/opendata/cms/Run2011A/ElectronHad/AOD/12Oct2013-v1/20001/001F9231-F141-E311-8F76-003048F00942.root to point to an example file.
Chage also the maximum number of events to 10. I.e., change -1to 10 in process.maxEvents = cms.untracked.PSet( input = cms.untracked.int32(-1)).
In addition, insert, below the PoolSource module, the following lines:
#needed to cache the conditions data
process.load('Configuration.StandardSequences.FrontierConditions_GlobalTag_cff')
process.GlobalTag.connect = cms.string('sqlite_file:/cvmfs/cms-opendata-conddb.cern.ch/FT_53_LV5_AN1_RUNA.db')
process.GlobalTag.globaltag = 'FT_53_LV5_AN1::All'
The lines above are intended to access to the condition data, such as the jet-energy corrections, trigger information, etc. You will learn about them in a later lesson. Right now it is sufficient to mention that it is a good idea to cache these data already so later in the workshop we can speed up the processing.
Take a look at the final validation config file
At the end, the config file should look like
import FWCore.ParameterSet.Config as cms
process = cms.Process("Demo")
process.load("FWCore.MessageService.MessageLogger_cfi")
process.maxEvents = cms.untracked.PSet( input = cms.untracked.int32(10) )
process.source = cms.Source("PoolSource",
# replace 'myfile.root' with the source file you want to use
   fileNames = cms.untracked.vstring(
       'root://eospublic.cern.ch//eos/opendata/cms/Run2011A/ElectronHad/AOD/12Oct2013-v1/20001/001F9231-F141-E311-8F76-003048F00942.root'
   )
)
#needed to cache the conditions data
process.load('Configuration.StandardSequences.FrontierConditions_GlobalTag_cff')
process.GlobalTag.connect = cms.string('sqlite_file:/cvmfs/cms-opendata-conddb.cern.ch/FT_53_LV5_AN1_RUNA.db')
process.GlobalTag.globaltag = 'FT_53_LV5_AN1::All'

process.demo = cms.EDAnalyzer('DemoAnalyzer'
)

process.p = cms.Path(process.demo)
Make symbolic links to the conditions database files from cvmfs:
ln -sf /cvmfs/cms-opendata-conddb.cern.ch/FT_53_LV5_AN1_RUNA FT_53_LV5_AN1
ln -sf /cvmfs/cms-opendata-conddb.cern.ch/FT_53_LV5_AN1_RUNA.db FT_53_LV5_AN1_RUNA.db
and make sure the cms-opendata-conddb.cern.ch directory has actually expanded in your VM. One way of doing this is executing:
ls -l /cvmfs/
total 18
drwxr-xr-x  8 root root 4096 Jan 13  2014 cernvm-prod.cern.ch
drwxr-xr-x 69  989  984 4096 Aug 29  2014 cms.cern.ch
drwxr-xr-x 14  989  984 4096 Dec 16  2015 cms-opendata-conddb.cern.ch
drwxr-xr-x  4  989  984 4096 May 28  2014 cvmfs-config.cern.ch
Finally, run the cms executable with our configuration (it may really take a while, but the next time you want to run it will be faster):
cmsRun Demo/DemoAnalyzer/demoanalyzer_cfg.py
14-Sep-2020 02:28:06 GMT  Initiating request to open file root://eospublic.cern.ch//eos/opendata/cms/Run2011A/ElectronHad/AOD/12Oct2013-v1/20001/001F9231-F141-E311-8F76-003048F00942.root
14-Sep-2020 02:28:13 GMT  Successfully opened file root://eospublic.cern.ch//eos/opendata/cms/Run2011A/ElectronHad/AOD/12Oct2013-v1/20001/001F9231-F141-E311-8F76-003048F00942.root
Begin processing the 1st record. Run 166782, Event 340184599, LumiSection 309 at 14-Sep-2020 02:28:26.283 GMT
Begin processing the 2nd record. Run 166782, Event 340185007, LumiSection 309 at 14-Sep-2020 02:28:26.284 GMT
Begin processing the 3rd record. Run 166782, Event 340187903, LumiSection 309 at 14-Sep-2020 02:28:26.285 GMT
Begin processing the 4th record. Run 166782, Event 340227487, LumiSection 309 at 14-Sep-2020 02:28:26.285 GMT
Begin processing the 5th record. Run 166782, Event 340210607, LumiSection 309 at 14-Sep-2020 02:28:26.285 GMT
Begin processing the 6th record. Run 166782, Event 340256207, LumiSection 309 at 14-Sep-2020 02:28:26.286 GMT
Begin processing the 7th record. Run 166782, Event 340165759, LumiSection 309 at 14-Sep-2020 02:28:26.286 GMT
Begin processing the 8th record. Run 166782, Event 340396487, LumiSection 309 at 14-Sep-2020 02:28:26.287 GMT
Begin processing the 9th record. Run 166782, Event 340390767, LumiSection 309 at 14-Sep-2020 02:28:26.287 GMT
Begin processing the 10th record. Run 166782, Event 340435263, LumiSection 309 at 14-Sep-2020 02:28:26.288 GMT
14-Sep-2020 02:28:26 GMT  Closed file root://eospublic.cern.ch//eos/opendata/cms/Run2011A/ElectronHad/AOD/12Oct2013-v1/20001/001F9231-F141-E311-8F76-003048F00942.root

=============================================

MessageLogger Summary

 type     category        sev    module        subroutine        count    total
 ---- -------------------- -- ---------------- ----------------  -----    -----
    1 fileAction           -s file_close                             1        1
    2 fileAction           -s file_open                              2        2

 type    category    Examples: run/evt        run/evt          run/evt
 ---- -------------------- ---------------- ---------------- ----------------
    1 fileAction           PostEndRun
    2 fileAction           pre-events       pre-events

Severity    # Occurrences   Total Occurrences
--------    -------------   -----------------
System                  3                   3
Key Points
The CMS VM contains all the required ingredients to start analyzing CMS open data.
In order to test and validate the virtual machine you can run a simple CMSSW job.